Don't forget to poke the photos to enlarge!
Showing posts with label wire wrapping. Show all posts

Tuesday, September 3, 2013

A New Secret Weapon...

I had already planned on doing the tools for the fireplace to match, but didn't mention it yesterday.

I got a comment from 1-2 Create that it would be a good idea...Yes.  I know.

Anyway, I got out the wire again this morning.  These took a bit longer than the fire dogs.  None of the pieces were the same.
 First  did the rack to hold the tools.  I am not going to go into great detail on how I did these.  It would take a small book to tell you everything that I did.  But I will give you a general idea.

I started the rack at the bottom...Knowing that these things usually have a base to protect the floor, I started with a 1/2" based coil of the #18 square wire.  That turned into the middle, twisted wire of the backbone.

Then I wrapped the base with half round to keep it from bending and coming apart.  The rest was done essentially like the fire dogs. Same design, but a little taller.

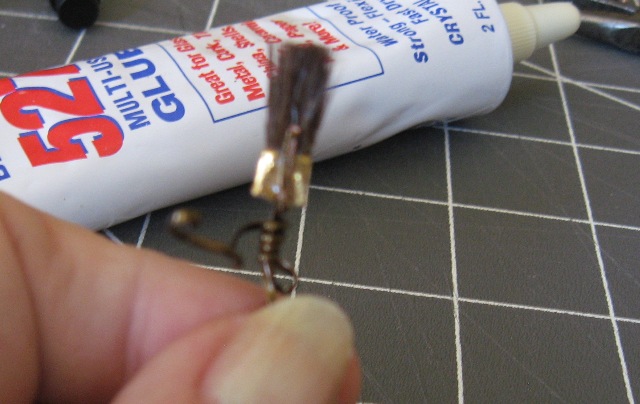
Now. About that secret weapon.  When I think about all of the old paintbrushes that I have thrown in the garbage over the years, I am very irritated that I didn't take one apart before now.

First I applied glue to one and tried to cut off and wrap the bristles all in one bunch for the little broom.  Total disaster.  I tried three times in different ways...Just didn't work.

Then I grabbed a new brush, wondering if I could saw part of the ferrule.  I always assumed that they had to be pretty tough metal to hold the bristles in the brush....Wrong, with a capital W!

I grabbed my little jewelry side cutters and took a bite out of one side.  To my surprise, it was VERY soft.


One cut on either side and I was through it with a clean cut.

I decided that it was intriguing and worth an experiment or two.  I needed something to make the little shovel with. 

I took the wire snips and chewed my way up the middle of one side.  Rough edges, but easily trimmed with a pair of old scissors.

It was getting better and better.  Nice shiny brass that could be cut with scissors and depending on the brush size, a pretty useful piece of metal for minis.


Within a matter of minutes, I had the shovel formed and all I needed was the scissors and my needle nose pliers.

Zar is very pleased with the resulting tools and Tessie is still snitting .... Is that a word?  Well, that's what she's doing.

She is quite envious of Zar's new toys.  She tells me that, "Those are much too feminine for Zar.  Way too many curlicues.  They would look much better in MY fireplace...If I had a fireplace...(Heavy sigh here) None of my places even has a fireplace...Woe is me..."

Anyway, I don't see a fireplace for her in the near future.  I have to finish Zar's  conversation pit.

See you tomorrow.


Monday, September 2, 2013

Got a Match?

I can only take paint and spackle in small doses, so I decided to wire wrap today.

Nope.  Not jewelry.

I woke up about 3:30 this morning and these popped into my head...One step at a time.  So much for sleep.

Here in the first photo, I have everything that you need to make fire dogs.  No, not the spotted fire truck passengers. The kind that hold logs in the fireplace.

The first one was a breeze.  The second one to match was not.

I took three pieces of square, 18 gage, antique bronze wire, five inches long.

This was my first try, so I had to have a bit extra to figure out what I was going to do.

On one of the pieces, I marked the center inch.  I grasped the first mark with my needle nosed pliers and the other mark with my round nosed pliers and twisted the wire.  That formed the center rope between the two wraps.

I then put a piece of painter's tape on either end to hold the square wires square, next to each other.  No slipping with this method. I pulled one end of the center wire out 1" further than the two edge wires.

Then I wrapped either end with #20 half round antique bronze, four times.  Each time I turned the wire, I squeezed it with the needle nosed pliers to tighten the wrap.

Then I pulled out the side wires in a bow.

Next I unwrapped the bottom end, the one with the longer center wire, and bent the two side wires to the side and down.  The center wire was bent at a right angle to the back. Then bent the same length as the two front wires. I put a curl in each of the three wires at the end.


For the top, I trimmed the side pieces to 3/4" and curled each side outward and down.

Then, grasping the wrapped area with my needle nosed pliers, I twisted the top center wire for about a half inch.

I trimmed that one to 1" and coiled it.  I did these wires so that the center wires were coiled towards each other on the pieces.

The hard part was getting them to match...The coils had to be fussed with a lot.  They are pretty close now.

If you are interested in trying this technique, there are a lot of instructions under Wire wrapped Jewelry on UTube.  I liked the ones from Beadaholic.  The instructors know exactly what they are doing and do it well.

Zar approves, so I can't complain.  Now all I need is logs and matches....No.  Wait.  I think that some brick or tile and a surround for the fireplace might be a good idea before we go striking matches....

See you tomorrow.

Sunday, August 4, 2013

Don't Mention Weaving!...

This morning, I refused to even think of the above as a pastime....None of that stuff today!

I got out the case that I fixed up with all of the wire weaving stuff and chaos ensued...

Have you ever tried to keep order in about a dozen different kinds of wire and lots of stones? 

It is nearly impossible.  Ask Tessie.  She helped...

Don't ask the names of the various stones that I used.  I could look them up, but I'm not really in the mood.

First I did a couple of wire wrapped rings.

I used square bronze wire on the top one and plain old copper on the one with the green glass bead.
I had some silver plated, square wire left that is banded with half round bronze, on the fossil  on the left.  The one on the right has square copper wire and a shell bead.
This is my favorite, out of all of them.  It is some kind of agate and I used bronze, square wire on it.  I think that I am going to have to find a chain of kumihimo to put that one on right away.  The photo doesn't do it justice.

I decided to do some of the old stones and fossils that I had, before getting to the new stuff that I bought a couple of weeks ago.

Right now, I am watching three squirrels chase each other around the yard...

Maybe I will be back to minis tomorrow....Maybe not.   I do know that I won't be weaving.  I stopped last night, after working on the roof of Widget's house.  I need a break to refocus my eyes...

See you tomorrow.

Sunday, July 28, 2013

And Still More Weaving...

Yesterday, I was up to the second row of charcoal gray...

This is the back of the rug. I have close to two inches now.

I am going with a rather rag rug look, since I have a lot of over dyed crewel in similar colorways.  So far, I have only used two of these.
Here's the front.  There is a disadvantage.  You can't see the first row of charcoal.

Actually, after it is finished, you won't be able to tell the front from the back.
 Last night I connected the top of the doorway and did what you see here.

HRH Widget, reluctantly posed again this morning.  Last night, he slept in it while I was weaving.

I think that I have cat approval...

I am thinking of making the roof separate and somewhat shaped kind of mushroom-ish.

I'm still thinking on that part.  If I do that, I won't have to go higher on the walls.  I can put a bit of headroom in the top part.
I think that you could count wire wrapping as a form of weaving.  The wires go over and under each other. 

These are older stones.  Not the ones that I got earlier this week. 

I figure that I will ease into the good ones and practice on the stuff that I had, just laying around.

I am going back to the rug now.  That is going to take the longest to complete.

See you tomorrow.

Thursday, December 6, 2012

Day Six, No Minis...

Real life is getting in the way today...So...No minis.

Instead, you get a view of what I did yesterday.

I am starting to do wire wrapped pendants with found materials.

These are some that I did yesterday.

The first photo is all shells...The first two are pieces of shells that I picked up on the beach in CA.  They were worn smooth and I used them as is, wrapping them in square copper wire.  The third is a piece of Mother of Pearl wrapped in square silver wire. I just did a fancy bail for that one.  Not really wrapped.

The second bunch are rocks.  The left one is some kind of quartz.  I couldn't catch the sparkle in the photo.

The center one is most interesting.  It is a rock with a hole worn through it.  It must have been in one place for centuries for dripping water to have worn that hole in it.

The third is an unidentified specimen that I just liked. They are all wrapped in square, antique bronze wire.
Photo number three is a broken turquoise cabochon wrapped with square copper wire.

The second one is an Egyptian scarab  wrapped in the antique bronze again.

I keep thinking that there should be some way to use this technique in minis....Any suggestions?
I saved the best for last.  This is a labradorite cabochon wrapped with silver.  This one, I experimented with twisting the wire.

The stone is hard to photograph.  The blue in it comes and goes with the light and is almost iridescent when it can be seen.

None of them are perfect, but not bad for beginning.

Sorry about the missing minis.  I will be back to that tomorrow. 

See you then!