Don't forget to poke the photos to enlarge!
Showing posts with label macrame. Show all posts

Tuesday, July 5, 2016

All in a Day's Work...

In the past twenty four hours, I have paved a floor.  Finished a macrame plant hanger and made a  bracelet... Oh and I potted a very strange plant.

First the floor.  I used the movie trays for the floor of the conservatory.

One part in the morning and one in the afternoon.
Four different trays.  Two different colors.

It doesn't make a difference.  The floor will be painted with a number of different colors and washes. Those will come in tomorrow's blog.
The plant hanger and the bracelets that you see are Seth and April's birthday presents.  They were born eight days apart, in the same year...

We are taking them out to lunch today... Outback, here we come!

Seth is on vacation. So we can all go.
The last subject of the day is this plant. 

Walmart has gotten into some rather exotic succulents. 

I have never seen one that is both furry and has little soft spines sticking out everywhere. 

I bought one for myself and then went back and got one for April...

I am not sure what is going on there, but I hope that they keep it up! 

I am making this short today.  I have to go get ready to go out to lunch...

See you tomorrow.

Saturday, July 2, 2016

Macrame and Beadwork... No Minis This Morning.

I will go back to the antique shop this afternoon.  This morning I had to do some macrame and beadwork for April's birthday.  Seth's is tomorrow and April's is on the 11th.

All she requested when I asked what she wanted, was a macrame hanger for a plant that I gave her yesterday... To quote her, "None of those seventies fluffy nylon things.  So I showed her this twine and she agreed to settle for that.  I didn't fringe the tassel or anything cute.  Just some brown beads and plain knotting.

Incidentally, if you want to do something like this in mini, you can do it with crochet cotton or #5 pearl cotton.  I use small seed beads when I do that size.

Just put "macrame" in the search box on the right side and you will find some information on how to do it in mini.
April also liked this bracelet that I just made.  I tried to give it to her and she said to save it for her birthday... So I did.
This is a piece of flat chenille stitch that I have been trying to learn.  I am having problems with turning corners on this one.  I will keep plugging along until I get it right.

That's about all I have done, so far today.  I am going to go work on the antique shop for a while now.  Wish me luck.  I might even get some mini-ing done this afternoon.. 

See you tomorrow.

Friday, September 26, 2014

There Will Be a Slight Pause...

OK.  Tessie read yesterday's blog and insisted that I make her hanger today...

She oversaw every step...

First I cut eight pieces of fine crochet cotton.  I think it is #30.  There is no label...

The length was about two feet each.  I then doubled those in half and did a slip knot with seven wraps around the top, leaving about an eighth of an inch for a loop to hang it on.

I made Tessie hold some of the strings out of the way, whilst I tied ten alternating overhand knots on four groups of four threads.(two threads on each side of the knots.
If you aren't familiar with macramé  terms, you can just put macramé instructions in your favorite search engine.  There are many of them out there and you can pick out the one that is the best for you.

Next I did five square knots of four threads each.

Then I threaded on a seed bead, with the help of a big eyed needle...

Then I tied five more of the square knots.
Here you see the start of the next step.

By the way, I am working from the top down on this one.  The big one had to be started from the top up, because of the pottery bottom.

This is my usual method.  It is much easier from the top down. You can just hang the top on something and work down.

Here, I am connecting the threads into a circle.  I tied a square knot between each of the legs of the top. 

Then I added a seed bead, followed by another square knot.
Now for the slight pause...

I had two seed beads to go and then disaster struck.  I lost the big eyed needle! 

It is impossible to thread the seed beads onto the crochet cotton without help  and the big eyed needle is the only kind of needle that will fit through the holes in the seed beads and hold the larger thread.

Anyway, I am going back now and crawl around on the floor of the workroom looking for my needle.  I have others, but I couldn't find even one...  Wish me luck...

See you tomorrow...

Thursday, September 25, 2014

Saucers and Donkey Beads...

Last week, I found this saucer shaped, hand thrown, pottery dish, with lots of holes around the edge at Goodwill for ninety nine cents... The wheels started turning right away.

I don't know what the purpose was originally, but the people at Goodwill obviously thought  that  it was next to worthless. 

Anyway, this morning I bought a roll of jute twine at Walmart.  Off and running...

I gathered up some Donkey Beads that my friend Ginnie had given me and went to work.

In case you are wondering, the basket that it is sitting on was the only thing that I could find to use as a form for working... It had nothing to do with the project. 
After a couple of hours, I had this.  I used to teach macramé back in the 70s and I don't use patterns... Whatever pops into my head goes into the piece.

I have been wanting a couple of macramé hangers for the back porch... Now I have the first one.
It is just too nice a day to stay inside.  So I took the kitchen step stool out and hung it up.  Tessie helped...Kind of.
I think that we both have a belated case of spring fever...

After I finish here, I am going back outside.  It is just too nice to stay inside this morning.

I am thinking that, after I play hooky for a bit, I will come back inside and make Tessie a copy of the big one for one of her plants... It's just a good day for goofing off.

See you tomorrow.

Saturday, September 14, 2013

While Walter's Away....

Casey will play.... I started off with good intentions...I got this far on the macramé.

The elephant is not fastened in place.  Just a trial. 

I used #5 pearl cotton and a twig from one of the rosemary bushes in the yard.

I was trying to decide if I liked it or not, so I took a break...Bad decision...
I was wandering around U Tube territory and found instructions for Viking knit with wire... Oops...Off on another tangent.

It took me all of ten minutes to learn how to do it and a lot longer to get it right.

It is simply looping wire around and around, but the trick is getting the loops even.

This was one long piece.  It can be cut anywhere, trimmed and used.


This is how it looks while the work is in progress. I just used some # 26 craft wire.  You can do as little as four loops and on up.  I did five on this one.

After it is finished, you run it through a sizing block with different holes in it to make it smaller and longer.

I didn't happen to have one of those, so I used adjustable pliers and winged it.  It doesn't look too bad.  It would look a lot better if I had a proper block.

I am now trying to talk myself into going back to macramé.... Trying....  This is too much fun.

Back to work.

See you tomorrow.

Friday, September 13, 2013

Knotting Is Going to Happen....

I did a couple more paintings after I left you yesterday.

I am leaning towards the first one.  Good color and kind of primitive looking.

Zar liked that one.
With that, Tessie started edging Zar out of the picture...Literally.

We tried this one, but it is too cute and feminine.  I didn't tell Tessie that, because she would have voted for that  one immediately.

When I said I didn't like that one, Tessie disappeared in a flash and so I waited, knowing that she had something up her sleeve.
She made it clear, in no uncertain terms, that Zar couldn't have this.  She said, "This is from my personal, private collection.  It belongs in the living room of the town house.  And besides, Zar wouldn't want a macramé owl in his living quarters.  You will have to make something in his colors and then we will see if we like it.".

That just means another day deciding on art...

No.  I am not going to make anything resembling an owl for the wall.

Just to humor Tessie, I will do a hanging....No. Not her with a noose around her neck. What she doesn't know is, I need something for the wall at the other end of the room, so that will keep me busy today. 

Walter has gone to Prescott to play golf for the next three days, so I am going to put my feet up, watch Korean Dramas and play... First with string and beads for macramé.

See you tomorrow.

Monday, October 10, 2011

Micro Mac.....

OK. Yesterday, Kathi asked if I had done a tutorial on a mini macrame plant hanger. I can't say that I have and I probably won't do a complete one on the blog. There are too many websites with good explanations on how to do it. I will give you a couple of basic knots and then a website that can actually teach you how to do it right.

Here is the lark's head knot that I used at the top of the plant hanger to attach it to the ring. That is how you start.

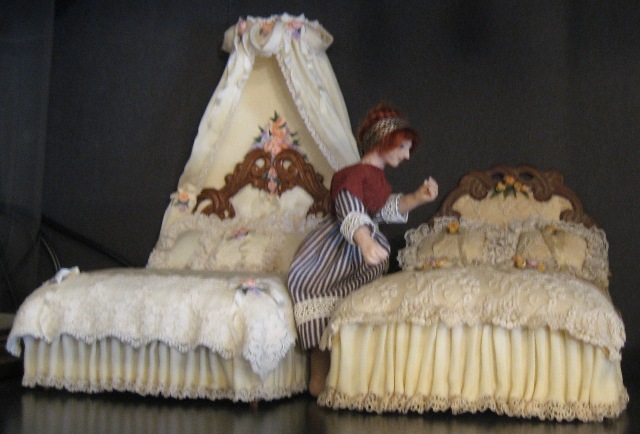
For the one that Tessie is holding in the last photo, I needed twelve cords. Basically, it is a three stranded hanger. Four threads for each strand. In the demo photos I am using #5 crochet thread....For the real thing, I went down to #20. That would be hard for you to see.

For the lark's head, you simply divide the thread in two and fold the resulting loop over the ring. For demo purposes, I used a tatting needle. Then you pull the ends up through the loop and tighten them down.

The second knot that you need for this is a plain old square knot, but it is tied over two filler cords, so you are working with four threads. The left thread goes across the front of the other cords and then the right cord goes under that and over the two center cords and down through the left loop. That is the first half of the square knot.

The second step is to pull the left cord under the other three and the right cord goes under that, over the two center cords and down through the left loop. When you pull everything up tight, you should have a square knot, tied around the two center cords.

The part on the hanger that I am showing you that is a spiral is simply the first half of that knot tied over and over again. If you tie the first half of the knot, the spiral goes in one direction. If you tie the second half it goes in the other direction.

When you get down towards the bottom, you will want to connect things....You simply take two cords from one knot and the two closest cords in the knot beside it and tie a square knot, using those four threads.

I have a feeling that this is all going to be as clear as mud to you. Therefore, I will send you to this website for clarification if you haven't done this before.http://www.free-macrame-patterns.com/learn-macrame.html

This site not only has clear instructions and better illustrations than I could give here, but it also has lots of free patterns. Some of their plant hangers are easier and some are harder. They have lots of patterns for other things too.

Anyway, Here goes on the pattern instructions for the one pictured. I wrapped a quarter inch jump ring with thread. That step isn't necessary if you don't want to mess with it.

Then I cut 6 pieces of #20 crochet cotton about a yard and a half long, each. I doubled these and lark's head knotted them to the ring. That gave me 12 working threads.

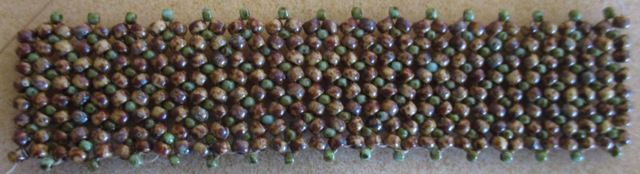
Divided into three groups of four, I did 10 square knots in each. Then I strung a small wooden bead onto the two center threads of each group. I then did 20 first half square knots in each group, making a spiral section.

I added another wooden bead to the center filler cords of each group. Then I did another 10 square knots on each group.

Now comes the fun part. Keeping them straight so that the two threads from one were adjacent to the next two, I tied three square knots, about 1/2" down, between the preceding lines, making a Y between the columns.

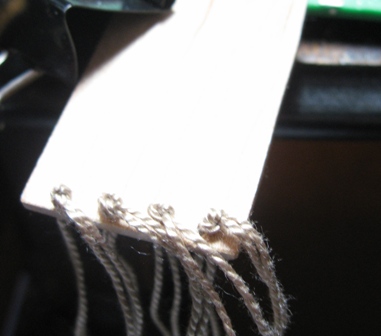
The last step was to carefully gather all of the threads together evenly at the bottom and tie an overhand knot in them. Trim the tassel straight across with sharp scissors, pop in a pot and hang!

This can be as simple or as complicated as you want to make it. I have done these with size 5 or smaller pearl cotton or larger crochet thread. Beads or no beads.

About the simplest one you can make is gathering all 6 threads into one lark's head knot over the ring, tying single square knots alternating about an inch apart 3 or four times, and an overhand knot in the bottom.

Play with it and have fun. Do go look at the diagrams on that website. Much better than mine. And look around the site at their patterns. Lots of ideas!

See you tomorrow.

Sunday, October 9, 2011

Sorting Out Sunday....

I am back to sorting the rest of the stuff in the workroom, so no projects today.

Tessie is "helping"....

She found another one of my earlier beds. Now she has it in her head that she needs TWO more houses. Thank goodness, that is the last one...I hope...I don't remember any others that I have stashed.


A couple of weeks ago, when Wednesday Witches met here at my house, we got to talking about doing macrame. I have a few books from the seventies and we were all reminiscing about doing that particular craft.

I remember discovering macrame when I was in school. I found a turn of the century (19th) needlework book that had a description of doing it. I wasn't even sure how to pronounce it, but I taught myself how to do it by following the instructions in that. I merrily went along doing it for a few years and then suddenly Mc Call's Needlework and Crafts magazine published an article about it. It took a couple more years, but it eventually caught on and everybody wanted to learn. Hence, I started teaching it in craft stores.

When I started doing miniatures, I pretty much quit doing it. Once in a while I would do a pot hanger or wall piece in mini, but other than that, nothing.

Talking about it made me think about how much fun it was to do. It seems that lately a lot of people are doing jewelry with fine cords and calling it micro macrame. I did a lot of that way back when.

I couldn't resist grabbing some thread and tying a bunch of knots. OK....I know. I am supposed to be finishing the townhouse. I am tying knots with one hand and doing the house with the other...Honest....

Then I remembered that I had a bunch of rug yarn in a storage bin in the garage....One thing leads to another.


Now I am working on a bag. This is one side. The other side will be the same. Mookie says "Hi!".

I am not going to quit mini-ing. I just needed something new to do while I watch TV at night. I can't just sit there and watch. I have to keep busy. This too will pass.

I am going back to sorting now. Slowly, but surely, the laundry basket is getting emptied. I will not be happy until it can be used as a laundry basket again....

See you tomorrow, with minis in hand.

Tuesday, August 3, 2010

In the Swing of Things...

Today you will start to see where I am going with the dome. It will only take one more day to finish it.

I am just sorry that the cherry wood that I used for this project doesn't show up well in the photos. Yup. It's a board with holes in it. I cut the board 1 1/8" wide and 2" long. Then I sanded it and drilled four holes in each end, evenly spaced.

I threaded two pieces, of about 18", of Perle cotton through each hole and left about 4 " on the bottom side. Then I did an overhand knot as close to the board as I could make it on both sides of the holes.

The next step will probably be a dead giveaway as to what the project is.....I macramed the bottom with three square knots, each tied over two core threads, in a triangular shape and tied them off with a separate piece.

Then I flipped it over and worked on the top side in a pattern of square knots, half hitches and a braid at the top.

I did the same pattern on both sides. When I was finished I hung them on a branch of the tree. Again, I used a wrap finish to attach it to the tree.

I don't know how it happened, but the focus landed on the far side of the swing.....I couldn't just have a plain old rope swing on such an elegant base, could I?

As you can see, I got the texture on the tree itself. Then I painted it with washes of burnt sienna , eucalyptus and trail tan.

I used dried Heavenly Bamboo around the base of the tree well and covered it with leaves and flowers.

Then I bribed Tessie to pose in the swing. She likes it, but won't be using it much. She absolutely refuses to let me put the dome over the top when she is on the swing. She claims she can't breath....OK...No dome....No swing.

She is now making noises that she would like a tree and swing on the roof of the townhouse. I have visions of big holes in the roof, workroom, bedroom and on down to the living room....I don't think that the house would take the weight of a full grown tree and soil. We will have to think of another way.

I promised her that she could use it for a few hours without the dome. I am working on that part now, so no worries for her.

This last step is going to make or break the whole thing. Unfortunately, I couldn't do it in reverse order.

Come back tomorrow for the final chapter.

See you then.

Sunday, May 16, 2010

A Big Mac and Some Little Macs

First of all, I thought that I should show you the new macrame that I finished for Tessie....It still has overtones of owl. I am not crazy about it. She doesn't object to the owly part. It's just me.

While I was at it, I dug out a couple of older pieces. This first one with the green beads is the one that I call the "accidental" teddy bear. I didn't intend to make him. He just appeared in the center while I was tending to other things. His face is just above the three groups of beads in the center. After I had finished, I looked at the piece and there he was, with his arms wrapped around the beads. Sometimes inattention turns out to be fun. At least he isn't as blatant as the 70s owls were. He was done around the same time. The whole piece measures about 11" long.


This last piece was done in the early 80s. Someone gave me the medallion that is in the center. It is a link from an Egyptian bracelet. It is copper and brass and engraved with the head of a female Egyptian in full head dress.

It hangs in my archeologist's office. For a long time it didn't have a home. I finally made this room box so that it wouldn't be all alone in the world. Don't forget to poke the photos to make them bigger.

Anyway, it's Sunday and I am taking the rest of the day off, now that I finished the un owl. Tessie still hasn't moved from the pod chair.....Zar is missing.....I think that he tried to get his turn and Tessie zapped him. I have no idea if she changed him into something weird or just locked him away for the day.....I'll think about that tomorrow....

See you then.

Saturday, May 15, 2010

No Owls Allowed......

I keep digging through books, the net, and old magazines, trying to remember what was popular back in the good old days......I forgot one of the most important crafts! Mid sixties meant the beginning of Macrame.

I got in on the ground floor of that craft, so to speak. I found an old DMC needlecraft book from the early 1900s and was off to the races. I didn't even know how to pronounce the word. Had to look it up, but it was intriguing enough to get me hooked just from the old engravings in the book. I had to try it.

My first pieces were with rug yarn. By the 70s, when it was really took off, I was skilled enough to teach classes in local craft stores.I made just about anything you could think of out of the knots. That included purses and vests.

I pulled out some old books today and started digging through them. Tessie was looking over my shoulder and reallllly liked the macrame hammock....

I talked her into a wall hanging to start. We will work up from there.....Hopefully she will get distracted after the wall hanging. Hopefully......

I went out in the back yard and grabbed a few twigs. The one that I settled on was from one of the rosemary bushes. Interesting shape.

Here is the beginning. I started it with the infamous lark's head knots. I put on 14 strands for 28 working weavers.

This is what it looked like after about an hour.....Yup. Another craft that takes just as long in mini as it does in real life. I wanted you to see a couple of the tricks that I use for mini macrame.

I have the twig pinned down to a piece of ceiling tile so that it won't shift. I put three loops of painter's tape, sticky side out to hold the non working threads out of the way. This is a real time saver.

I just noticed that this is starting to look like the awful owl macrame pieces that were popular in the early 70s....NO!!!! Not the ugly owl!!!! i am going to have to do something about that.

I am not sure why I insisted on working on things that are messing up my eyesight this week. First the chair. Then the rug. Now macrame. I think that I need to go do something big for a while.

Maybe I will do some sock knitting. I don't have to watch what I am doing with that.

Tessie has been in the pod chair for 24 hours straight. She refuses to leave and has Zar waiting on her hand and foot....She keeps promising him a turn, sitting in it if he does whatever she asks.....I have a feeling that he is about to dump a drink over her head. I do hope that she has the sense to move out of the new chair before this happens.

Anyway, I am going to go watch the fun and knit socks for the rest of the day.

See you tomorrow.
P. S. I forgot to add a great site to teach yourself macrame and get free patterns....Go here! http://www.free-macrame-patterns.com/ Not only do they have patterns for "ugly" owls, they even have Siamese cats and bunnies!.....NO!!! I am not making those for Tessie!