
I dug through the stash and found this creamy yellow stripe. Perfect to go with what I have planned for the inside.
It's a little tame for Tessie, so I left her out of the loop. If she likes it, she can move right in. If not, she will have to find some other place to play.

I also needed to re do the pin board. For those of you that haven't seen my other posts about this, it is simply a large piece of acoustical tile. I use the wrong side. It is first covered with graph paper. Then a layer of wax paper, so that the ink from the graph paper won't bleed onto the fabric.
I fastened all of it down with painter's tape.
For these curtains, I traced the outline of the window frame onto the wax paper. And the top curve of the window two extra times, so that I could do the swags at the top.
The first step is the long curtains, themselves.
I start by cutting, for each side, a piece of fabric the width of the window, plus about a half inch extra all around for hems.
I am just doing the curtain part this morning. Tomorrow I will show you the swags.

To start, I make a quarter inch hem around the bottom and the two long side with white glue.
I cut a piece of 1/8 X1/16" wood a bit shorter than the outside pleat. It can be trimmed later. This one will probably have to be trimmed because of the curve of the upper window.
I would rather have too much at the top. It can always be trimmed, but never added to.
Starting at the bottom outer edge, next to the pleat with the board, I do pleats every half inch and draw them in to about 1/8" each.
At the same time, I determine where I want the tie backs to be and put a corresponding pin at that height. I slant those down a bit towards the center, because when you tie curtains back they tend to pull down a the center edge a bit.
Next I do the draping of the top section. I start with the center edge and the first pleat is the lowest drape. As I work towards the outer edge, I pin each pleat a bit higher to again, make it look like the curtain has weight.
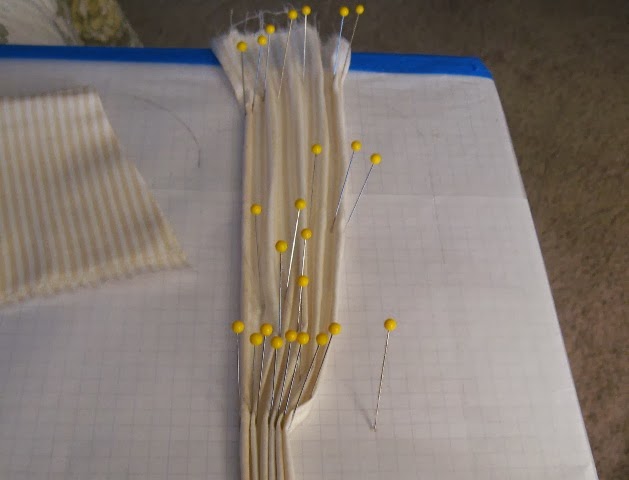
In other words, always remember to make the curtains look like they are heavy enough to pull themselves towards gravity.
When I have all of the panels done, I will spray them with unscented extra hold hairspray. At present, I am using Suave brand.
That's as far as I have gotten this morning. I have a lot more to do today, so I will go back to work now.
See you tomorrow.
2 comments:
I think watching the curtains being pleated is one of my favorite things..it means the build is coming to an end or close to an end :)
Casey, I mentioned your blogpost about making curtains on my own blog. I owe your thanks, for your information helped me in making curtains for my own tiny house. http://liduina88.blogspot.nl/2016/03/curtains-part-i.html
Post a Comment