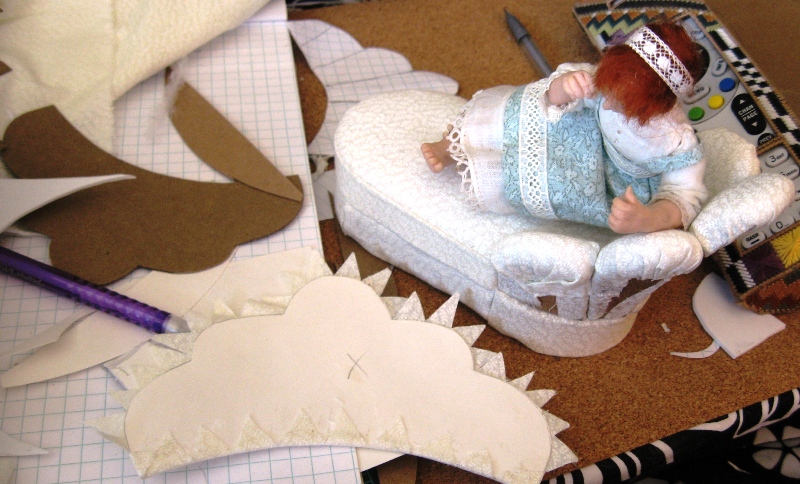
 Yesterday, after establishing the look that I wanted on the chaise, I started fiddling with a pattern. Here it is.
 If you attempt one of these, you will want to check the pieces at every stage, and I do mean every stage. Yours won't necessarily turn out exactly like mine. It is almost impossible to make two the same with this method. I did a lot of trimming between fittings. Just a tad at a time.

You have to make allowances for different weights of fabric and batting. Also your cardboard or poster board won't be the same as mine.
For the petals, I used the plain cardboard that comes between layers in my Fancy Feast cat food. For the filler of the sandwich, I used two layers of fun foam. I wanted something that would curve nicely.

While I am on that subject, I curled the tops of the petals to the back slightly. That gave the whole back a nice arch.
Unfortunately, this photo was before the curve. I did the curves by cutting the cardboard against the grain so that it would curve more easily. All cardboard has a grain, just like wood.
I wanted the grain to go crosswise of the petals so that they could curve back....If I had wanted them to curve in the center in the other direction I would have cut them lengthwise of the grain.
I did the same thing when I cut the veneer for the kitchen cabinets in the Clockwork Caravan. I cut them with the grain running up and down the face of the cabinet, making it much easier for the wood to bend around the cabinets.

Tessie is holding one of the petals to show you what the "sandwich" looks like from the side. Bottom to top, cardboard, two layers of fun foam, another layer of cardboard and two layers of bonded batting....Notice that it doesn't go all the way to the bottom. That is to allow for the seat cushion to fit closely to the arm of the chaise.
The petals are glued into place and the sides of the petals are glued to one another.
In the next photo, Tessie has already taken over to see if it works. It does.
In front of her is the outer back that will cover the messy back of the petals. It also had to be custom cut. the width on that piece is about 1/2" wider than the inner pieces. You have to allow for the outward curve.
As you can see, I have clipped the fabric all around. That is so that some of the bulk will be eliminated when I fit it to the back.

The last chapter is gluing the outer back on and then decorating. I ran a fancy ribbon around the seams and Tessie condecended to my putting on a couple of bows and roses to go with the bed....Nice of her.
Sorry, but Mookie came in and decided to perch on the slide out. He sleeps there all of the time when either Walter or I are working....If he had his way, he would sleep on the four inch area in front of the keyboard....Thank goodness, he didn't try to fight for it while I was writing this.
He got bored and fell asleep shortly after I took the photo. He should be tired. He woke me up at 3:00AM this morning, wanting someone to play with. I am going away now and take a well deserved nap.
See you tomorrow.
9 comments:
Very cool. I want one in my size!
Hi Casey. Nice chaise! I'm still hoping Tessie will want the black and white bed you made especially for her. I love that bed! The chaise will still work with the black and white bed,especially with a touch of black.
But the final decision is, of course,for you and Tessie to make.
I may just have to make a bed like that for my mini people. Let's see, the Mayor's master bedroom could use a fancier bed. That's in my large dollhouse. Let me see, that room has pink, green and cream cabbage rose wallpaper. VERY victorian you know! Time to search for fabrics. I would love to do a mini room with four or five coordinating fabrics like Brooke Tucker does.Her rooms are marvelous!Your furniture pieces remind me of hers.
Thanks for the tutorials.
Phyllisa
Thanks for sharing, I loved it!
Looking good Casey! Is that frilly scalloped piece next to the chaise in progress a needlebook?
Love that chaise. Thanks so much for the tutorial!
Hugs
Sandie
Sharp eye, Kat. Yes that is a needle book that I made several years ago. It is an easy one that looks difficult. Just two pieces of illustration board cut to shape and covered with a layer of batting on the outside. The cover is blind stitched over that, with a lining that is the same fabric.. No batting on the inside. A couple of pieces of felt a bit smaller are sewn along the seam between the front and back....Decorate as you will...
That looks great! Thanks for sharing your method - much appreciated as always. Judith x
awesome! excellent craftsmanship
Wow! It's wonderful.
Bye Faby
Post a Comment