 I kind of wandered around for a while and then decided that the bottles that I am going to be making from the pens and pencils will need trays to sit upon. I dragged out my "easy" basketmaking stuff. If you want the original directions, go here. http://caseymini.blogspot.com/2008/03/very-easy-basket-tutorial.html Since I was just making tray baskets, I figured that it wouldn't take long......It wouldn't have if I had just made a couple. I wound up making eight.
 I used a scrap of Penelope canvas that fit around the woodsies that I was going to use. Instead of gluing first like I usually do, I went ahead and ran the overdyed floss through it first. I normally like to glue the pre cut canvas to the base so that I can make the floss go in a continuous weave. 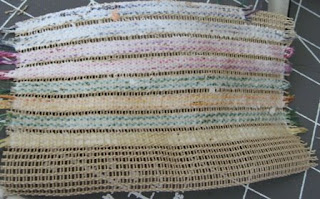

I decided to try something new. I did all of the stitching. Then I ran some glue over the back of the stitched area, leaving the space in between un glued. It was easier to trim that way.
I let that dry. Then I did the trimming into strips.
Meanwhile I picked out the bases that I wanted to use. I put glue on one side of each one and laid fabric on them. Then I trimmed the fabric flush with the edge.

Here are the steps in case you want to do one.
First the woodsie of choice.
Next the fabric glued and trimmed.
Then with glue on the edge of either the woodsie or the canvas, glue it around the edge and trim the end that overlaps to about 1/8".
Last step is to cut lace to fit and glue inside the rim. Oops! I missed the lace on the green one in the back row.

I can't say that I am completely happy with some of the color choices, but I will make them work with what I put inside. Just to show you, I put some of the pencil points in for size comparison.
I imagine that you are wondering where Tessie is today......Look at the colors.....Does that answer your question? No puce to be seen. She refused to come out and help unless I did puce. Alas....No Tessie. Now I know how to keep her at bay. I am not making the making of the purple ones til last. So there!
See you tomorrow.
6 comments:
Oh, so lovely!
I will try this too, thank you a lot.(I want to try all your DIY's, love them all)
Cute trays! Are things cooling off yet?
Auquí, tambien hace muchisimo calor, como tengo el ordenador en el estudio(es la parte alta de la casa imposible estár por la tarde) así que me estoy haciendo vaga, ni minis ni ordenador, hace mucho calor, lo mismo le debe de pasar a Tessi. Hasta mañana.
Such a pretty idea and looks easy to do as well. Thank you so much. Here it is as hot as at your place and the air is so moist that it seems sticky.Hugs
What a wonderful basket tutorial! I am currently wondering how in the world you make the woven wicker furniture. I was looking through some back issues of mini magazines and saw where people created these elaborate wicker chairs just by looking at full-sized version in a magazine??? I used to make large reed baskets but can't imagine doing so in miniature as I feel like the Jolly Green Giant!
Jody
Mini Leaps and Bounds
http://minileapsandbounds.blogspot.com/
Jody, that's exactly how I do the wicker. I found a really old book that was a textbook for making real wicker. I taught myself from that. You may have seen some of my wicker in the magazines. Quite a few pieces were used by Pam Throop in her houses.(Historic Homes in Miniature was the name of her company)She was featured a lot in Nutshell News and Miniature Collector.
Post a Comment