Today I started going up the sides.
I work from the inside to the out. I find it easier to get the needle where I want it to come out this way. It is also easier to pull the needle through this way. At least it is for me.
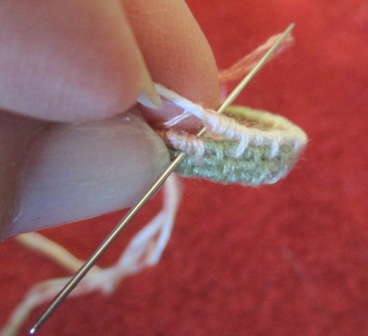
I am three rows up in this first photo. I am doing a four wrap. Four times around the core and then the fifth one goes through the row below.

Here you can see that, if you are careful the wraps make a diagonal line up the side of the basket... Sometimes people try to hit the same spot every time and make a straight line up the side of the basket with the wraps, by going through the previous wrap.
As I said, I was not trying for a perfect basket this time. I wanted it to look like a beginner's basket. Some of the wraps are here and there. Not exactly in line.

The handles are done by simply wrapping the wire as long as you want the handles. Then you form them into an arc. I think that I wrapped these handles about 12 times. Then I fastened the other end just like I did all of the other wraps.
I am showing you the inside of this rim to let you see what happens when you finish the wire. I simply cut it off at an angle and wrap it to the coil below.
 Once you get the hang of it, You will not have a lump. It will be a smooth transition.
 Here's the outside of the same spot. You can do another row around the top if you want a thicker handle on the sides.

The first one is the one that I just finished.
The brown and white one is a two color one. When you want to do that, you simply carry the color that you aren't wrapping with along the wire and wrap around it. When you wish to switch colors, you just switch from one color to the other, always carrying the one not in use inside the coil, with the wire.
I picked the third one because I pulled in the neck of that one. It is just a matter of putting the wire where you want the basket to go. I decorated that one with real feathers and turquoise chips.
The last one is an open weave. The open areas are formed just like the handle on the new basket. I simply kept putting the "handles" one after another all the way around and then switched back to the coils. I fastened he coils to the scalloped part as I went around with the next row on the outside.
Now. Grab some covered wire, some embroidery thread and a needle and get to work!
I will see you tomorrow.
3 comments:
I love these, Casey. I can hardly wait to try this myself - as soon as I finish the room box I am working on that I need to have ready for a miniature show here on Saturday! I wish I had Tessie to help me get it done --- on second thought... - Marilyn D., Oromocto, NB, Canada
Marilyn! Trust me. You don't want Tessie's help! LOL
Thanks Casey. I have to try this. :)
Post a Comment