
I started getting serious this morning. I took everything apart and started from scratch.
These are the methods that work best for me in putting these kits together. There are a lot of ways, but this works best for me. For what it's worth, this is how I do it...
I have learned over the years that the more painter's tape the better. I want everything to be straight when I get done.

I started with the floor and the center wall. I am using Aileen's Tacky this time. I tend to use whatever white glue I happen to have at the time. Some are better than others, but mostly they all finish the same.
When putting two walls together, I spread the glue in the depressions of both walls, not the tabs. In other words, where the wall fits together between the tabs. You can see that at the right side of the first photo. The darker piece to the left has glue in the depressions. The lighter wall to the right has glue behind the tabs that are sticking out of the other wall.
That takes care of the dye cut edges and the splinters. on the inside of the walls. Then I do the opposite side, like the inside corner that you see, with another line of glue and wipe it down with a wet paper towel. I do this to the floor edges too.
Yes, I use a lot of glue. It can be wiped off as it squeezes out, but you can't easily add more if you miss a spot.

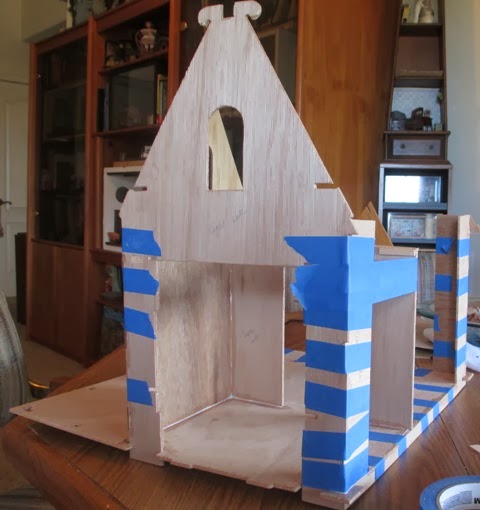
The other thing is making sure that the corners are as matched up and square as I can get them. Then I tape....and tape some more.
Again, if you get it lined up and taped so that it won't move in the first place, you will save yourself a lot of headaches later.
The problem with this particular kit is, the whole side of the house is all one piece...Connected by a narrow foundation piece at the bottom...And it is all interlocking.
In other words, you are sliding one edge into the slot that you see at the bottom corner. That piece that is sticking out on both sides. Then you have to carefully bow out the center to force the other end into place.

Any excess glue that runs out gets wiped off and put onto the rough ends of the tabs. That seals them and a lot of times makes them smooth enough that you don't have to do a lot of sanding.
The kitchen area of the center wall was bowed out slightly. I pulled it in with tape and will let that sit with the rest of the house. That will help with putting in the ceiling later.
If I tried to do it now, I would probably pull some of the other pieces out of alignment.
Yes. I know that the porch is sticking up some... Remember the photos yesterday? After I put the roof on and the posts in place that will take care of itself.
I am quitting for now. I am going to sit and watch the glue dry, while I work on the wicker...

I am going to have to go look. I am almost sure that she has one somewhere. Maybe she hid it to see if I feel sorry for her and let her have the new one... Sorry Tessie. Not going to happen.
See you tomorrow, with the next step.
5 comments:
Hi Casey,
thank you for sharing your assembly technique. When I built my first Greenleaf kit I used hot glue...the shame!
Big hug,
Giac
It's interesting to see the process, Casey! A lot of work but it will look nice once it's all done!
Giac, for shame! I can't say that I ever used got glue on a house. Early in the game, I got my hands on a Harrison that had been a display model. Raw wood. I started to work on it and pieces started falling apart in my hands. I had to disassemble the whole thing to a pile of wood and start from scratch! At least the hot glue was easy to peal off in big chunks....
creo que es una muy buena idea lo de utilizar las cintas adhesivas para sujetarlo todo mientras el pegamento seca
Tessie no se cansa de pedir nunca , a ver si nos deja ver ese nuevo sillon
besitos
Mari
It is going to be fascinating watching you assemble this beauty.
HUgs,
Meredith
Post a Comment