
It is cloudy and drizzling outside. Humidity is about as high as it can get.
I have the first coat on, but don't want to put the second one on until that is dry....Whenever....
After a couple of coats of that, sanding between coats, I will put on the spackle. When I get finished, no worries. Even if the foam disappeared, there would still be a solid shell there.
Someone suggested that it might, but I am pretty sure that it won't. My teacups have lasted over twenty years. The foam on those is just fine. And they are out in the open.
While waiting for things to dry, Tessie offered to help me with the tile... She's just like me. Hand her a paintbrush and some paints and she's a happy camper.
There is a tutorial for these tiles somewhere else in the blog, but I will briefly go through it again.
I used illustration board from Hobby Lobby and I am finding that it is not quite as hard pressed as the stuff from Michael's. It will be OK though. After it dries, I will put a finishing coat on it.
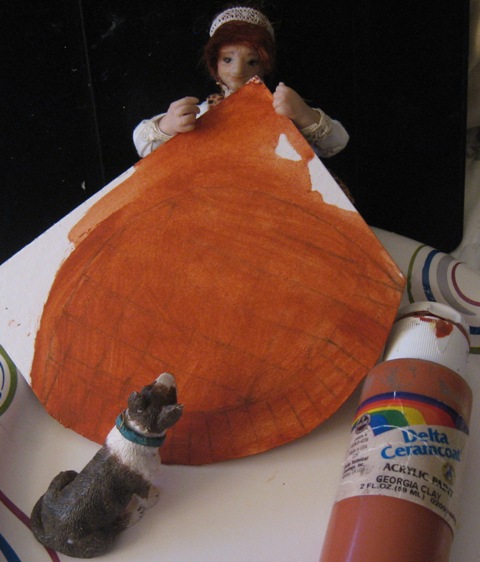
This is the bottom of the fireplace. I had to wing it. In the original room, there is no tile or brick...Just stucco. I don't think that they will be building any fires there.
First step in doing brick or tile this way is to map out where you want it to go. In this case, I wanted fanned tiles around the edge to match the curve of the fireplace above. The center was filled in with diagonal squares. I did this roughly, by eye, because Sautillo tiles are known for their irregularity.

Next, with a new blade in the Exacto knife, I scored to the left and right of the lines at an angle. Cutting a V groove in the board. Maybe about a 32nd of an inch.
Basically, all I am doing is taking the top layer or two off, so that the "grout" will be dimensional.
If you use this to do a lot of brick or tile, be sure to change your blade every once in a while for a cleaner cut. You don't want your blade to drag.

Tessie would have you believe that she did this to help Zar get his new place together....Is she kidding? She can't even lift that brush!
She did help with the mopping up though. You need to keep a Kleenex or paper towel handy and wipe over the washes to keep the tile more red.

I will keep checking. I want to get this part finished. I'm going to go wire in the transformer now....No worries about wetness there.
See you tomorrow.
6 comments:
la humedad es terrible para algunos trabajos, solo hay que tener mas paciencia
ese mosaico tiene muy buena pinta , estoy deseando ver que acabado haces con ellos
besitos
Mari
There's a lot of waiting for things to dry with this project but good to hear Tessie is finally in a happy mood! :-)
Véronique
Normally, drying is not a problem most of the year here in AZ...Unfortunately, Monsoon Season is in full swing now. I am just going to work around it.
You can send the moisture to Texas! I love the way you made the tile....We can wait for the drying.
I love the look of the tile. Looks great.
WOW those tiles are fabulous!
Post a Comment