The back plate on the original one was wood. Today, just for fun, I decided to make it from illustration board. It is the same thickness as the wood. The wood was 1/16". So is the illustration board. You could make these any shape or size that you want to. I tried to keep the height of the book shelf uniform, at about an inch all the way across. It's close, but a couple places are just a hair larger.

For this one, I left the back white so that you would be able to see more clearly. I am thinking of all different ideas for this. It would be fun in all different colors for a child's room.
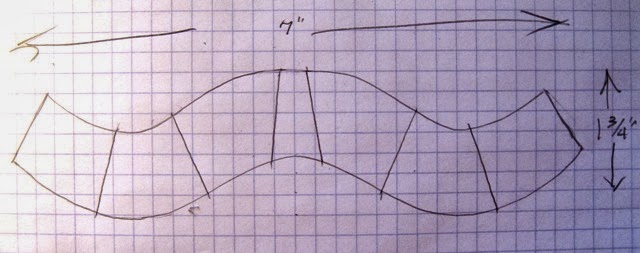
I used brushed silver for the sides and supports on this one for contrast. You could use any card stock weight paper for the sides.
I cut the upright supports double width, folded them and glued. They should be heavier than one thickness. I cut a strip from the card stock that was 1 1/16" high and 12" long. That gave me enough for all 6 supports. I cut them at 1 1/2" intervals and folded them in half. The fold will go to the front when I glue them in place. put glue on the inner surface and fold them flat. The ones I did yesterday were wood veneer and thus thicker.

You have to have two one inch strips for the outer shell. I marked them at 3/4" and 1". Then I cut the one inch line.
I scored the 3/4" line with a stylus and folded it at a right angle. I slashed the 1'4" all along about 1/4" apart. Do not go over the fold line.
Starting at one corner, I made a 1/8" fold to wrap around corner over the end. Then as I was going along, I cut Vs in the parts that went over the outside curves.
Gluing a few inches at a time, I made sure that the glue was on the back to cover where the paper would be and on the edge. That makes for a nice, neat edge.
When you start to run out of your 12" strip, you should be at the middle of the bottom. On the one yesterday, I made sure that the seam was right at the center bottom. This one, I forgot that and as you can see, the line is visible to the left of the bottom center. The other one looks a lot better.
I got carried away. I didn't need the Vs in the inner curves. It doesn't hurt, but isn't necessary. The tabs won't overlap on a straight stretch or an inner curve. The Vs are really only necessary on the outer curves. And the corners should be clipped at a 45 degree angle at the corners.

Paying no attention to the bottom right, this is how it should look when you get everything glued to the back. As you can see, the other two inner curves lay just fine without the little clipped Vs.

If you want your shelves to be really straight, It is a good idea to use a small ruler or even a square corner of paper and continue the lines on the back piece to the edge of your sides.
You will have to trim the folded supports at the back a little. By now those should be dry. Simply run just a little glue along the top bottom and back edge of the supports and put them in place where your guide lines are located. Again, You can change the location of these too, but be aware that the size of the supports may have to be a bit larger or smaller.

When you are finished, fill it and enjoy. I would suggest that you use something to glue the shelf in place, rather than trying to get it to hold up with wax or putty. It can be pretty heavy when filled with books.
Go look at "unusual bookcase ideas" on Bing or one of the other search sites. There are all kinds of ideas for bookcases for which this would work.
Experimentation can be fun. And sometimes even successful! Go for it!
See you tomorrow.
8 comments:
brilliant will have to try this
I really like how that turned out, Im down for trying it.
This will look great in Art's mancave! Thank you for sharing this tutorial!
Véronique
Cool looking shelf, Casey. Thank you for sharing an idea. Mini hugs, Natalia
Those are so cool!!
What a great shelf! Very creative Casey.
Thanks for sharing this beautiful idea.
Very cool Casey!
Post a Comment