
This morning Tessie pestered me until I gave in and said that I would make her another planter for the rooftop garden.
It took me about an hour and a half and a lot of cleaning in the workroom to even start.
I needed to drill 49 holes around the edge of the top and 4 more around the bottom shelf.....Of course, I needed a drill to do it. I couldn't, for the life of me, find either my Dremel Mini Mite or even my pin vise hand drill anywhere. I looked high and low.
After I was sure that neither of them was in the workroom, I expanded the search to various drawers, tool bags and cupboards in the family room.
Would you believe that I put them away in a book shelf in the family room, behind some books. Please don't ask me why I put them there....I guess it seemed like a good idea at the time....Anyway, I did get some cleaning done, so I don't think that the time was waisted.
Thank goodness for Mini Mite. He has been around for 20 years and is still going strong. Fingers crossed. When you need to drill 53 holes fast, that's the ticket.

The next step was cutting 49 pieces of cloth covered wire and shoving them in the holes and gluing them in at the correct length. Proper spacing, on the legs especially, at this point is very important if you don't want a wobbly plant stand, table, chair or anything else.
I then wrapped the portion of the leg that goes between the top and bottom of the stand with #20 Cebella crochet thread. I wax it as I go. I prefer this to linen thread. Just a personal preference.
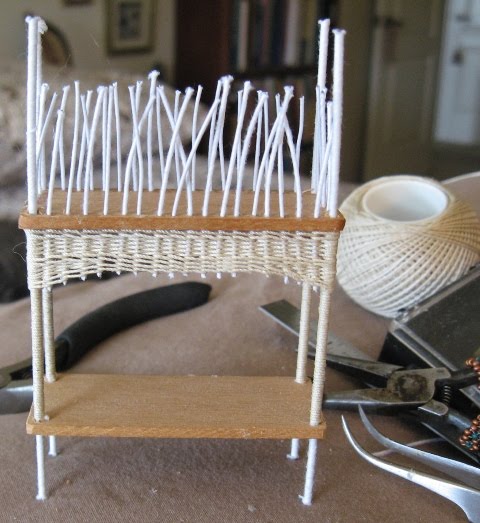
As I start, I glue the end of the thread to the bottom of the top board. I find it easier to do the bottom first and then the top. That goes for most any wicker. I have tried it top first and don't like it because usually the top is the part that is going to be seen the most and I don't like handling it after it is finished. So it is last.
I glue the thread to the back side of the wire and then cut the wires close to the edge after it dries.

Then I do the top section of weaving, glue and trim the same way. Here you see it with a partial trim. I wrap the bottom section of the feet with thread and glue them.
The last step is the most boring. I take six strands, a couple of yards each of the thread. I knot them together at one end and start braiding, keeping the threads flat at all times. This takes forever......
When I have enough to wrap around the planter four times, I know that there is enough to finish.

I am now trying to talk Tessie out of growing cucumbers, for pickles, in the planter. I don't want to make cucumbers, or for that matter, pickles either. I know how her mind works. One thing leads to another.
I wonder if I could talk her into beansprouts? Small. Two leaves each. Easy to make.....
I know it will never happen.....I can dream, can't I?
See you tomorrow.
20 comments:
Very cool, Casey. Thanks for a peek into the process. :)
They came out nice. :)
Wonderful tutorial Casey. Very good description and wonderful pictures.
Carolyn
Beautiful! I have ordered a book on making dollhouse wicker furniture but this is a wonderful place for me to start. Did you find my Dremel with your's? I can't find mine either.
Jody
I would really like to try my hand at basket weaving unfortunatly I have not been able to source any white paper covered wire, I must get in touch with my friend in Brisbane though, she has made a few chairs
Great tut Casey!
Deni,the wire that I use is cloth covered. It is usually found in the floral department of craft stores here. It usually comes in white and green and in several sizes. I use a smaller one for the body and larger size for the legs. If you can't find it at a store, I know that there are a lot of places on line that carry it. Good Luck!
Jody, sorry. I only found mine. Good luck on hunting yours down. I think that they get up and walk around, finding places to hide when we aren't looking!
Great planter!
What do you use for the wax? Beeswax? The stuff that is in the sewing notions?
I use a hammer and punch for holes :). This wicker tutorial is very clear. I read your previous post about the 52 page wicker "encyclopaedia" lol. Wish I can lay my hand on a piece of treasure like that. Just bought some old dollhouse & reference books from Sandra Morris. Can't wait to see what's in those.
O.M.G. Those are amazing! Love them!
Hugs,
Jill
Kat, the bee's wax that I use is the kind that the bead stores carry. The stuff for sewing seems to leave a residue on the thread. I think that it has a bit of regular wax mixed in.
Sans, I can't use a punch because I use hard woods like walnut and cherry for my bases. It has to be drilled.
Thanks for showing us how to do this Casey. xxx
Great planters :o) you make it look so easy.... but I'm sure it isnt! I know I would make a right mess if I attempted to even drill the holes, I'd probably lose a finger trying! LOL Tessie is very lucky indeed to have you make such lovely thngs for her.
OMG you are sooo talented! I think I will have to have a go myself at some point for my new house! Can't wait now to start!
Thanks for the brilliant tutorial it really helped! Your designs are good as well, especially how you left a little gap between the weaving!
Can't wait to see what else you have planned!
Hannah
Wonderful!!!
Wow. I am so impressed with my beautiful chair! I can't believe how complicated this looks. I bought the book, but doubt I could ever make something that looks this good! I even know where my drill and wicker book are now. Still no internet at home. Sigh...
Hi Casey well I did find the wire and I found some cotton but looks like the silly girl at the counter didn't put it in my bag! I dont know, can't get good help these days!
So I have to put beeswax on the thread?
What is the thread is it crochet cotton?
I think I picked up size 6 cotton would that be right? (of course it is still in the shop}
I will have to make up my own pattern I can't find a free one online as yet!
Deni, I usually start beginners out with #10. Six would be pretty big if it is numbered the same as it is here. I did say in the blog that mine is #20 Cebella crochet cotton. Cebella comes in #10.
Just run the thread over the bee's wax as you weave. Forgot to mention that the holes for the wire are 1/8" apart.
Hi Casey!
Thank you for those tips!
Mmm not sure what we can buy that would be the same here, but I will check it out!
Not really familiar with Crochet cotton as I don't crochet I only knit!
Thnaks again
Ha ha ha after reading this, I went out to the dolls hosue store near me and they just happened to have a sale on books, and what was in there! A book on how to make simple wicker furniture! So obviously I hasd to buy it! :D
Can't wait to get making now!
Thanks for the inspiration!
Hannah :)
Hi Casey! Just wanted you to know I was so inspired with your wicker plant stand I had to try one myself. If you give me a few minutes I'm going to create a post on my blog with a picture of my progress so far. Thank you! Carolyn
Post a Comment