 Today is pattern making day.
 By the way, I lied to you yesterday. I left out three pieces of wood that are needed. Those are the ones that you see at the top edge of the outside. They are all 3/16" by 1/4". The back is 6 1/2" long. The sides are 2 1/2" long.
I rounded the edges, lengthwise on two sides of the quarter inch.
The purpose of these is to make a nice rolled edge on top.
Now. As I said, today is for making patterns. After I am finished here, I will check them twice and re-draw them for your benefit.
I seldom use a tape measure in minis. They aren't always as accurate as they could be, but when I need to measure over or around something they are the only tool that will work. OK. I could use a piece of string and then measure that, but this is less work, in the long run.

So...I need to find the length of the sides and back pieces from the seat, over the top and under the back roll.
I pinned the end to the front, wrapped it over the back and poked it snug with my fingernail, then stuck a pin in it at the crease. 2 3/8" long.
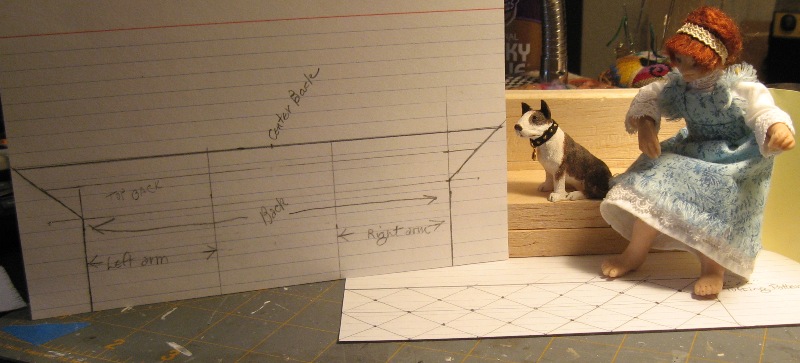
To draw the pattern, I used an index card. I already knew that the back of the sofa was 6"long. I centered that measurement on the card then drew a 45 degree angle out from the top of the back. There has to be an allowance to cover the corners of the top rail. It will continue down and around the back of the roll. I will have to wait to figure that out when it is cut out and can be fit around the base. The side patterns will simply be two inch sections cut from either end of the back.
Who said that geometry classes go to waste after high school? I use it all the time in mini.
I also drew out a pattern for diamond tufting on the seat. That's under Tessie's feet. She is being unexpectedly cooperative. Oh! The excitement of new furniture. Especially if it's for her.

The pattern was easy, because there were no odd numbers. All in inches. No quarter or half. I simply drew a line down the center length, marked off the edges at 1" intervals. Then diagonally connected the dots.
Wherever the lines intersected, I put a dot for tufting.
Tessie even helped me out with the post it note, for making a template for the front of the arm. By the way, this is a great way to get a tracing of anything small. Just stick it to what you want to trace and have at it. Then just take it off and cut it out. It also sticks to whatever you are going to make the piece out of for marking purposes.
I think that is as far as I am going to go today. I need to get a head start on the week of laundry that has piled up. And yes, I am still knitting.
I promise to keep it coming until the Chesterfield is finished. Just a few more days left.
See you tomorrow.
3 comments:
sigo el paso a paso con mucho interes, gracias
Susi
Looking good, Casey. Can't wait to see the rest. I'm thinking of doing it this time around.
This is a very interesting serial tutorial Casey, looking forward to instalment 3! Thanks for taking the time to photograph and post it :)
Post a Comment