 Yesterday afternoon, Tessie announced that she needed a shelf in the workroom for her new TV. Mind you, all the TV produces is static and snow, but she has hopes for a satellite or cable hook up, so that she can watch Twilight Zone and The Gate.....It's another one of those "Hold your breath and wait." situations.
 I humored her and made her a simple 4 board shelf to fit the TV. It's beginner stuff, but always handy to have in your book of tricks.

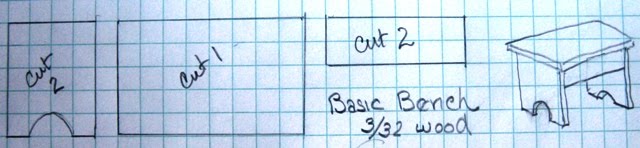
I used 3/32 walnut board to do it. You can use any wood or thickness. This is my personal preference. With walnut, it's not necessary to stain. I simply finished with Deft spray satin acrylic varnish. A couple of coats, with sanding between does the trick. This isn't going to be a show piece. Most people won't even notice it is there.
You can adjust this pattern to whatever size shelf you need. And you can change the shape of the boards to make it a fancier shelf.
The method is cut out the pieces by whatever means. I have done these with anything from an Exacto knife to a scroll saw. They are very simple and no trouble to cut.
Sand the pieces. To put them together, You lay the shelf face down and center the long edge of the back support on the back edge of the shelf. You then glue that and the two side supports together. Let them dry well, varnish and you are basically done.
Tessie is pleased. Zar, not so much. He says that the screen is so small that he needs his binoculars to see the picture from where he is sitting.
He dragged a small 5 board stool out, as close as he could without being in kicking range of Tessie's feet. Whilst he is sitting there, I may as well give you a pattern for that also. It's another simple but handy pattern.
The same instructions for cutting and sanding work for this pattern.
When you go to put it together, a gluing jig is handy. You want to get the four bottom pieces square. You do this part first, upside down. The two support pieces go between the leg ends. Then when that is dry you simply center the top and glue it on. This can be finished any way that you like. The one that Zar is sitting on is simply painted.

This pattern can also be adjusted to different sizes. The ones on the porch of Hubert's Haberdashery are the same pattern, but stretched to six inches. For those, I painted and distressed the bottom and stained the top.
Keep in mind, if you are wanting seating, the bench should be between 1 1/4 and 1 1/2 inches high. In real life that would be between 15 and 18 inches high. That is standard seating height.
If you just want a step stool, it should be more like 3/4" to 1".
Everything was right in the world. Tessie and Zar, sitting peacefully on the bench together, above my head.....Until Tessie borrowed the binoculars, pointed them at me and said, "OK. Now. We finished the shelf in the workroom.....We need kitchen shelves, closet shelves, book shelves in the living room and a bench for the entryway of the townhouse. No more fooling around! I want my house finished! NOW!"
Did I say that it was a simple project? Oops! Not when it involves that many shelves!
See you tomorrow.
5 comments:
Thank you again Casey. I am very grateful for all the tutorials you give and never miss a visit.
haha she sure knows what she wants and i have to say it looks good :) i love reading your blog thanks for the many smiles
Siempre tan instructivo y tan simple, ademas de forma tan simpatica,muchas gracias, un beso.
Susi
luv that stool & shelf Casesy!
I have made a few stools in the tudor style, quite similar
I worked out the pattern on paper and cut with a scroll saw!
I would rather do it in thick card like mountboard so much eaiser and paints up really great!!!!
Deni, I can't reccomend cardstock or paper for this, because it doesn't hold up over the years and I want what I build to last.
Also, be aware that you need to use archival papers if you do use paper. Regular paper is not acid free and will break down and yellow. This is really a matter of personal choice. I choose to use something that will last a long time. Just one woman's choice.
Post a Comment