The entry with the instructions is "Not So Easy Basket" at http://caseymini.blogspot.com/2008/04/not-so-easy-basket.html It will explain what is going on.
Here you see the simple supplies for the bag type basket. I used over dyed floss, all six threads. There is no need to separate them. When you get good at it, you can do it with less threads for a finer basket. The warp of the basket is linen thread that people use to do macrame jewelry. It can be purchased as craft store and bead stores.
If you want to make a stiffer basket you can use cloth covered wire. That will have to be painted or dyed to match the thread that you are using. It only comes in bright white and once in a while green in #32 gage. That's the size that you want to use.I prefer the linen thread because it is softer and easy to work with, especially for a bag.
 I started out making "Spirit bags" like this to hang around the neck. After that I made them smaller for minis.
You can make the bag any size that you want. I did this one with 20 pieces of linen cut about 6" long. There should be excess in the length.
The first thing that I do is lay it out on a work board and straighten it into one layer. I then tape it to the board with some blue tape for the first couple of rows of twining.
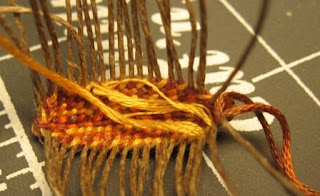
This is how it should look when you start. I doubled the floss and looped the center over the first spoke on the left. The piece of thread at the front goes over the back thread and under the next spoke and ends up in front again. See the other blog entry for further instructions.

Twine to the end of the row. Flip it over and go back to where you started. Now work around the end of the first row and do a row on the opposite side from the last row. That way you will be starting the bottom of the bag. Pull it tight every few stitches and try to keep them even. From here on you keep going round and round. No more back and forth.
After you have about five rows you can start bending the bottom so that the sides will come up. Be sure to pull tight on each end as you go around. This will force the sides of the bag upwards.

When you run out of thread simply flip both ends inside as if you were going to go behind the next stitch, but stay inside. Then simply start a new thread the same as the first. Double it and loop over the next spoke to continue weaving.
By the way, you can use regular floss You will end up with a bag that is all one color or striped. If you start behind with two different colors knotted together in place of the loop, you will have every other stitch one color and the ones between the other color. Experiment. Play. You might just invent something totally new.....

The Inspector General is making sure that everything is correctly done. She is not happy because I didn't finish the one that she found yesterday. I tried to tell her that you would have to learn from the beginning.....She dragged out the magnifying glass and is knit picking for all she's worth. Her main complaint is "If you had to start a new one Why didn't you do the one to match my hair?" I quickly shoved that skein under the box and told her I couldn't find it. I also made sure the puce wasn't in sight.
Next time I will show you a couple of fancy stitches and do a "how to finish" segment. For today I am quiting. I am going cross eyed from this and I am getting a headache. I am not sure if it is from the basket weaving or from Tessie's complaints. Either way, I have to do something else for a while.
See you tomorrow.
7 comments:
my goodness, I'm going cross-eyed just reading the directions! But it looks like it'll be really nice. Thank you for the instructions. Reminds me that I have a god's eye basket only half-done in a box around here somewhere...
Tabitha
Tabitha,if you haven't done baskets before, I would suggest that you go to the easiest woven basket directions and work your way up. It will seem a lot simpler. This is definitely not for beginners. Good luck!
Fantastico, gracias por el tutorial
you're right about it not for beginners. Beginners use a piece of wood to start with so they don't have "rib" holding problems. can you guess how come I know!
LOL great tut! Can't wait for the finale.
Karin
PS just recommended your blog to a mini newbie. So many great tuts...so little time!
Casey,
Thanks for the tutorial... I may have to learn to make these baskets.. LOL.. I keep adding things to learn to my list.. Hope your headache is better..
Tina
I really need to take a few days (or a whole week) and play with the basket tutorials. They would be fun projects in general, but I could also work on them at Rendezvous.
That looks fab! Thanks for the instructions. I'll keep them in mind for something to do on a lazy summer afternoon in the garden.
Post a Comment