
OK. I succumbed to the idea of having electrical lights in the Glencroft. Gaslight is pretty, but a bit impractical for miniature houses and as far as I know, there is no such thing as steam powered lights.
I dug through my electrical supplies and found a 5 light transformer that I didn't remember buying. That worked for testing what I was building. Actually, the first thing I did was rework a brass Houseworks chandelier. The silly thing has been in my stash since the 1980s when someone gave it to me.
First I tried wrapping the copper wiring tape around it. That too, was from the 80s. I never used it for wiring. It was from a foray that I took into real stained glass. A couple of classes and lots of cuts on my hands later, I decided that I would rather do miniatures. I always use round wire for minis, so the tape just sat in the electrical drawer. It still might stick to something else, but it definitely doesn't stick to shiny brass now.
Next, I pulled out the paints. Here's what I have so far. I am going to make black shades for the five lights. I am still debating knocking down more of the shiny brass. Maybe an antiquing wash. Anyway, it still lights after all these years. Yes. Those are the original bulbs.
I lost interest in that. Next I took up these. I spotted this package of "Professional" picture hangers.....I didn't know that picture hangers could be amateur. I guess the way that I usually hang pictures by pounding a nail in the wall would be considered amateurish. So now we know. If you want to be a professional picture hanger, you must use these fancy brass thingies.
If you will notice, the label on the package says that they won't damage your walls......I'm not sure how they figure that. The nails that come in the set are bigger than the regular ones that I use to hang things. But being an amateur, what do I know?
These will never be used to hang a picture, so what do I care? I am turning them upside down, doing some bending and using them for the body of wall sconces. First I bent the hook out straight. Then I bent the end with the little half round half balls up at a right angle. The little black dot that you see in the middle of each one is the hole for that big ol' nail that won't damage your wall. It goes straight through, so the wire leads from the bulbs can be fed through said hole.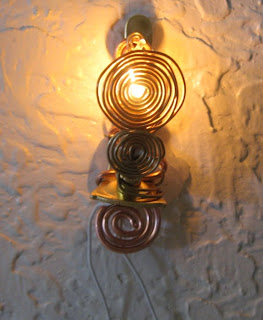
This is my first try. I just wanted to see what I could co with some wire. I used #18 copper and #26 brass. The larger the number, the smaller the gauge. I never quite understood why they do that with needles, threads and wire. It seems like the wire should have a smaller number if it is smaller wire. That's just my twisted logic.
This first one isn't perfect, but they will get better. I have lots of the picture hangers and lots of wire. This is another case of "Practice, practice, practice!" That's really only about 1 1/4" long. The darker wire in the center is exactly the same as the top wire. It just looks darker because of no light behind it. The copper spiral at the bottom continues up and does a serpentine design up the back of the sconce.
I am going back and do some more mad experimentation now. I think I will try making the next one look like a miniature slinky around the bulb. An orange stick should work to shape it. Wish me luck.
See you tomorrow.
I dug through my electrical supplies and found a 5 light transformer that I didn't remember buying. That worked for testing what I was building. Actually, the first thing I did was rework a brass Houseworks chandelier. The silly thing has been in my stash since the 1980s when someone gave it to me.
First I tried wrapping the copper wiring tape around it. That too, was from the 80s. I never used it for wiring. It was from a foray that I took into real stained glass. A couple of classes and lots of cuts on my hands later, I decided that I would rather do miniatures. I always use round wire for minis, so the tape just sat in the electrical drawer. It still might stick to something else, but it definitely doesn't stick to shiny brass now.

Next, I pulled out the paints. Here's what I have so far. I am going to make black shades for the five lights. I am still debating knocking down more of the shiny brass. Maybe an antiquing wash. Anyway, it still lights after all these years. Yes. Those are the original bulbs.
I lost interest in that. Next I took up these.
 I spotted this package of "Professional" picture hangers.....I didn't know that picture hangers could be amateur. I guess the way that I usually hang pictures by pounding a nail in the wall would be considered amateurish. So now we know. If you want to be a professional picture hanger, you must use these fancy brass thingies.
 If you will notice, the label on the package says that they won't damage your walls......I'm not sure how they figure that. The nails that come in the set are bigger than the regular ones that I use to hang things. But being an amateur, what do I know?
These will never be used to hang a picture, so what do I care? I am turning them upside down, doing some bending and using them for the body of wall sconces. First I bent the hook out straight. Then I bent the end with the little half round half balls up at a right angle. The little black dot that you see in the middle of each one is the hole for that big ol' nail that won't damage your wall. It goes straight through, so the wire leads from the bulbs can be fed through said hole.

This is my first try. I just wanted to see what I could co with some wire. I used #18 copper and #26 brass. The larger the number, the smaller the gauge. I never quite understood why they do that with needles, threads and wire. It seems like the wire should have a smaller number if it is smaller wire. That's just my twisted logic.
This first one isn't perfect, but they will get better. I have lots of the picture hangers and lots of wire. This is another case of "Practice, practice, practice!" That's really only about 1 1/4" long. The darker wire in the center is exactly the same as the top wire. It just looks darker because of no light behind it. The copper spiral at the bottom continues up and does a serpentine design up the back of the sconce.
I am going back and do some more mad experimentation now. I think I will try making the next one look like a miniature slinky around the bulb. An orange stick should work to shape it. Wish me luck.
See you tomorrow.
2 comments:
Looks fab Casey. Much better than anything you could buy and how inventive.
The professional bit is quite funny and your invention is anything but amateur, infact it's genius.
Love it, love it, love it!
What a brilliant idea Casey. The light looks fab..
Post a Comment