Don't forget to poke the photos to enlarge!
Showing posts with label Poly Clay. Show all posts

Tuesday, November 7, 2017

Fingers...Hands... Up to the Elbows....

I did a few more hands today.  Each hand starts out as a flat slab of poly clay.  I usually use Super Sculpy flesh tone, with a bit of this and that  added to make the color of the skin I want.

I just roll it out with the pasta machine and then form the arm around one of my handy, dandy, armatures.
I then cut three slits for the fingers and roll the fingers out and cut them off to the proper length.

This step takes some practice.  Once you get the hang of it, it goes pretty fast.

After that, I cut a length of a roll for the thumb and  add it to one side of the hand. Then I start smoothing everything.  When I get it the way I want it to look, I finish with an embroidery needle.

You can get perfect nails on the hands with the eye end of the needle.  Just pick a needle that looks to be the right size and press it into the end of each finger.

After you have them the way you want then, put the little stands in a pan and put that in the oven.

I turn it on to 275 degrees and let it heat up with the hands inside.  I let them bake about 15 minutes after that..  Take them out.  Let them cool. Put them on the doll of choice.

If there are any rough spots when you are finished, you can smooth the hands out with an emery board.  I usually cut the emery boards once lengthwise and once across.  That way you have four emery boards for the price of one and all of them will get into smaller spaces!  I do this for furniture making too.  Works like a charm.

That's all there is to it.

See you tomorrow.


Friday, October 27, 2017

Hands and Feets

This is one of those things that I came up with about 35 years ago and am still using.

If you decide to pass the idea on, please give credit where credit is due. Thanks.

As far as I know, I have been doing this longer than anybody else. And I have never run across anybody else that actually does it.

I make my hands and feet NOT on the person.

I make them on these little gadgets that I make.

I take a pipe cleaner and start by folding in the center and twisting down about two inches. Then I make two loops, so that the spikes are up in the air.
 Then I wrap the top spike in floral tape.  Bottom up and then back down.  That gives me a base that I can build the appendages on.

After they are baked, they slip off and can be put on the person in question.

For instance, I want Albert to be able to hold his pipe, but not all of the time.  Therefore, I want one hand that can hold the pipe and one of the same hand that is not doing anything. Maybe the other hand can be holding a martini(or not).
I will be making at least two for each hand.  Then I will do a pair of feet for closed in shoes.(formal occasions) and some that are barefoot, for sandals. Albert even wore sandals with his suits occasionally.  If he thought that he could get away with it.


I have a whole box of hands that are for Tessie and Zar.  They change hands all of the time.

It just depends on what they are doing at the time.
After I bake them, I slip them off of the stands.  I put them in the box in separate compartments for each person.  That way, when they want to do something special, all they have to do is go to the box and change their appendages.

OK.  I have blogged long enough.  Back to the hands and feets.

See you tomorrow.

Saturday, October 21, 2017

Skinning Albert...

That is, I am trying to get Albert's skin color right...

I think that I am just about there.

He was darker than I would have thought.  Some of the colored photos that I found of him were much darker than I would have thought in the black and white ones.

Anyway, I have been jumping on and off of the pasta machine for the past hour.
 The color that I started with was the flesh color that you by in a large package. 

It was just about the color of the block on top... Just a hint of flesh color.

I added about one of those little blobs to a large piece of the flesh color... I may have to add just a touch more.

It is easy enough to do, but you don't want to add a big bunch all at once or you may get a terra cotta skin tone.  It doesn't take much to darken the flesh color.
This photo is more accurate than the photo above.  it is the same piece of clay with the same amount of color in it.

I am just about satisfied with it. 
I stopped at a garage sale on the way home from Walmart... What a deal!

I got the two large pots that I planted the geraniums in, in this photo.
And all of these and just a few more... $5.00.

I have been alternating planting and cranking the pasta machine.  Both are good exercise, but each has it's own set of muscles... I am going to be sore tomorrow.  Oh well, I can sit and sculpt Albert. 

It's a good excuse to do that and nothing else tomorrow.

See you then!

Wednesday, June 7, 2017

Off On Another Tangent....

Look what I found at Goodwill yesterday! 

I have always wanted to try my hand at bonsai... Now I can.  I found these three pots at Goodwill for cheap! Now I can try it.  That little Cyprus tree at the back left is going to be my first victim.  Now all I need is to hunt up some wire.
We did cakes at Wednesday Witches today. As soon as I got home, Tessie had her hands out, wanting to eat it.  It hasn't been cooked yet.  Or cut.  So she can't have it yet.
Here's a close-up. It is a chocolate cake with strawberry filling between the layers. 

I have to cook it and then cut her a piece...

It will be about a half hour and then she will probably devour the whole thing. 
Oh well.  It's one of those magic cakes that replenishes itself when eaten.  She will be eating it for years to come. 

I am going to go finish the process now.

Back to work.  See you tomorrow.  Cake or no cake.

Thursday, April 7, 2016

What the New Thread Will Do!

Tessie and I argued about which to make first.  An afghan or a rug?  I wanted to do the rug.  I knew  that it would take a lot less time than an afghan...

I won.  I simply took the thread and canvas to Wednesday Witches with me.  She couldn't do anything about it. 

Here's what I have so far.

My friend Joan discovered that there were two skeins of each kind of the tie dyed thread.  Which can't be all bad if you want to make a rug and an afghan to match...
I broke down and ordered original Super Sculpey in original beige on Amazon, Monday.  It got here yesterday and it is the right stuff.  I am back in business. 

The old stuff I had was breaking down.  I shattered a couple of the hands that I made the other night.  It absolutely is not supposed to do that.  Being so old, I am not surprised.

Anyway, I told Tessie that, if she didn't behave, I was going to make a mini me.  She told me to go ahead.  I would only be five inches high and she could take me on, since she is 5 1/2" high... She forgot and I reminded her, that I am the one making it and if I decided to go ahead with it, I could make me 6" high and very strong!  Strangely enough, she quieted down and wandered off   somewhere. To someplace where I wasn't... I win!
Last but not least, I think that we have a mommy squirrel.  Sorry about the terrible photo, but I haven't washed the outside of the window since the last rain... Very spotty.

She has been squirreling away nuts by the cheeks full and this morning I saw her going over the back fence with a big hunk of lettuce, hanging from her mouth... Feeding babies or just very hungry?  We shall see in a week or so. 

I am going back to work on the rug some more... Yes. I know. I should finish all of the old rugs before starting something new... Oh well.  What is done.  Is done.  Or at least it's started.

Back to stitching. See you tomorrow.

Saturday, April 2, 2016

Testing, 1-2-3 Testing....

OK.  Since some of you said that you would like to make your own people... Here's a short tutorial on getting things in the right place.

The head is the most important part.  On a 5 1/2" doll, it goes as follows.

The head should be about 3/4 of an inch long and about 1/2" wide...
The eyes are at the halfway point between the top of the head and the chin.
The eyes should have an eye length between them.
The bottom of the nose is at 2/3 of the head.  In this case it is about a half inch.
The mouth is 1/3 between the nose tip and the bottom of the chin. 

I got Tessie to lie down next to the sketch, so that you could see the similarities? between them.  She really is 5 and 1/2 inches tall.  The hair and the stretched out feet make her look taller at the angle that I took the photo.

She kept squirming whilst I was taking the photos... And complaining?  You would not believe some of the words that she used!

I first make a pipe cleaner armature. Everything is two pipe cleaners twisted together.  These are the long ones that they call chenille stems. I bend two in half and twist them.  These become the back bone and legs.  I take one and twist half of it together and put it a little more than an inch down and twist the rest.  That becomes the arms.  They will be shortened when we put on the poly clay ends. As will the bottom of the leg stems.  They only go part way into the leg portions of clay.

Anyway, the arms when stretched out should be about the same as the height.

From top to bottom.  Shoulders at one inch.  Waist is two to two and a quarter inches down.  Torso finished at three inches and the knees at four.  The last half inch takes up the ankles and feet.

Assuming that you made a head, arms and feet, you then assemble them  with the pipe cleaners. I wrap the ends of the stems with floral tape to keep the arms, etc. from slipping off.  I cut a little off until the length looks right... Starting with the feet and head, so that I will know when the height is right. Head first, then feet.
After that, I cut strips of thin quilt batting.  I wrap the arms with about one inch strips.  The upper legs with a little wider strips. 

Over the years, I learned to stretch the end of the strips and smooth them into the layer underneath.  When you are just starting out, you may have to use a little glue on the end.

I use a wider strip to go around the torso.  You can put a little extra padding in the bust and the bustle area... I don't.  I find that the clothes fill things out nicely, especially on Tessie.

Some people cover the batting with strips of nylon stocking material or some other jersey.  I don't. Tessie wears bloomers.  That seems to cover her bottom nicely and hold things together.  Her top is enclosed in a dress top or blouse that covers everything. She seems to do just fine with those coverings.  If she starts complaining, I just make new ones.

Of course, Tessie had to try out the new foot and a couple of the new hands too.... Maybe I shouldn't show you this. 

She built a better skate park on the stove this morning... She has been buzzing around it on the skateboard I found yesterday, while cleaning... I really shouldn't clean.  It always gets Tessie into trouble..

The butter dish will never be the same.  She inserted the ends of two energy bars under the lid and away she went... She has to be quick.  She jumps the energy bars at both ends.  Only the middles are smooth enough to ride on.

She has been singing "Girls Just Want to Have Fun!" at the top of her lungs.  I guess I should go make more hands and feet.  I doubt that she is going to get through the day with the ones I just made. 

I just heard her yell, "Testing, 1-2-3, Testing!". I guess I should go see what she has added to the mix... I don't think I want to know!

Wish me luck.  I think that I'm going to need it!

See you tomorrow.

Friday, April 1, 2016

Another Five Hands and a Foot...

I was on a roll!  I made five more hands and a foot last night...

Here are a couple of the steps.  My apologies for the first blurred photo. I accidently eliminated the good one and didn't feel like going back to stage it again.  It is simply to show you how big I make the flat of the hand. About the size of one of my fingernails. Or a bit smaller.
I then wrap the rest of the clay around the armature.  Cut in the fingers with an exacto knife and roll the fingers to make them round.  That takes a bit of practice.  The piece at the bottom is the thumb  round at one end and flat at the other, to fasten it to the hand.  It goes on the under side.

The hunk of clay beside it is the excess that I cut off after smoothing the arm.  I do that a little at a time to get it right.

Tessie immediately changed hands and one foot to see how I did.  I didn't tell her that I made a couple of the hands for Zar.  She is now wearing one of Zar's left hands and complaining that it is too big for her...

I guess I should break the news to her that she is not the only one that breaks hands and needs replacements once in a while.

Anyway, I don't think that she will be trying to fix anything with sticky wax for a while...

Before I leave, Phyllisa asked where Zar started. I don't normally do the hunting, but here I will make an exception. Zar started here.  http://caseymini.blogspot.com/2009/04/give-girl-hand.html  

Actually, it was similar to yesterday's circumstances. Tessie messed up a hand and I had to fix it. You can find it by going to Steampunk man, but that shows you the second entry first and you have to scroll down to see the first one.  If you go to the above entry, that is the first one.  After that just hit newer post at the bottom of the page. I hope that this helps.

Back to the dirty workshop.

See you tomorrow.

Thursday, March 31, 2016

Just a Small Matter of Blackmail...

Tessie was whinging and whining all morning.  I was playing out in the garden when I should have been making a foot...

I told her I wouldn't make new feet until she showed you the old one.

I couldn't believe that she tried to fix it with sticky wax.  Well.  It kind of worked until she tried walking on it.  And she can't zap unless she has both feet to land on.  She learned that the hard way.  I had to go pick her up off of the floor three different times before she gave up on that.

Anyway, I had an Echocardiogram(just par for the course, nothing special) this afternoon and decided to wait until that was over  to do feet.
I made a new leg for the old foot and a new foot for the old leg.  Thus the parts were not wasted.

Then I made another foot like the old one for the right side.  I did some extra hands whilst I was in the mood.

I won't go through the whole thing. There are tutorials elsewhere on the blog.
All in all, I made two hands and three feet.  That should keep Tessie in hands and feet, at least until Saturday.

I think that Kota is truly our cat now.  He didn't bat an eye through the whole procedure. He took a bath and then just sat and snickered through the rest of the proceedings.

Tessie didn't even wait for the foot to cool.  She grabbed it and shoved it on.  Then she stomped a couple of times and was gone.

No, "Thanks Casey!", or anything else.

I did hear her yell as she zapped out of here.  She shouted loudly, "This foot is Extremely HOT!!!"

That's the thanks I get for making extras.

So much for feet and hands!

See you tomorrow.

Friday, February 13, 2015

Secret Hand Shake...

OK. I confess... Tessie, Zar and company break a lot of hands.

Poly clay is susceptible to breakage when flying around on dragons, motorcycles, pogo sticks and brooms...

I have learned over the years to keep a few spare parts on hand.

This morning I made a few new ones.
The nice thing about having a lot of hands(yes and even feet for Tessie) is that you can change a hand at a moment's notice if one gets broken...

In the first photo, you can see that I start out with a long piece of clay stretched out flat.  I shape the basic hand and cut in fingers.

Then I close the arm around a handmade stand of pipe cleaner and floral tape.

After it is firmly around the base, I start shaping the hand.  Roll the fingers, one at a time.  That's the tricky part.

Then the attached thumb gets shaped.  The hand gets posed... Sometimes it's open to hold a tool.  Sometimes it's closed in a fist or maybe thumbs up.

It just depends on what kind of mood Tessie is in.  I make a lot of fists...Just kidding.

The fingernails are put on last.  I use a small tapestry needle.  It is just the right size and shape to make the indentation.

The last step is to bake them.  For Super Sculpey, it is 275 degrees.  I put them in a glass dish and into the cold oven.  Set the timer for 20 minutes.  That is usually long enough for hands of any sort.

After they come out of the oven I let them cool down in the pan. 

After that they can  be slipped off of the stand and are ready for use, when needed.

Usually, Tessie wants to try them on right away.

It must be handy to have spare parts available at a whim.  I store them in this little red box... There is a slot for right, left and weird...Rubber gloves, for instance.  The top, larger section is for broken parts to be repaired.  Oops!  I should have done that one while I was baking.  Oh well... Next time.

We are on our way out to go to the Tucson Museum of art, downtown.  There is a special exhibit of a private collection.  I hear that it has a lot of famous paintings.  Need to go see!

Then we are going to Café a la C'Arte for lunch.  It is right next to the museum.  One of the Wednesday Witches owns it.  Great food!   I sound like an advertisement... This is not a paid plug.  I just like the restaurant.  It is in an old adobe house from the 1800s. 

Gotta run!

See you tomorrow.

Saturday, December 15, 2012

I'm All For Easy....

Sometimes easy is good....Other times it's hard.

Keep reading....This will all make sense in a bit.

I made Saltine Cookie Bars this morning. They are very easy, unless Tessie gets involved.

I will put the recipe at the end of this, if anybody wants to try them.  They are usually very easy.

This time, not so much.  Tessie was in one of her "helpful" moods.  This just means that she wants the cookies NOW.  She sat on the handle of the saucepan and stirred the sugar and butter whilst they boiled merrily away....Only trouble is, you really shouldn't be wearing a big red hat that falls off a lot when you are leaning over and stirring.  The hat is now washed and is drying by the sink as we speak...Thank goodness, Tessie didn't loose her balance...
After I spread the chocolate chips on top and spread them around, I went away to let them cool. 

I got shoulders and new arms and hands sculpted on Engelbert.  I wrapped the other nameless elf's arms with floral tape.  I couldn't find white so I had to use green.  It really doesn't make a difference, but I like white better.  Just a personal quirk.  I still have to do some more refining on the first little guy. Then I will start working on the other one....
I decided to take a break and see how the cooling was going.

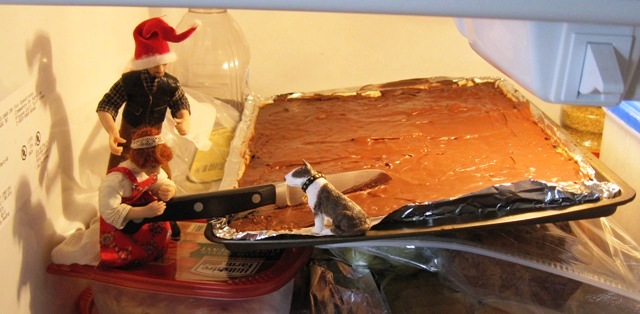
One step into the kitchen and this is what I came up against!

Mind you, this stuff is supposed to get cold and be broken into chunks.  Why wait when you have a good paring knife?

I took that away from Tessie and shooed them all out. 

To stop them from doing it again, I put the tray in the refrigerator....

About an hour ago, I opened the fridge to get a Pepsi and The Terrible Two + One froze in place.  Maybe they thought I wouldn't notice if they didn't move.  It didn't work.

The three of them are now locked in the workroom and I told them that they can't come out for cookies until I come and collect them. 

I have to figure out a way to stop Tessie's bad zapping habits.  She seems to be able to get into any place when she puts her mind to it.  And now she is taking others right along with her.

I think it was the footprint fudge that started it.  A little bit of sugar makes the medicine go down....It also makes Tessie's powers stronger.  In theory, all I have to do is keep Tessie away from the sugar....Wish me luck.

See you tomorrow....Recipe for Tessie's favorite cookies below.

Saltine Cookie Bars.

Line a large cookie sheet with foil and butter it well.
Lay out a single layer of saltine crackers to cover the bottom.
In a saucepan, boil 1 c. sugar and 1 c. butter(two sticks) for two minutes, after it reaches the boiling point..
Pour over the crackers and spread evenly.  Bake  4 minutes in a 400 degree oven.
Remove from oven and sprinkle with a 12 oz. package of chocolate chips.
When chocolate is soft, spread around evenly. 
You can sprinkle with nuts if you wish...I don't bother...It gets eaten as fast as I can break it in pieces.
Chill and then break in pieces.
Hide it from Tessie!!!

Sunday, July 29, 2012

With Good Intentions...

First of all, this is what happens in our back yard during the Monsoon Season.  Desert plants spring up all over the yard.

Some of the ones that I like the most get to live where they grow.  This little guy is smack dab in the middle of the yard and that's where he's going to stay.

The monsoons have hit the last couple of days and are about to come in again this afternoon.  It starts getting dark about 3:00PM every day.

As I said before, it's not a good time to take photos of minis.  It's also not a great time for beads either.

I started out intending to do some dishes and food for the crooked cottage and the weaver's workshop....Good intentions often get bent out of shape when the poly clay leaves it's cage.
I had a LOT of scraps from other projects just laying in the box of canes...How could I leave them there to contaminate the pretty canes?

The answer is, I couldn't.

For those of you not familiar with "Natashia Beads", they are my favorite way of using up scraps.  She is a lady from Russia that invented the process, thus the name.  They are also referred to as mirror beads.  I kind of think of them as little Rorschach tests...  You can pick out all kinds of things in the images.  There are four sides to the beads and each side is a different test.  I see a butterfly in the first one...You find things in the rest.

These are three that I came up with.  Mind you that these are nowhere near finished..

The first step is to moosh(technical term) up a lot of little scraps of different colors together and  chop them up still further.  I usually gather them up and roll them together.  Then if they aren't fine enough when I slice the piece in two, I chop that piece up more and gather it together.  I keep repeating the process until it looks pretty fine.

When they are fine enough, you shape them into an oblong block.  Then you proceed to cut it lengthwise in the center.  Lay those out, cut side up and do the same thing to those two pieces.  Then you basically turn the block inside out.  If you did it right, when you stick it back together, each side will have a mirror image on it.

I still have some smoothing to do on these and then I will have to put a hole through the center lengthwise.

When I am satisfied with the shape and smoothness, I will bake them.

When they are cool, they will be sanded and polished.  The last step will be to put Future Acrylic floor wax on them for a good finish.

This is the sum total of my work today,,,,Not a plate or a carrot in sight.

I will get back to the serious stuff tomorrow.  Right now I am having way too much fun finding things in the sides of the beads. 

I see a bunny and a frog and......

Anyway,  back to playing and enjoying the rainy weather.

See you tomorrow.

Saturday, May 12, 2012

"Don't Forget My Feet!"

Periodically, Tessie just plain wears out her hands and feet...That's when I get to play Doctor Frankenstein...If you could see me now, you would see a mad woman wringing her hands and grinning a lot.

She knows about the operation and participates in it gladly.... Hey!  Wouldn't you have brand new hands and feet, without any wrinkles if you could swing it?  I know I would.

I put her to work making stands to cook the new limbs on.  She is good at it.  She knows the right size for them.

The only trouble is, she assumes that I am going to make as many hands and feet as she makes stands, so she goes all out.

After eight stands, I had to take the chenelle stems  and  floral tape away from her.  I told her that, if she made any more, I would make the rest for Zar.  She stopped immediately!

I grabbed the stands and started.  I thought that you might like to sit in on the operation. 

The first thing that I do is make a kind of a paddle shape on one end of the piece of Super Sculpey and flatten the other end. 

Then I wrap the flattened piece around the stem. It is important to slip the clay off of the stand and back on once in a while, so it won't stick.

Next, I use an Exacto knife to cut three slits for the fingers.

I roll the fingers gently between my fingers.  They will elongate and must be trimmed.  When they are in preportion to the hand, I cut a piece of clay and roll it to the shape of the thumb with the pad below it.

You can see this directly to the right of Tessie in the photo. 

That gets smoothed into the hand to remove the seam. 

When I am satisfied with the length of fingers and thumb, I use the eye end of a needle to make indentations where the fingernails are.  Then I position the hand the way I want the finished pose to be.

About the time I finished taking the photo, Tessie started yelling...."You forgot my feet!  Make me some new feet now!  The old ones are dirty on the bottoms!"

I calmly started a new foot as I asked, "And who got the old ones dirty?  I know it wasn't me."

She just grinned and answered, "Stop fooling around.  I want new feet and make them Happy Feet!" 

She doesn't know how tempted I am to make her look like a tap dancing penguin...

See you tomorrow.  P.S.  Thanks to Elga, I think that I am getting the hang of this new system!  Thank You Elga!!!!!


Thursday, October 20, 2011

Happy Feet!!!

Poor Tessie! I made her wait until this morning for the operation. I did give her a bottle of Zar's magic elixir to keep her soothed. Let's just say that she was feeling NO pain...

I thought you might be interested in how her foot replacement surgery is done.

I am a very gentle doctor when it comes to transplants. She gets to keep the old one until the new one is finished and it is just a matter of a couple of seconds that she is without a foot.

I took a hunk of flesh(translate that to Super Sculpey) about the size of her existing foot and start by shaping it around a bone(chenille stem, wrapped with floral tape). Then, after I get about the right size, I start smoothing the ankles and shape of the foot. I use a toothpick as a tool for most of it and my fingers for smoothing....

I put a lot of dots at the end of the last sentence to let you catch your breath before I tell you how to get a perfectly smooth surface on your clay. Some people are going to say UGH, but it is a foolproof method. Lick your finger, and use it to smooth. For some reason just wetting your finger doesn't work as well. If you are worried about poly poisoning, simply use a wet wipe in between licks. Someone taught me this about 30 years ago and I am not dead yet. I also have very smooth poly skin by doing this. I know....Icky!!!

The only tools that I use for this, other than fingers, are toothpicks, exacto(to separate toes) and a tapestry needle to make the toe nails.

In this photo, I still need to do some smoothing on the toes. You can see just a bit of the chenille stem sticking out of the top. That will be bent to make a stand for the foot to rest on in the oven.

I put the foot in the oven. Set the oven temp to 275 degrees. Then I turn on the timer for 15 minutes. I turn it off after that and let the foot cool in the oven.

As of now, Tessie has a new foot, is dancing on the balcony, on a chair. She has the bottle of elixir, which is now about 1/4 full and she is feeling no pain. In fact, she is doing a happy dance with Spike.

No more sore toes!

See you tomorrow.