Don't forget to poke the photos to enlarge!
Showing posts with label egg carton rocks/bricks. Show all posts

Tuesday, January 7, 2014

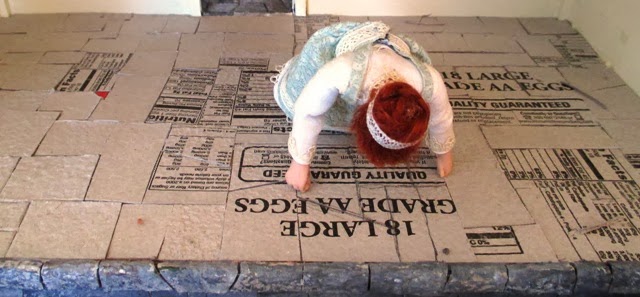
First Floor. Everybody Off!

Back to having eggs for breakfast for a while.  I am running out of cartons.

I do still have the trays from the theater, but they are really rough. 

I laid the bottom floor this morning.
Here's a bit more detail on how I go about it.  In the first photo you see a large piece that will be cut up and turned into this...

I started along the left wall and was doing the "one piece at a time" school of cutting....Then I decided to streamline it for a while. 

This method wastes a bit of the carton, but it is much faster.
First I trim down a larger piece of the egg carton so that it will fit exactly into a space.

Then in the first two photos, I simply cut it up into pieces and glued them in.

That way is OK if you know what you are doing and have done as many of these floors as I have, but I realized that some of you are just starting out at this.

In the  third and fourth photos, I cut the piece to fit where I wanted it.  Then I laid it in place and drew some lines where I thought it should be cut.
Notice, none of the pieces are the same size and they don't necessarily run in the same direction of the grain of the carton.  That gives it a bit more variation in the texture.

I then take it out and cut one piece at a time and glue it in place.  Once in a while you need to trim off a sliver of carton here and there to make them fit just right.
"You got EGGS on my floor!"  There's always something for Tessie to complain about. 

She knows very well that it isn't going to look like this when it's finished.  Heaven forbid that she would wait until I was done, to see what it looked like, before complaining.

Oh well....I am just going to go get a stylus and a crochet hook and start doing the seams between the stones now.  Before I do, I shall stuff a couple of chocolate peanut butter cookies in her mouth.  That will keep her amused for a while.

Back to the stylus.

See you tomorrow.

Tuesday, June 4, 2013

Rockin' It...

People
asked if I was going to frame it...I did.

Probably not the way that they thought.  I like rocks.

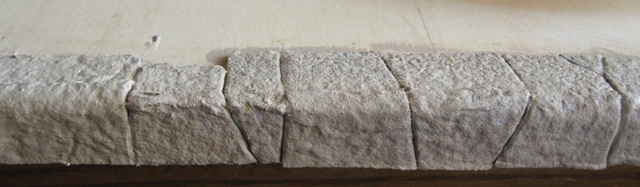
So...Back to the egg cartons.  In order to make the rocks around the window dimensional, I doubled the egg carton.  I used the edges that curl and folded them lengthwise, so as to make them thick.


I glued them around the edge of the window, cutting to fit as I went.

When I was done with that, I didn't like the woodwork...So I covered that with a single thickness of egg carton, using the rolled edge at the top to cover the wood.

I know it isn't conventional to have wall to wall pink carpeting with the stone, but I like it.  So, for the time being, I am keeping it....It may disappear later.  It's not that difficult to replace if need be.
 After I got the stone in place, I used the head of an aluminum crochet hook(wet) to mash down the edges between the stones.

In the photo, the left side is mashed.  The right side is not.  It really does make a difference in the end.
I used a pallet of black, white, burnt umber, brown gold, and sage green to color the stones with washes.

That's as far as I have gone this morning....

Lots of other work to do.  The witches will be coming tomorrow.

See you then.

Wednesday, August 29, 2012

Fingerpainting Can Be Fun.....

OK.  Here we go!

This is the pallet that I used.  If I were going for gray rocks, I would have Ceramcoat Hippo Gray on there too.

Since I am going for rocks that are from the same quarry as the chimney stones, I used Trail Tan for my base coat instead.

My pallet is, from the Antique White at the top, clockwise, burnt sienna, trail tan, Wedgwood green, red iron oxide, and charcoal.

They are all Ceramcoat.  That's the paint that I use most. Better coverage than most.

The only paint that I use straight out of the bottle in color is the base coat.  I still added a little water....Needless to say, a little thicker where the writing was on the egg carton.

I painted an area about 8" long.  I don't want to do it all at once, because I want to work in the wet paint.  It blends better that way.

As you can see from the pallet, the rest of the colors are a free for all.  I keep putting more color on the brush without rinsing.
Here, I have put on, in this order, Wedgwood green, brunt sienna, red iron oxide and charcoal...Each color is mixed in the center pallet, picking up some of the previous color.  I don't necessarily mix them together on the brush.  Sometimes they are pretty well blended. At other times I deliberately load each side of the brush with a different color.... That way I don't get so much spotting of color.

I mentioned my most important tool in the title of the post....

If you are squeamish and don't like to get your fingers in the paint, don't look at the last photo!

Of course you could use a paper towel or tissue to dab at the wet paint, but the secret is, the fingers can get into places where towels and tissues can't.  And fingers don't steal paint from the surface like absorbent towels or tissues.  You need to keep the moisture on the wall, not take it off.

Hey!  It's acrylic paint.  It comes off with soap and water!  No problem.

Basically, all I can tell you is, I go at it as if I were doing a painting of a wall.  Add the colors a soupy wash at first and sparingly.  It's better to apply too little and build up than it is to get it too wet and have to wait to do more.

The last color to go on the brush is the antique white.  Again, I don't rinse the brush.  That way you aren't getting glaring white.  You are just getting a hint of highlight.  It is like the sun is shining and the highlights are just barely touching the outer bits of rock...I do use the fingers on this too, but lightly.

By the way, I don't use straight black.  I use charcoal because it is easier to blend in with the other colors and doesn't get as muddy as black does when you blend it.  It's just a personal quirk.  You can use black if you want to.  As far as that goes, you can use any colors that you like. 

The best way to decide what colors you want to use is to find a photo  of stonework that you like and try to analyze what colors are in the rocks.

On the chimney that I showed you yesterday, I went a step further and did charcoal washes in all of the places where the serpentine stones go up the side.  I did if very sparingly and very weak, but it makes the serpentine design stand out a bit more.

OK.  Now it's your turn!  Have fun!

See you tomorrow.

Tuesday, August 28, 2012

Slowly I Turn.....Step by Step....Inch by Inch....

I am back to turning egg cartons into stone.  I want to get the foundations of both of the Tudor cottages finished.
By the way....Keep every egg carton that you can find.  Our Walmart store stopped carrying regular eggs in the mache cartons last month.  

I don't know about you, but I tend to break a lot of eggs in those silly foam cartons.  They don't protect the eggs at all.

I decided to go into more detail on how I use them.  I hope it's not too late.  I am either going to have to start buying very expensive organic eggs, brown eggs or eggs in the 3 dozen or more sizes to get the cartons. 
The first photo isn't just a record for posterity.  It's to show you how I use them.  The inside is what counts.  It's all bumpy and lumpy.  That's what you need for good rocks.

See how the lip of the carton curves out?  That's the part that makes great corners for rocks.  The flat part is just for pavement. 
I start by cutting off the flat part of the sides with the lips....No corners.

Then I cut them as wide as I need for the side of the foundation in this case.  

The part with the lip curve over the edge and the main piece covers the side.

The piece that I cut off of the bottom is used to form the top of the rock on the top of the foundation. 

In the second photo, you see all the steps, beginning with the cuts. I take a strip of the curved side piece and cut it, at random into odd pieces.  Those get glued to the side first. 

Then I use the piece that I cut off to do the tops, matching up the cuts on the sides and the tops.

The next step is done with my handy dandy, metal #00 crochet hook.  The point of that size is perfect for sculpting the stone. I figure that there is more of a chance of you having a metal crochet hook that size or a little larger, than there is of you having the right size of ball stylus.

I wet the head of the hook and press down hard on the mache.  You don't want the material to be too wet.  Just wet enough to make it stay where you want it.  This section that you see has just been done and there is not any sign of water on it. 

A lot of times I will just touch it to the tip of my tongue to get it wet.  That's all it takes. If you get too much water on it, it just goes back to the shape that it was.

See the crack in the center brick? It's not a separate piece.  I simply put the crack in with the tip of the crochet hook.  Same with the brick to the left.

Notice that the seams between the top and sides have disappeared.  I just keep smoothing the edges of the two pieces until the seam kind of seals itself together.

I only have two and a half sides to go, putting stone pieces in place and sculpting them.  That will probably take up the rest of the day.

Tomorrow, I will do a detailed description of how I do the washes.  Here's a teaser.

This chimney could still use a little more sculpting in places.  That's the nice thing about the egg carton technique.  Until I put on the final protective coating, I can go back and keep working.  Even after it is painted.

In case you are wondering where the terrible two are this morning, as soon as they saw the egg cartons, they left.  This isn't their cup of tea...Mention rocks and they run for cover.

Back to work.

See you tomorrow.

Thursday, June 28, 2012

One Tiny Little Problem....

OK.  It took me almost three hours to trim and fit that little bit of paving that you see on the front and one side of the Crooked cottage.

I took the house off of the foundation to do it.  Then, when it the job was finished, I set the house back in place.

Can you guess what the tiny little problem was?

Well.....I only did the paving where the house wasn't.  Not where the house sits on the board.

When I sat the house back in place I went to open the front of the house....I had to lift the front of the house to open the door, clear of the paving stones.   

It was one of those "Duh!" moments that we all have.  Especially in miniature.  Oh well....

It will be easy enough to fix.  I will just lift the house up by the same height as the pavement, plus an extra little bit.  Then the door will open without having to lift anything...I hope.  I am pretty sure.

I just need to get back to it and fix the error.

I am getting absolutely no sympathy from the Terrible Two, plus One...

They told me that I should work well into the night to get it back to a working door.  I think that I may need a lot of support.  The three of them now seem to be working together....HELP!!!
In the meantime, I have to show you the neat assortment of beads that I found at Walmart this morning. 

They were put there just for me.  Or maybe not....  They have quite large holes and will look wonderful on Kumihimo ropes. 

Yes.  I realize that will mean a sidetrack to Kumihimoland.  It's not a problem though.  The Kumihimo is something that I do in the evenings, after the mini work is done.

There are about a dozen different colorful assortments.  Walmart seems to be stocking a lot more jewelry making stuff than they used to.  Some of it, like these, are irrisistable to a beader and jewelry maker.

I must raise the house before I start playing with beads!  Somebody, give me a shove back towards the house.

See you tomorrow.

Sunday, April 22, 2012

The Chimney Rocks!

Every stone is in place! On to the other steps now. The next one is to do the sculpture work with the stylus and Exacto. We won't mention the water and Emery boards. Those are extras.

Tessie is again checking on things. She reckons that the chimney is tall enough....However, "It would look nice with a pot coming out of the top."

She has stopped measuring with Spike now. She announced, this morning, "Forget the Spike thing. Let's just say it should be "Head and Shoulders" above the roof peak." She means her head and shoulders, naturally. I didn't tell her that her head and shoulders measured exactly one "Spike" high!

Here's, more or less what it is going to look like. At least now you can see what I am going for.

Sorry that the photos aren't great. For some reason, that corner is a bit dark this morning. I can't figure out why. The sun is shining and it is 91 degrees outside right now...It may hit 100 today.

As you can see, I still haven't cut the side out of the main building yet. I am trying to decide if I want the hole to go all the way to the top or leave the top closed and put a false door in on the second floor. I imagine that open will win. Easier to see that way...Although I do like the idea of a fat little Hobbit like door to the storage room.

This last photo is just to prove that I did cover the whole thing with stones and to show that the serpentine stones continue all around the stack.

Tessie is trying to get Zar to build her a periscope to wrap around the chimney so that she can sit back there and spy on people....I don't think he is convinced.

By now, he knows that as soon as he does the work, she will look through it a couple of times and start complaining that she can't see everything at once. She is just going to have to peek around the corner instead.

Meanwhile, I am off to get lunch ready and then back to the stones.

See you tomorrow.

Friday, December 16, 2011

The Night Shift.....

OK....Team Tess-Zar were at it all night long. I woke up with a headache from all of the pounding and chiseling that went on.

I suspected that they would ban me from the family room, so I set up a hidden camera in one of the spider plants on the kitchen counter. I set it to snap a photo every 15 minutes. Please don't tell the Terrible Two! If you tattle on me, there will be no more photos of their progress!

As you can see from this first shot, they made short work of the basic shingling....I suspect that there might have been some zapping going on...Plus, they used the largest shingles that they could find and I can't say that they are very careful about lining them up. The words willy nilly come to mind. There has to be a way to suggest to them that they cover the bendy places in the roof....

They covered the cottage with a towel this morning and weighted it down with cans of beans and soup from the cupboard. Under no circumstances, am I to peek. Dire threats were made... Nobody gets soup or beans for the duration...

I solemnly promised that I wouldn't peek. I didn't say that I wouldn't use a hidden camera.

The two of them work a lot like I do. They jumped from the half finished roof to the foundation. They got that covered with rocks, but not painted yet.

I heard them discussing whether or not there was a need for a fireplace of the same rocks. Nothing was decided as far as I could tell.

They have been paying attention. They stole the remainder of my egg carton stash. Reminder to self: "Eat more eggs!"

That was the end of the work for the evening. The photo time stamped 2:15 AM found them on the top floor of the cottage, playing tug of war with a chocolate dripped pretzel. I am not sure why they both wanted that particular one. There were more in a bag a few feet away. Maybe more chocolate on that particular one?

That reminds me. In order to keep them interested, I probably should leave cookies or fudge laying around. I have fudge in the fridge.

Tomorrow I am making Spritz Cookies. I have the stuff to make a couple of other kinds.

I do hope that I have enough to keep them full and working until a couple of days before Christmas....I wonder if, if I suggested it, they could get some of their friends to help. We need to speed up the process, if they want their usual three day Christmas bash. That means more cookies! Lots more cookies! I have to start baking now.

See you tomorrow.

Saturday, June 18, 2011

Throwing Rocks!

OK, the rocks on the foundation are essentially done. I may have to go back in and do a bit of touch up here and there, but otherwise, done.

I was starting on the third side when I took the photo of the pallet(aka paper plate). As you can see, I am not at all neat about it. I start out with the original charcoal gray, trail tan, and antique white, red iron oxide and sage green....Rocks are NOT all the same color of gray. Go look at a rock wall if you don't believe me.

Every rock starts out with a base color and then lighter and darker tones are added to each rock. Probably about half have every color in them. I can't explain exactly how I do it. Each time it is different. If you are just starting out, probably your best bet is to start with the darker shades and dry brush lighter shade over the egg carton rocks. I suggest that your lightest color be put on with a very light touch and all of the strokes running in the same direction. This gives the illusion of sunlight.As an after thought, I decided that there should be a way for small creatures to hide under the structure, if the need arises. I went to work with the keyhole saw and cut into the base. It would have been a lot easier if I had thought of it before I stuck it on the house and stuck the egg cartons on it, but it worked.

The dogs seem to like it. Maybe there won't be any room for strange creatures under there....I wouldn't bet on it though.


I am going to have to work on getting some better photos of the rocks. they look all the same shade of gray in this photo....They're not!I stained some of the half timbers with red mahogany and started playing with them on the open side.

Zar and I are both pretty pleased with them so far.

Tessie took one look and of course wants a house with half timbers now....So soon she forgets. Her cottage, that she turned into a millinery shop, is half timbered....The Witch's Warehouse is half timbered...She's part owner of that one. She is not without half timber.

I ran 1/24 scale chair molding around the opening. I have to figure out what I am going to do on the curves....Another thing to add to my list of problems.

I will think about it much later today. April is taking Walter and I to see "Super 8" this morning and then lunch this afternoon. I am out of here for now.

See you tomorrow.

Friday, July 24, 2009

The Mad Mason Strikes Again....

I am trying to finish the bedroom fireplace today. I thought that I would show you a trick that I use with the egg cartons.

See the little lip that sticks out at the edge of the carton? There is one all around the edge of the top. It is really handy. Don't cut it off when you are cutting up the cartons to save.

This is how you get a corner on the stones. If you look at the hearth that I am working on in the photo, you will see what I mean. The edges are covered, even though the illustration board is about 1/16" thick. I simply cut all of the edge pieces out of that lip. In case you hadn't noticed, the face of the stone is the inside of the box. This is the only place that there is an edge that turns the right way on most of the cartons. If you are careful, you can use this on the corners of buildings and walls by butting another piece of the carton the same length to the edge. It looks like the stone is a solid corner stone if you do it just right.

I noticed that the place in the wall that had a cubby for logs is still showing from when I patched it. I am going to have to do some more to that area so that it isn't showing....Or I could put a large wing chair in that corner. I have gotten pretty good at hiding spots like that over the years. No. Don't start looking for flaws. I told you. I am good at camouflage.

I still have to do some stonework on the inside of the fireplace. How I wish I had decided to change to stone before I put that wall together!

See? I am great at camouflage. All I have to do is bribe Tessie to stand in front of the log cubby place. What flaw? I don't see a flaw. Too bad I can't get her to stand there all of the time. Just bribing her to stand there while I took the photo was worth two pizzas and a keg of bug beer for refreshments for her and Zar while they watch DVDs tonight. They are back in business. Tessie found five seasons of "Buffy the Vampire Slayer" in the top of our closet this morning. Back to the Cat Tree Theatre. Mookie and Widget are banned until tomorrow.

Meanwhile she is pointing out where one of the rocks needs a little more work. Picky. Picky. Picky.

She just told Zar, "When I have a bedroom in Spiderwort Manor, it is going to be waaay bigger than yours! And what is more, I am going to have a fireplace that is twice as big as yours too!" She thought I was out of earshot when she made that statement. She is very confident. I still haven't signed any contracts to build the house. She is going to have to get it in writing before I build it. Quick! Hide all writing implements!

See you tomorrow.

Wednesday, July 22, 2009

A Rockin' Good Time!

I don't have the faintest idea who first thought of the egg carton rocks idea. It has been around more that twenty years. It is the bestest, fastest way to do rock walls that has so far been invented.

I decided to use it on the fireplace in the bedroom. I like it so much that I may just do it in the living room and on the exterior chimney also. I haven't used it for a long time and I had forgotten how easy it is to do. And yes, I am saving the carved surrounds to use somewhere else.

Tessie has "lost" the wand again and has been very bored all morning. I asked her to fetch me a piece of heavy paper. I forgot to specify the color.....Yup. Purple. Rather than search for gray, I got out the Ceramcoat Hippo Gray and painted it. Needless to say, that didn't make her happy.

For any wall or other surface that you want to cover with rock this way, you can apply directly to said wall or cut a template. I choose to do a template for the fireplace since it is already in place and I didn't want to stand on my head to install it. I do use a gray background for this. It makes the process so much easier.

I used the carved fireplace surround as a template. After painting, I let it dry so that it wouldn't curl. Then I proceeded to cut random rocks. In this case, I wanted them to look as if they had been shaped. I used regular scissors to cut the shapes and nipped off the corners. If you have to cut angles, be sure that you have the rough side facing up so that the angles are going in the direction that you want them. For example, I had to have pie shaped pieces to curve around the top. I made sure that the rough side was facing me so that I would get them going in the right direction.


As you can see, I didn't try to make the pieces fit exactly. They can easily be trimmed after they are glued to the template.

I started at the center top and worked out to the bottom of each side. I made sure that the inside of each piece overlapped the paper. That way when I get it glued in place I will be able to glue matching pieces inside the fireplace for dimension.

Tessie is sitting on a pile of the egg carton tops that I have saved. Some people save the bottom parts as well for more curved rocks. I don't. If I ever need those, they are easy enough to collect. You can also save the carry out cup trays from theaters and fast food places. They are a little rougher texture if that is what you need.

Here is the painted surround. I used a pallet of charcoal, hippo gray, trail tan, old parchment, light ivory and leaf green. They are all Ceramcoat. I just dabbed and dabbed with a stiff brush. I don't clean between colors. I will hit the stones with a couple of coats of flat varnish to finish and protect them.

Tessie is now raising a fuss because she doesn't have a fireplace in her cottage. I knew this was going to happen. To quote her,"A witch needs a place to keep her cauldron! Spiderwort Manor is
going to have a big stone fireplace! Is that understood??? After all, it's so easy I could do it myself!".
I replied, "Have at it Tessie!"

I am leaving soon. I have to go to Wednesday Witches mini meeting. I don't want to listen to her complain all afternoon! Sweet relief. I just hope that she doesn't find the wand while I am away...

See you tomorrow.