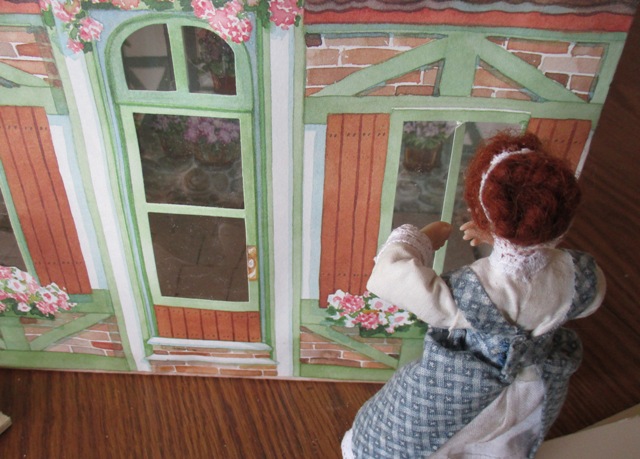
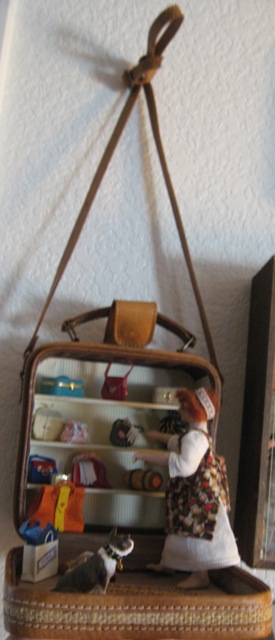
I think that you have seen these bags before, but I have a suggestion for you that works for any kind of mini cleaning...
Take a photo before you start cleaning!
This can save you a lot of time... I used to spend more time trying to remember where everything was supposed to be than I did in the actual cleaning process... This saves time for sure!
This one isn't too difficult to figure out. Simple arrangement and everything goes back fairly easy...
This is a sewing room bag that I did a long time ago. Again, there is not as much to move and dust under as in some of the other boxes, but it still saves time to have the photo, in case something jumps out and rolls across the floor and you can't find it...
This is the bag the made me start doing this. It is from a London oriental shop and has lots of bits and bobs in it.
I can take everything out and dust and still put things back fairly fast. I have added a few things over the years and it doesn't always look the same every time I go to clean.
Anyway... Guess what I am doing this morning? Yup. Cleaning house... Still.
Back to work.
See you tomorrow with clean bags!
Don't forget to poke the photos to enlarge!
Showing posts with label bags. Show all posts
Monday, February 13, 2017
Thursday, August 18, 2016
For the Time Being...
I found a couple of things to put on the side tables.
The first is the bag with the oriental shop inside.
The other was the Walmart gazebo.
I may change my mind several times before I get it right.
I have mentioned the first one before. The bag is from a shop in London.
The doll is one that I purchased at a show here in Tucson. I don't know a lot about her. She seems to be Japanese, from the clothes that she is wearing.
I got a bit more done on Tessie's new chair. That's about it for minis.
I did buy this bunch of flowers at the Dollar Tree.
I am going to use try using them for Wisteria flowers in the conservatory. I think that, if I trim them right and paint them shades of purple, they will work. I can at least give it a try. Back to work.
See you tomorrow.
The first is the bag with the oriental shop inside.
The other was the Walmart gazebo.
I may change my mind several times before I get it right.
I have mentioned the first one before. The bag is from a shop in London.
The doll is one that I purchased at a show here in Tucson. I don't know a lot about her. She seems to be Japanese, from the clothes that she is wearing.
I got a bit more done on Tessie's new chair. That's about it for minis.
I did buy this bunch of flowers at the Dollar Tree.
I am going to use try using them for Wisteria flowers in the conservatory. I think that, if I trim them right and paint them shades of purple, they will work. I can at least give it a try. Back to work.
See you tomorrow.
Thursday, April 21, 2016
A Clean Slate...
OK. I started the floor for the bag this morning. I need to keep one step ahead of the rest of the gang.
I used my usual movie trays to do it. I am actually looking forward to doing something that needs a different kind of floor. I am in a rut.
First you cut piece by piece, so that they all fit together.
As you go, you glue the pieces. I stated at the front edge of the piece of ceiling tile and worked back.
After I got everything on and the glue sort of dried, I took a #7 crochet hook and used the head to pull down the edge of the tiles. Then I put in some extra details here and there with the same instrument.
Yes! It still fits. Now I have to do the painting. I will do that tomorrow. One step at a time and show you what I do, when I do it.
Looking straight into the sack, from above, it doesn't show up much. When it is painted, you will be able to see all of the details.
Tessie and I both think that I am going to have to change the cellophane to some clear plexi. It is hard to see through the cellophane. It is getting old.
We are fighting over furniture to go inside. I want wicker(which I already have made) and Tessie wants a workbench for planting... Which I would have to make from scratch.
I may have to stomp my foot to get my way this time. I don't want to make another workbench. It seems like just about every other project that I do needs a work bench. I am tired of making them. Back to the argument.
See you tomorrow.
I used my usual movie trays to do it. I am actually looking forward to doing something that needs a different kind of floor. I am in a rut.
First you cut piece by piece, so that they all fit together.
As you go, you glue the pieces. I stated at the front edge of the piece of ceiling tile and worked back.
After I got everything on and the glue sort of dried, I took a #7 crochet hook and used the head to pull down the edge of the tiles. Then I put in some extra details here and there with the same instrument.
Yes! It still fits. Now I have to do the painting. I will do that tomorrow. One step at a time and show you what I do, when I do it.
Looking straight into the sack, from above, it doesn't show up much. When it is painted, you will be able to see all of the details.
Tessie and I both think that I am going to have to change the cellophane to some clear plexi. It is hard to see through the cellophane. It is getting old.
We are fighting over furniture to go inside. I want wicker(which I already have made) and Tessie wants a workbench for planting... Which I would have to make from scratch.
I may have to stomp my foot to get my way this time. I don't want to make another workbench. It seems like just about every other project that I do needs a work bench. I am tired of making them. Back to the argument.
See you tomorrow.
Thursday, April 14, 2016
Another Short Door!
The one in the center is one that has the foam core cut to fit inside and the window cut out..
I have done a number of rooms in gift bags over the years, but this one is a little different.
Tessie is already complaining that they made the door too short...
These have a back wall printed on the interior. There are cellophane windows in the front, so you can see the interior. So no cutting of a window in the front. People are going to have to peek in the windows to see what is going on inside.
A friend sent me four different styles of these a few years ago. I know I will never do four of them, so I took them with me to Wednesday Witches, yesterday.
I talked three other witches into joining me in bag, room box making.
It has a slate floor at the bottom, and shelves with baskets of flowers. I think that I will turn it into an indoor garden room.
I have my work cut out for me... Or should I say, my work will be cutting out. I am going to cut out the pieces for the floors and walls for everyone. The floors will be ceiling tile and the walls foam core. Easy enough to do. I may as well since I have the material and tools.
So... Back to the saw and Exacto.
See you tomorrow.
Tuesday, March 29, 2016
Plugging Along... At a Snail's Pace...
Sooner or later, I will get the room finished. It's not going to be today...
I did find this Oriental Shopping bag from London. Cleaned it up and took a photo...
Everything inside is either stuff that I have collected over the years or things that people have brought back from trips to the orient.
The doll is one that I found at a doll show here in Tucson. She is not quite in scale, but she has always stood beside the bag, since I got her.
She and the bag are once more in the living room where they can be seen.
The basic bag is easy to make. It is simply one of the rectangular shopping bags. I built a box of foam core to fit inside snuggly. Then simply decorated it as I would any small box. They can be painted or papered. If you want to protect the things inside, simply cut a piece of clear plastic to go in the front of the box, behind the window.
Here's proof that I still have a couple of holes in the bookcase to put stuff in... Please don't look at the right side of the photo. It's another view of the piles in the first photo.
And while I am doing the cleaning... Tessie and Zar have rejoined MY party. This is sooo unfair.
I realize that they are happy for me... But do they have to rub in the fact that I am too big to go to my own celebration...
I think that I am going to have to make a mini me. The only problem is, it would be hard to tell which one was Tessie and which one was me!
I am going back to cleaning. I have the Wednesday Witches coming here to celebrate tomorrow. If I can't fit in the tiny party I will have a big one of my own... And they can't come. They are too small! They might get stepped on... Deliberately!
See you tomorrow.
I did find this Oriental Shopping bag from London. Cleaned it up and took a photo...
Everything inside is either stuff that I have collected over the years or things that people have brought back from trips to the orient.
The doll is one that I found at a doll show here in Tucson. She is not quite in scale, but she has always stood beside the bag, since I got her.
She and the bag are once more in the living room where they can be seen.
The basic bag is easy to make. It is simply one of the rectangular shopping bags. I built a box of foam core to fit inside snuggly. Then simply decorated it as I would any small box. They can be painted or papered. If you want to protect the things inside, simply cut a piece of clear plastic to go in the front of the box, behind the window.
Here's proof that I still have a couple of holes in the bookcase to put stuff in... Please don't look at the right side of the photo. It's another view of the piles in the first photo.
And while I am doing the cleaning... Tessie and Zar have rejoined MY party. This is sooo unfair.
I realize that they are happy for me... But do they have to rub in the fact that I am too big to go to my own celebration...
I think that I am going to have to make a mini me. The only problem is, it would be hard to tell which one was Tessie and which one was me!
I am going back to cleaning. I have the Wednesday Witches coming here to celebrate tomorrow. If I can't fit in the tiny party I will have a big one of my own... And they can't come. They are too small! They might get stepped on... Deliberately!
See you tomorrow.
Thursday, August 27, 2015
Here's Your Backpack... Now Go!
This was the scene just a little while ago...
Things, with Daisy working on the house just weren't working out...
She just doesn't understand building... She is great when you want to go someplace in a different time, but no concept of hammer and nails...
Finally, I asked her to leave. I told her that I would finish her house...
I thought that would be an out for both of us...
There was a string attached to her departure...
She explained to me that her last trip back was a hurried one and she lost all of her luggage in the rush to stay alive and in one piece... Something about Morlocks?
She allowed that, if I would lend her some luggage and a back pack, she could go...
Luggage? Sure. Coming right up. I have several sets all ready to go.
Backpack. Not one in site.
She said that was OK. She could co some more house building whilst I made her a new one.
OK. Backpack? From scratch?
Toilet paper roll. Of course.
It is the same idea as the tampon purses... Just larger.
I went and grabbed a toilet paper core and some scissors. Started chopping and in no time I had a backpack started.
You could make it any size that you want. Daisy's was about 1 1/2" tall and an inch wide. The pleat in the bottom took up about a quarter inch fold.
I took a tan glove that was fine suede on the inside and used that for the outside. I glued a piece to the outside of the main piece. Then I trimmed it flush with the edge of the form.
I cut two pieces to fit in the sides and glued them suede side out to the sides. It is easiest if you do the bottom first and then one side of each and the other side of each last.
Then I cut 1/8" strips of a darker suede for the straps and the fastener.
I fit them on starting with gluing the upper part of the strap under the flap for the bag.
Then I made the loops the right size by fitting them to Daisy. That was the difficult part. She is ticklish!
As you can see from the above photo, I glued those to the back of the bag and then glued a diamond shaped piece over the strap ends and the end of another piece that becomes the closing.
While I was doing that, Daisy and Tessie got things together and got the time machine ready to take off.
I went in to take a photo of the send off. In the one at the top of the blog, you can see the backpack better...
Soon after this photo, Daisy was on her way...
Without her around, hitting her thumb with the hammer and saying bad words, I think that the work will go a bit faster... I will miss the flashing lights of the time machine in the living room.
I think that the work will go faster with only one tiny witch supervising. We shall see...
Back to work.
See you tomorrow.
Things, with Daisy working on the house just weren't working out...
She just doesn't understand building... She is great when you want to go someplace in a different time, but no concept of hammer and nails...
Finally, I asked her to leave. I told her that I would finish her house...
I thought that would be an out for both of us...
There was a string attached to her departure...
She explained to me that her last trip back was a hurried one and she lost all of her luggage in the rush to stay alive and in one piece... Something about Morlocks?
She allowed that, if I would lend her some luggage and a back pack, she could go...
Luggage? Sure. Coming right up. I have several sets all ready to go.
Backpack. Not one in site.
She said that was OK. She could co some more house building whilst I made her a new one.
OK. Backpack? From scratch?
Toilet paper roll. Of course.
It is the same idea as the tampon purses... Just larger.
I went and grabbed a toilet paper core and some scissors. Started chopping and in no time I had a backpack started.
You could make it any size that you want. Daisy's was about 1 1/2" tall and an inch wide. The pleat in the bottom took up about a quarter inch fold.
I took a tan glove that was fine suede on the inside and used that for the outside. I glued a piece to the outside of the main piece. Then I trimmed it flush with the edge of the form.
I cut two pieces to fit in the sides and glued them suede side out to the sides. It is easiest if you do the bottom first and then one side of each and the other side of each last.
Then I cut 1/8" strips of a darker suede for the straps and the fastener.
I fit them on starting with gluing the upper part of the strap under the flap for the bag.
Then I made the loops the right size by fitting them to Daisy. That was the difficult part. She is ticklish!
As you can see from the above photo, I glued those to the back of the bag and then glued a diamond shaped piece over the strap ends and the end of another piece that becomes the closing.
While I was doing that, Daisy and Tessie got things together and got the time machine ready to take off.
I went in to take a photo of the send off. In the one at the top of the blog, you can see the backpack better...
Soon after this photo, Daisy was on her way...
Without her around, hitting her thumb with the hammer and saying bad words, I think that the work will go a bit faster... I will miss the flashing lights of the time machine in the living room.
I think that the work will go faster with only one tiny witch supervising. We shall see...
Back to work.
See you tomorrow.
Wednesday, August 1, 2012
Bags in a Bag...
This was very fast. I found some paper backed wood flooring scraps in my stash. I cut a piece to fit the inside top of the purse and one for the hinge and back part. That turned it into the floor of the closet.
Then I found a piece of real sized wallpaper to fit the inside back and sides. I cut it just by pushing it into the purse and bending it where it needed to be cut.
When I got it in, I didn't like the color of the stripes, so I painted it Antique White with Ceramcoat.
I trimmed out the flooring with leftover strips.
Then I added strips of leather to cover the edges.
I cut shelves from 3/32" basswood, a little shallower than the body of the purse and trimmed them with a strip of cove molding on the front of each shelf.
Those were also painted antique white.
Basically, that was it.
I pounded a nail in the wall...Filled the thing with some of Tessie's bags that were scattered all over the house.
She immediately moved in. I expect that to keep her happy for a day or two.
I have to go to the mini meeting this afternoon. She sabotaged herself. By putting in shelves, she can't hide inside and go along to the meeting...Too bad...
I have to go get ready now.
See you tomorrow.
Then I found a piece of real sized wallpaper to fit the inside back and sides. I cut it just by pushing it into the purse and bending it where it needed to be cut.
When I got it in, I didn't like the color of the stripes, so I painted it Antique White with Ceramcoat.
I trimmed out the flooring with leftover strips.
Then I added strips of leather to cover the edges.
I cut shelves from 3/32" basswood, a little shallower than the body of the purse and trimmed them with a strip of cove molding on the front of each shelf.
Those were also painted antique white.
Basically, that was it.
I pounded a nail in the wall...Filled the thing with some of Tessie's bags that were scattered all over the house.
She immediately moved in. I expect that to keep her happy for a day or two.
I have to go to the mini meeting this afternoon. She sabotaged herself. By putting in shelves, she can't hide inside and go along to the meeting...Too bad...
I have to go get ready now.
See you tomorrow.
Wednesday, April 4, 2012
I survived JoAnn's!
I'll bet that you thought that the bad JoAnn's people got me....Nope. We won. I am not telling you what Tessie did, but let's just say that they won't mess with her again! We got the paint replaced.
I then came home and baked brownies. Unfortunately I only painted a couple of walls in the Weaver's Workshop while those were baking.
The Wednesday Witches came for the afternoon. I never seem to get minis done when I am they are here. I am too busy talking, eating and generally having a good time. No concentration whatsoever....
Sorry to be so late, but I had to clean up after all of the messy witches after they left. Sometimes we get a bit unruly.
I decided, since I didn't have any new minis to show you, I would show you some closer ups of the "Neal Street East" Oriental shop in Covent Gardens in London.
Actually, the real one is much larger than this...This one is done in one of their bags. I carefully folded and carried several shopping bags home from the trip. Bags are great for making little glimpses of a favorite vacation spot.
The real shop is more like a bazaar or marketplace. There are many wonderful things to see there....It seems to me that someone told me later that the shop had closed. I can't confirm it, but if they did it is a shame.

I then came home and baked brownies. Unfortunately I only painted a couple of walls in the Weaver's Workshop while those were baking.
The Wednesday Witches came for the afternoon. I never seem to get minis done when I am they are here. I am too busy talking, eating and generally having a good time. No concentration whatsoever....
Sorry to be so late, but I had to clean up after all of the messy witches after they left. Sometimes we get a bit unruly.
I decided, since I didn't have any new minis to show you, I would show you some closer ups of the "Neal Street East" Oriental shop in Covent Gardens in London.
Actually, the real one is much larger than this...This one is done in one of their bags. I carefully folded and carried several shopping bags home from the trip. Bags are great for making little glimpses of a favorite vacation spot.
The real shop is more like a bazaar or marketplace. There are many wonderful things to see there....It seems to me that someone told me later that the shop had closed. I can't confirm it, but if they did it is a shame.
Most of the things in my version are Asian treasures that I have collected here and there over the years.
Someday I may turn it all into a real room box, but until that time, this is a fun way to store the pieces and show them off at the same time.
The little antique Japanese doll is not really to scale, but as long as Tessie doesn't stand beside her, it's not noticeable.... 
I am not sure what Tessie said to her, but she disappeared. Tessie is now boasting about owning an Oriental shop.....
By the way, the fancy oriental shelves with the golden dragons on the corners? Plain hand built shelf. Painted with Red Iron Oxide. The golden dragons used to be the outer frame of a mini Japanese lantern. There are six to each lantern. I have enough for two more shelf units.
I am off now to finish cleaning up after those messy witches.
See you tomorrow.
Monday, May 23, 2011
The Old Bags......
I thought that I would put on some of my older bags, just to show you what variations you can get with Tampax, among other things. You really don't need much in the way of materials. None of these took over six inches square of material....I will not claim responsibility if your man finds a hole in his best silk tie or his old, soft leather gloves!Don't forget to poke the photos to make them larger.
We'll start small. Three of these bags can be made with Tampax. The two Turquoise silk ones and the red leather one are just that.(No neckties or gloves were harmed in the making of these.)
The tube was just cut in a different shape on the two flat ones and the barrel one wasn't squashed. The instructions for that one are here... http://caseymini.blogspot.com/2008/03/barrel-bag-tutorial.html It was one of the earliest tutorials on the blog. The larger one was done with card stock, covered with fabric. There are also instructions for the shoes in a couple of different places too.

Here's an assortment of all different kinds. Some of them open and are lined. Those would be the black satchel on the top, the cream leather at the bottom left, with matching wallet and the one next to it with the open mouth. Oh! And the one next to that has drawstrings that actually work.
Since I am on a purse kick, I took out my shadow box with all of the purses. It needed refurbishing.
Tessie kept hinting that she would appreciate it if I left the glass off of the front when I was done, so that she could change purses more often....Not a chance.
Did I mention that I actually carry one of these around in my car at all times. It hangs over the cigarette lighter that has never been used. Hey! I had to make it useful somehow.
Some of the other purses in this photo and the one before are made over a piece of foam core....I will show you how to do those tomorrow.
Right now I am finishing the laundry and cleaning up after a messy weekend.
See you tomorrow.
Tuesday, November 16, 2010
Emergency!!!
This morning Tessie tripped over a loose floorboard and broke her leg again. I was going to take her to the emergency room, but Zar saw what was happening and announced, "Please! I am a physician when I am not inventing time machines and such. I can fix this!....Hmmmmmm...Now where did I put my bag?"
After a quick search, I volunteered to whip him up a new one...Time was wasting.
I grabbed a piece of thin black leather, a small oblong of foam core board, some glue and scissors and went to work.
The foam core was 1/2" by 1 1/4". I cut a piece of leather at 1 1/2" tall and a length that would fit around the foam core, with just a bit of an overlap.
I beveled the foam core. Then I ran a line of glue around the outer edge and stuck on the leather a quarter inch from the bottom, starting in the center of one of the long sides.
Next I mitered the bottom corners to eliminate bulk and glued the flaps to the bottom of the foam core.
I overlapped the seam and glued it. Then I cut an extra piece of leather to cover the bottom and glued it in place.
At each end of the top, I folded in a triangular area to form a pleat. I put glue on the inside of the bag to hold it in place.
Then I folded over and glued one long edge of a piece of leather, then trimmed it to about 1/16" for the handles.
I edged the top of the bag with more leather, but it isn't totally necessary. Then I cut a flap to close the bag and glued it with the flat end on the back where the seam is and flipped it through the handles and glued the pointed end to the front.
I put a piece of gold paper on the tip to indicate a fastener. That's it. Almost instant doctor's bag.
You can line these bags and leave them open at the top if you wish to put something inside.
Anyway, disaster was averted. Zar got a new bag and Tessie's leg is like new. She has been bouncing all over the place. If she keeps it up, Zar is going to have to re-set it!
She keeps singing, "I'm alright....Don't nobody worry 'bout me!". I don't think that is the result of the new leg......She watched "Caddyshack" last night.....Twice....Now she has me singing right along with Kenny Loggins.
See you tomorrow.
Thursday, July 29, 2010
This Tape Isn't Sticking.....
I found it at an antique sale in Fort Lowell Park, years ago. It's the only one like it that I have ever seen. One of my favorite things.
Anyway, I took the spool of tape away from her in exchange for making her a new purse.
She specified spiders. "It has to open, so that I can carry things in it. Not one of those faked ones that just looks like a purse."
As usual, if you want to see things better, poke the photos.
You could make the purse any size and shape that you want it to be. It is basically 8 pieces of card stock and some fabric. Oh and a little bit of trim.
On the left is the pattern that I made. You want the back and the front of the purse the same size and shape. the bottom is a narrow strip to give it depth and the top flap is whatever shape you want it to be. It is 3/4" wide.
I cut out two pieces of each shape from card stock. The outside pieces were glued to the underside of the fabric with a small space for bending, between. The inside pieces are trimmed a bit smaller and covered individually with the fabric. The edges are wrapped to the back and glued down.
The two paddle shaped pieces on the right are the sides of the purse. They are simply folded over, glued and cut out. No card stock in them. They need to be flexible.
The tongue of these pieces are glued to the center bottom of the outside and the inside piece of the same shape is glued over them. Next the back inside is glued, catching the back of the side pieces between interior and exterior with glue.
The lining of the top flap is glued in place. The photo with the clips is showing how it looks when it is this far along.
Next you do the same with the front edge. Glue the interior to the side pieces, facing in, and then pull up the front exterior piece and clip. Take these stages one at a time and don't try to rush. Let the glue dry on one step before moving to the next step.
When you have the body of the purse together, You can trim it however you like. I used #5 Perle cotton and ran it around the edges as cording. I ran a piece inside the cover and around for the handle, gluing the ends inside.
I put a tiny piece of Velcro on the flap and body to close the purse.
Tessie is now happily running around the workroom experimenting with what will fit inside.....Ungrateful, as usual, she is whining and whinging, "It needs to be bigger! I can't get anything worthwhile in it." This statement was made while trying to stuff a mixing bowl, two ladles and a straw hat, side wise in the bag....Non of it stayed inside.
I guess it's back to the drawing board. Bigger purse, coming right up.....I am not stupid. If I make it big enough, she won't be able to lift it. I hid her wand so she can't zap it. I win.......For now anyway.
See you tomorrow.
Subscribe to:
Posts (Atom)