Don't forget to poke the photos to enlarge!
Showing posts with label bed tutorial. Show all posts

Thursday, November 13, 2014

Non Foaming Foam...

This is why you shouldn't use thin foam to pad minis... Granted, it lasts a few years, but then it literally dissolves into dust!  Beware!

This is what is left of the foam on the green bed that I showed a few days ago. 

All gone... It only lasted about five years and this is what it looks like after about 20.
 I got in a bed mood this morning... I went into bed mode and tore the green bed up. 

I put a flat skirt around the bottom by cutting a long piece that would wrap around the bed and over lap by about a quarter inch. 

Then I glued a small hem on one long side.  That piece, in turn, got glued to the block.

The block on this one is several pieces of foam core cut  2 1/2 by 3 1/2 inches.  This bed was made before I knew about ceiling tile.

The pillow is a separate piece.  Simply rolled material.  It can be stuffed with batting, if you want fluffier pillows.  I didn't bother on this one.  I simply glued a hem in on each end and rolled and glued the end of the center to the layer beneath.  It will be glued in place over the head of the bed.

Here's another way to make a 1/2" scale bed skirt.  This one is handmade bobbin lace that I simply glued in place, over the muslin.

The base for this bed was two thicknesses of ceiling tile. 
Here you see the green bed finished.  I cut a piece of cardboard in the shape that I wanted the headboard and covered it with material that matched the bed skirt. Then I overlaid that with a scrap of antique lace.  That piece was all I had left.

I cut the quilt for the other bed from some fabric that was printed with photos of real quilts.

I still need to work on this one some more.  Thus the two drawers full of spindles.  I need to make a headboard.

That's all I have done so far.  I need to get back to work. 

See you tomorrow.

Friday, February 8, 2013

"No! No! No!"

"This will not do at all!!!".  That was Tessie wailing, when she got a look at what I did to the Warren Dick bed...

I tried it out and found that the mattress from my first bed was a perfect fit.  As was the over shot woven coverlet(in cross stitch).

I did a mixture of what was on that bed and what was on another mattress that I found in my stash...

The only problem was hers, not mine.  If you look closely at the sheet, you will see MY monogram on it in embroidery.  Evidently, Tessie has, once again claimed something of mine.
I am not necessarily going to use these sheets and coverlet.  I was just trying them on for size.

After this photo, Tessie did her usual bed test... AKA trampoline testing... There was no way that it was going to hold up to all that jumping...She fell through both the bed and the trundle underneath.


I didn't really mind.  I had plans to restring it anyway.  The original was done with plain, white, soft cotton kitchen twine.  It didn't look a whole lot like the hemp rope that they used to use for these beds.

Sooo. I cut it off and found some nice hemp rope.  It's jewelery twine that I use for micro macrame jewelry.

I measured and cut one long piece and tied a double knot in the rough end.

There is a smooth and a rough direction in this kind of thread.  You want the smooth end as the one that you will pull through all of the holes.  If you don't, it will fray. I tied a double twisted knot in the string and put that in one corner and then went back and forth through the holes crosswise.  Then continuing on around the corner of the leg, at the headboard corner, I went in the other direction, weaving as I went.

Holding the thread tight against the frame at each pass and the weaving, makes for a very nice tight grid to put the mattress on.  When I got to the end, I tied another double knot around a pin, held close to the frame.   Now Tessie can jump on it as much as she wants to.  It won't come loose...Well a least not for a while.

The photo doesn't show the color well.  It is about the color of sisal rope.  Below it, you can see the stuff that was on it.  Very unsatisfactory.

I am now going to go see what I can find to dress the bed.  I need another mattress for the trundle.  I have enough sheets and pillows, if Tessie will let me use my monogrammed sheets.  I have a feeling that she will want those to go on the trundle, so that nobody can see the initials.

Anyway, back to work.

See you tomorrow.

Saturday, July 21, 2012

Roped and Hog Tied....

I got up this morning with intentions of finishing the rope bed in a hurry....Not to be.

I just didn't like the way it was swaying.  Not enough bracing and the ropes were going to warp it even further.  I think that's the hazard of turning this one into the mini. 

I decided to put a bit of extra bracing under the rope area.  I know it's not authentic, but I am not to worried about the bed police coming to take me away.  By the way, I used #5 DMC pearl cotton for the rope.
Not too long after we got the bottom braces stained and the ropes laced, stretched and tied, I heard wailing coming from Lettice's room.  I went to look and found that somebody pilfered her mattress.  I told her not to panic and that I would find the culprit and return it to her.

Then I went to get it.  I knew immediately where it was.
Nellie bribed Zar to get it back for her new bed.

Thank goodness for one of a kind beds in different sizes.

The mattress was a wee bit too large.  I absolutely am not going to remind  her that the coverlet is removable....Let's just let her think that she will have to make a new one.

Don't you dare tell her either!!!

Meanwhile, I am going to have to go make another mattress and put her to work on a coverlet.

Back to work.

See you tomorrow.

Sunday, June 3, 2012

Confined to the Bedroom....

Why do I do these things?  I talked myself into rearranging the furniture in the bedroom....Our real one.  It takes two people and a small horse to move the bed alone.  While I was doing that, I did laundry...Multi-tasking can be fun?

I finally finished everything about 1:00PM.  Then Tessie reminded me that we still had a blog to write.  Thanks a lot, Tessie.

I told her to get to work.  If she wanted me to write, she was going to have to do the task at hand.  I was too tired to wield the needle

Surprisingly, she went to work.  I did the guidelines on the back of the mattress.  I used a piece of cardboard that separates the layers of cat food cans in the Fancy Feast cat food.  Yes.  I save those.  They are unprinted, come a couple to a box and are a little heavier than the cardboard that is for outside boxes.

The piece was 3" by 6" with just a hair shaved off of two edges to allow for the fabric wrap.

I pierced each hole in the cardboard with a sharp needle.

Then Tessie threaded a little smaller needle with two strands of embroidery floss and went to work. She stabbed straight down through the layers of cardboard, batting and muslin.

It was something to watch.  she had to flip the mattress over and poke through the muslin, batting and try to hit the same hole.  If she couldn't find it by feel, she had to flip up the muslin and batting to see where the hole in the cardboard was.

You will notice that she started in the center and worked out. She pulled tightly on the back side to make it padded. 

If you do it, you may want to use a glue stick to make the batting stay in place on the card or cut it a little bigger than the card, trimming after stitching.

Then all you do is trim it a bit and pull the extra material around to the back of the cardboard, miter the corners and glue it down.

She claimed to be as exhausted as I was after she finished. 

She borrowed Cordelia's cat and tried it out.  He only comment was...."It's not as soft as marshmallows and furthermore, as a snack, it lacks a certain something..." 

Did I mention that I made a huge mistake?  I let Tessie in the room when I started dragging the house kits from under the bed. Thank goodness, she only saw the Magnolia....When she saw that one, I thought that it might be a good idea to leave the Harrison and the Sweetheart cottage under the bed until she left...

As it was, she was in a snit because I had been "hiding" that one.  I wasn't hiding it.  She just forgot about it. 

It will take a few days to get her mind off of it.  By the time I finish the present two cottages, she will have forgotten it altogether.

It's funny.  I think that I am bad with the attention span of a six year old....Then I see her and I feel better.  Hers is about the length of that of a goldfish....I heard that there's is around two seconds....Yup.  I feel much better now.

Now where was I?  Oh!  I remember.  See you tomorrow.

Saturday, June 2, 2012

All We Need Is Marshmallows....

I started the "Monastic Canopy Bed" this morning.

All you have to do is build a box.  It was all built from 1/16" bass wood.  The bottom and top pieces were 3" by 6".  The ends were 3" by 1 3/4".  The sides were 1 3/4" by 6 !/8".

I cheated and stained those boards and the trim with Minwax Red Mahogany before assembling.

That way there will be no problems with the stain not covering glue spots.

I assembled the box in my gluing jig.  It was a bit tall and in a couple of spots I had to stack the magnets to keep it straight.

I put some strips of wood on the inside to hold up the top about a quarter inch down.  I didn't glue the top piece in....just in case we want to hide something in there.  I guess I should drill a hole in one corner so that they will be able to lift the top out of the frame, if need be.

I used small chair rail for the trim.  It was also stained before it was put in place.

Since Tessie insisted on helping, I had more suggestions than I needed on procedure. First she was worried about  the thickness of the mattress.  I explained that their mattresses were more or less a thick quilt and not a foot deep, like some of the ones now. 

She allowed, "Oh well.  I won't be sleeping on it anyway, so I don't even care how thick it is." 

I do hope that I was lucky enough to record that statement.  You heard it here.  She doesn't want to live there!  I am going ot hold her to it.

Her next helpful hint was a bit scary...."You know, if you made it a little longer, it would make a good coffin, maybe for Zar the next time I get mad at him...."

Bad Tessie!

Then  she proceeded to test it out....As you know, her way of testing is to jump up and down on any bed I make.  If it makes a good trampoline substitute, it is ready for use.

This one didn't pass...."This is way to hard to sleep on.  If I can't even get a good bounce on it, you may as well scrap it and start over."

I answered, "Tessie, you know that all it needs is a good mattress..."

Tessie countered with, "No...All it needs is a few Jet Puffed Marshmallows!  Where'd you put the bag?"

The last I saw of her, she was elbow deep in the cupboard where I keep the baking items...I didn't have the heart to tell her that she finished them off a week ago, last Tuesday....Nope.  I didn't buy more.  I am still scraping them off of the furniture where she had used them to sleep on that day. 

She refuses to go back to the house that she got from Cordelia.  She has all but abandoned it and she keeps talking, under her breath, about a new mansion....

I am going somewhere now, where she isn't, and lie down for a bit.  Please don't tell her where I am.

See you tomorrow.

Thursday, June 30, 2011

Fast, No Sew, Pillows...

I am not in the mood for sewing, so I decided to do no sew bed pillows. Please follow me for instructions. Here we go. Don't forget to poke the pictures.

Get out some Aleene's Tacky Glue, sharp scissors and tweezers.

Find some cotton fabric that you like and some low loft quilt batting. Don't try fluffy quilt batting for this one. It doesn't work as well. Trust me....

Cut a piece of batting three times as long as the width of the pillow that you want to make. I cut these 3 3/4" long and 2"wide The result is a 24" by 15" Pillow in real life. When the batting is folded in thirds, the mini pillow is 1 1/4" by 2".

Next I cut a piece for the outside from my striped cotton. I made that piece wrap around the pillow with 1/2" extra on the raw edges all around. If you are lucky, you will find some fabric with a nice salvage like the one that I am using. If not, allow enough on one long edge for a glued hem. Glue the hem under if you have to do it this way.

Here's the tricky part. If you are doing this for the first time, I suggest that you get out an iron and turn under the three edges by pressing in one long edge(this will be folded in half) and two shorter edges in 1/4" only. You will need the extra for ease around the pillow.

Starting at the long edge, put glue on the folded edge that is turned down...See photo. Do not glue it to the inside of the pillow. Allow the seam to stay free of the pillow. It will look like the second case in this photo on the inside.

Next, glue the side seam the same way. Again, glue selvage to selvage....Not to the inside of the pillow. I did this seam half at a time to make sure that it didn't stick to the inside of the case.

When that is finished and dry, take a pair of tweezers and put the pillow form between them all the way to the other end of the pillow. This is the easy way to get the batting in, without messing it up. I learned the hard way that you can't just stuff it in with your fingers.

When it is all the way in, you can use a skewer or the points of your scissors to make sure that the corners are in correctly.

Last step is to put just a couple of dots of glue along the inside edge and pinch the edges together. This makes the fabric look like it has some weight. It doesn't stick up unnaturally.


I put up the curtain next to the bed. I did this by gluing the top of the curtain to a strip of wood, above the bookcase. Then I glued the curtain to the bookcase side. I put a piece of molding across the front of it to hide the top. When the roof is in place, the top will never be seen again.

As soon as the glue was dry, Zar started putting things in the shelves. The nice thing about the pillows is, they are scrunchy just like real ones. He can bend one to shove under his elbow whilst he reads.

I may have difficulty doing anything else in the bedroom today....I guess I should move on to the living room or kitchen now...

Tessie's nose is, once again out of joint. She is putting the screws to Zar for another week worth of Casey rental....He isn't going for two cookies, one muffin a day plus "expences". Who knows what she will consider expenses if he says yes...?

She is sitting in his living room pouting. Let them work it out. I am going someplace that is not here, now.

See you tomorrow.

Monday, June 27, 2011

Get Off Of My Bed!!!

Bed making 1o1....I decided to work on the bed this morning. Everything in the bedroom end of the trailer is done except for the floor now.

This is my usual way of bed making. It all started with a class from Judee Williamson way back in the early 80s. She is a great teacher and I learned a lot from her. Since then I have changed a lot of the methods though.

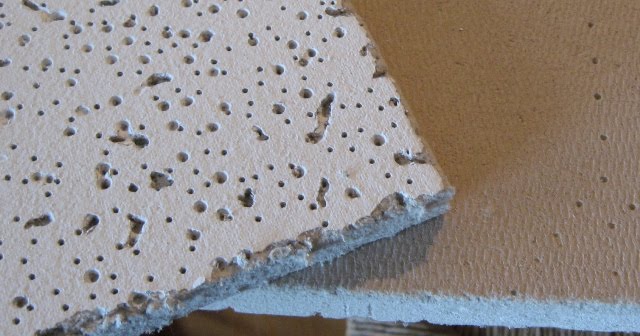
I had a bed block already to go. It consists of three layers of acoustical ceiling 4 1/2" by 6" glued together like a layer cake. That is covered with muslin. That keeps the tile from shredding on the edges.

I then cut a piece of illustration board the same size and glued four layers of low loft batting to that. Go easy on the glue. It only has to hold together until you cover that with muslin or cotton for the bottom sheet.


Next, I cut out some strips of index card that were 3/4" wide and a little less that the height of the bed. These form the pleats.

I cut a piece of cotton fabric twice as long as the strip of pleats that I wanted to go around three sides of the bed. I turned under a hem with white glue.

Then I glued the strips of card vertically along the bottom edge of the strip, with the width of one of the strips between them. The uncovered part of the cotton forms the inverted pleats.

Lay it face down on your work surface. put a line of glue on the sides of two of the pieces of card. Force them together and press down on the tunnel of fabric that forms between the two.(center of photo) Each side gets glued down to the cards. When they are flipped over, they should look like the pleats on the left of the photo.


Next I glue the pleats to the sides of the bed and fold the top part without the card down over the top and glue. Then the muslin covered mattress is glued on top of that.
For the quilt, I covered a piece of the low loft batting with a piece of fabric that was about 3/4" extra all around. I lightly glued the edges to the back as a form of basting. I didn't line the quilt because the bed will be permanently made.

I then did a pattern of french knots all over the top to quilt. Then I cut a piece of muslin for the folded portion of the top sheet.

There are more details in other entries, under the "bed tutorial" section.

I didn't get to the pillows or the bookcase headboard yet. That comes next.

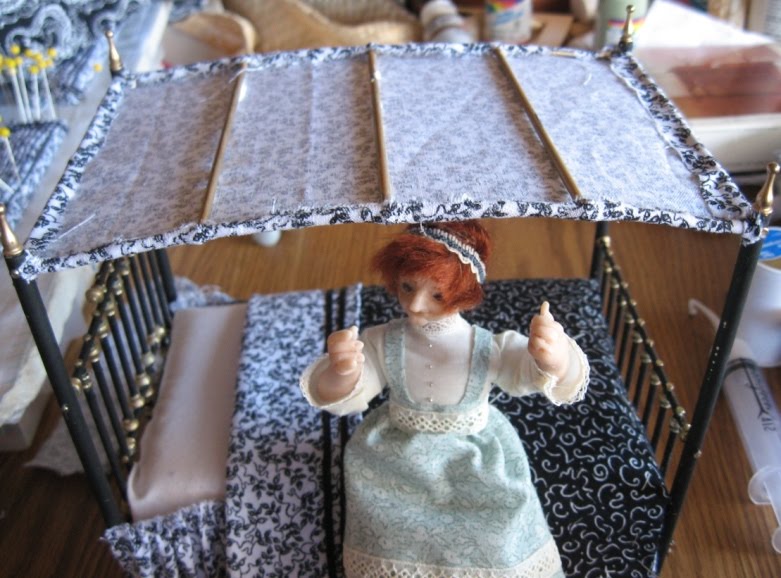
As you can see, I finished the inside of the window and put up a rolling blind.

Meanwhile, Tessie crowded in and tried it out. She says that Zar has nothing to worry about. She pronounced the bed a failure and stupid.....

Her exact words were....."The bed's too high and the ceiling is too low! How can anybody be expected to stand up and bounce on a bed when they hit their head every time they jump? Dumb bed!!!"

Oh well. That solves the problem of her trying to talk Zar out of the trailer. If she can't bounce on a bed, the whole domicile is worthless in her eyes.

Back to work. I have to make the most of my time. The next three days, Walter is in Detroit. Wednesday night I will be frantically cleaning up the mess, but until then minis, here we come!!!

See you tomorrow.

Saturday, April 2, 2011

And So To Bed.....

The Bed is finished!!!!! At last!!!

This morning I had to hunt for the black fabric. I put it away in a very safe place....I finally found it in the closet with my clothes??

I got to work and starting with the bedspread, I glued everything together.

First the spread. I glued the edges lightly to the side skirts. Then I trimmed and put on the long curtains. The tops got trimmed down to about 1/2" and were bent, glued to the top and pinned in place until they dried.

Then the top valence was added in the same manner. The top was covered with a piece of poster board, cut to fit and covered with the darker fabric. That was pinned in place and left to dry.

I did the pillows the same way that I do for all of the beds. It is covered in an earlier bed tutorial, so I won't repeat that part here.

I did one long Tampex tube bolster pillow to prop up the back of the pillows. Four rectangular pillows to sit in front of that and then a smaller bolster pillow. That one, Tessie grabbed and wouldn't give up for anything.

She has been zapping the bed all over the house. It is getting rather irritating to other homeowners.

She keeps popping in and trying it out in various rooms.

The last thing I did was chase her down and put ribbon tie backs on the curtains.

No. Wait.... That wasn't the last thing. The last thing I did was lock her out of the computer room so that I could take a photo of the bed without her messing it up.

You should have heard the hysterical shouting and banging on the door!


No....On second thought, it was not at all pleasant.


I did get the photo that I wanted. Here is the finished bed. The lighter fabric still looks somewhat bluish, but it isn't. Honest.


Everything is peaceful now. I am not sure where the bed is at the present time. It disappeared as soon as I let her back into the computer room.


I am going to assume that sooner or later she will run out of zap and put the bed in the townhouse, where it belongs, and take a long nap.


I am off to open the box I just received from Greenleaf. The contest kits are here. As usual, I probably won't enter. I just liked the kit. Sooner or later it will turn into something. Probably for Tessie, if she has anything to say about it. Maybe I should just go hide it under the bed for now.....


See you tomorrow.

Friday, April 1, 2011

No More Big "T"!!!

I was just not happy with the monogram and quilt that didn't harmonize fully with the hangings on Tessie's bed.

After some discussion and promising to use the "Big T" somewhere else(hopefully, she will forget about it).

Tessie and I came to an agreement on what to do about the situation. It took a while, but we decided that a whole new quilt was in order.

Tessie finally settled for the same fabric that is on the kitchen chairs. It definitely looks better than the other "T" quilt. So.....New....Start from scratch...Quilt.

I did have a bit of a tussle with Tessie. At one point she found the black and white dragon print that you see to the left in the second photo.....

Its not even close to scale and I didn't think that Chinese dragons would work any better than giant Ts and I certainly didn't want to make a third quilt....I know how Tessie's mind works....Third quilt....Third bed.

Anyway, This whole thing put me a couple of steps behind where I thought I would be today. I glued the canopy liner to the top, around the sides and across the bars.

Then I fitted the new quilt in place. I haven't glued it on yet. Just to be safe. Nor have I glued the top sheet down either.

I couldn't wait to see how the draperies were going to look at the head of the bed, so I pinned them in place.

I turned my back to get some lunch. When I returned, Tessie had half of the top valence pinned in place.

Mind you, I am going to have to take all of the pins off and everything off and start over, but I am just as anxious to see this finished as Tessie is.

I am thinking matching dressing table....The only problem is, I don't have any of the lighter fabric left. I doubt that I could find any of it now. I have had it for a couple of years.

Whatever happens, I will show you how to do a dressing table...It just may not work for the townhouse.

I am off to start pulling pins, basting threads on the quilt and gluing now.

"Tessie! Get down from the top of the bed before you break it again!"

See you tomorrow.

Thursday, March 31, 2011

Anybody Got Another Pin?

After going through an inordinate number of pins, I got the pleating done for the valance and the side curtains.

I am using every scrap of a fat quarter of the black and white. I have maybe a piece 1" by 9" left....That can go in the box that is labeled "Scraps too small to do anything with.". It is also called a waste basket...

I did run a basting thread through the top of the ruffles. They will have to be folded over the rails of the canopy and have to be fairly flat. Now I am going through the spray and wait routine. I am going to have to do a bit of piecing on the valence, just as I did on the skirt at the bottom. No worries though. I have just enough. For the side curtains, I did the pleating just the same as I would for window curtains.

The only difference is, I didn't put a wooden stabilizer in the one straight pleat. I do that on regular curtains so that they will hand right.

I use a wood strip that is 1/16" by 1/4" by however long the curtain is. It makes the curtains hang naturally.

For the bed curtains, I didn't do this because The straight pleat will be glued directly to the headboard side post. As for the skirt, I glued on the strips of ribbon at the bottom before pleating.

Someone asked if the hairspray messes up the glue under the ribbon. The answer is no. I have never had anything come loose with the hairspray process.

This part is going to take a while to dry and I have some real life things that have to be done, so I am going to leave the rest of the bed for tomorrow's blog.

Now my only problem is getting Tessie to move so that I can use the hairspray on everything again. I won't say that she is anxious to have this finished, but she is ready to pull out the pins at a moment's notice.

I guess that I am going to have to distract her with something on the iPad. I noticed that "Practical Magic" is one of the "new arrivals". Maybe that will do it..... I have to go spray now.

See you tomorrow.

Wednesday, March 30, 2011

"You Disassembled MY Bed!!!"

"Why??? How could you??? Fix it!!! Fix it NOW!!!"

"OK, Tessie. I didn't do it on purpose. I was just trying to unbend the bottom bar on the foot board."

I really didn't mean to do it. One of the cross bars on the top was already loose. I gently bent the foot piece and the whole thing fell apart, much to Tessie's horror.

At first, she just stood there with her mouth open, imitating a guppy...."Oh! Oh! Oh!"

Then she settled down into a mild rage. "You broke it on purpose, so that you wouldn't have to dress it for me!", she accused.

I calmed her and explained that it could be easily fixed. She was having none of it until I sat down and put it back together. Then I weighted it down with the gesso bottle and let it dry.

That made her feel a bit better, but she stood guard over it and watched the iPad through the bars until she was sure.

It made her feel even better as she watched me glue the three pieces of the bed skirt to the sides and start trimming the top. I discovered that the way that this mattress is done, I can't tuck the top edge between the layers. So I simply trimmed the top where the foam start,s so that I wouldn't have to bend it. I will show you the other way soon.

Of course, Tessie had to test it for bouncing. I held my breath whilst she jumped up and down on the mattress. I was just keeping my fingers crossed that she wouldn't break it again. It held. Thank goodness!

After it passed the bounce test, I started making the bed coverlet. I discovered that the fabric that I had picked out was way thicker than I usually use. I guess I didn't unfold it after I purchased it. I just stashed it. No three layer quilt with this stuff.

I tried quilting just through one layer. That didn't look right...No puff to it. I pulled that out and then tried French knots all over....Too heavy or too light. Just not right.

Then Tessie solved the problem....."I want a large, fancy monogram right smack dab in the center of the blanket! A big, "T"!

To humor her, I tried it. Actually, it doesn't look half bad. At least if the owner of the bed is an egomaniac. Who? Tessie? Nah......


I am not happy with the whites though. The white in the skirt and sheet are VERY white. The white in the monogram, not so much. I am debating looking for something else...

Anyway, That's all I am going to do for now. With my luck, if I work on it any more, I will surely re-disassemble it....That wouldn't be a good thing at all.

See you tomorrow. P.S. I just winged the T on the bed, but if you are interested in doing something similar, this blog has hundreds of patterns for alphabets for stitching. http://patternmakercharts.blogspot.com/

Tuesday, March 29, 2011

Giving In....

Tessie wins again! Last night I couldn't stand the wailing, whining and whinging anymore.

I made her a new blouse, as well as a new apron. She did agree to keep the skirt. She opted for "something springy". Her words, not mine.

She found an old string of beads that I made years ago and insisted on wearing those.

Surprisingly enough, as soon as she got up this morning, she was in a better mood and immediately started helping with the bed work. Kathi asked about the ribbon trim on the bed skirt. As I said before, I did put it on with glue. However, I didn't tell you about this handy little gadget. I always have a couple of these Monoject 412 syringes filled with Aleene's Fast Grab. They are wonderful for putting a thin line of glue where you want it.

I got mine at various mini shows. I would imagine that you could buy then somewhere on line. I have never tried. They last a long time.

You need to keep a stainless steel pin in the tip when not in use. I have been known to forget to put the pin back. The tip gets clogged.

Sometimes, if it hasn't been too long, you can simply pull the dried glue out through the tip.

If you get one, only fill it half full.... You have to fill it more often, but it saves time and a lot of fighting with the plunger. And I always clean them out between fillings.

Simply rinse with hot water and if there is any glue stuck in the tip a small crochet hook or some other pointy object will unplug the point. OK. Enough about glue syringes. In case you can't tell, it's one of my favorite tools.

Back to the subject at hand....The bed. I finished putting a second coat of black on it this morning. It is drying now, as are the pleated bed skirt pieces. The bed skirt pieces have been sprayed thrice( Love that word) and are now drying. As soon as they are totally dry, I will cut and glue them to the sides of the bed.

Tentatively, the black patterned material to the left of the photo is what Tessie has chosen for the quilt. It's a little dark, but we have plans....

Tomorrow I will show you different methods of attaching the bed skirt. Then we will proceed to the quilt and pillows.

Last but not least, by Thursday, we should be to the bed hangings or curtains. Whatever you call them, I will show you those and the top treatment.
By Friday we should have a finished bed....That is only if Tessie doesn't decide that she needs more new clothes......

See you tomorrow.

Monday, March 28, 2011

Skirting the Issue....

OK. Here we go again....When I first learned this technique back in the 80s it was lots of sewing and complicated. I have simplified it so that just about anybody can do it.

First of all, I am basically lazy, so I don't always run a line of stitching at the top as I am doing here. The reason for the stitching on this is, it is for the bed skirt and I will be trying to make it as flat as possible to go under the quilt.

The first thing that I did was measure to see how long the skirt had to be. In this case it was 2 1/2" high by about 18" long(finished).The piece that you cut should be at least twice as long as the finished measurment. I usually like to make allowances for a little extra for side hems and other silly things that can go wrong.

Unfortunately, I am working with a fat quarter, so the length is on the short side. I am going to have to do two of them. I cut the fabric, on the grain, about 3" wide. This is going across the fabric. Not along the selvage. Then I turned under about an eighth of an inch hem with Aleene's fast grab.

In the first photo you can see that I have added two strips of grosgrain ribbon as decoration. This was also done with glue.

I then ran a double basting thread about 1/4 to 1/2" from the top. Leaving both ends free, I can pull from either end to get the gathering that I want.

Starting with a bottom pin on the left side of the pin board, I line the bottom of the fabric up with one of the lines on the graph paper. This will be my base line for all of the pleats. The pins are all pulled downwards at a pretty low angle to the board, outwards. Away from the edge. Once I have the first bottom pin in place, I also anchor the top with a pin stretching in the other direction. This is also at a slant away from the fabric.

Now....To form the pleats, stick a pin lightly into the fabric two lines to the right of your base pin and drag the fabric back to the middle line to form a pleat. It will look like an upside down U.

When it is where you want it, stick the pin into the board through the fabric.

What you are doing is taking two steps forward and one step back with every pin. Your fabric should be 1/2" in length between the pins, but the pins are 1/4" apart when you stick them in. This forms the U.

Alternate, first a bottom pin and then a top one. Don't gather the top of the fabric with the thread.

Just make the same pleats that you are doing at the bottom. On the top, stick the pins in above the thread and make sure that none of them splits the thread. That will stop the pleating action....Make sure that the bottom and the top of each pleat are the same. And do stretch the fabric just a bit with the top pin to increase tension.

If you do it right, it will look almost like you are using one of the rubber pleater thingies.

Just keep plugging away. Bottom pin. Top pin. Bottom pin. Top pin until you run out of your fabric. Then you can gently Pull the thread to get the gathers in. If you are having trouble getting it to gather, sometimes you can nudge the gathers with a pin to ease them into place.

Once you are satisfied with the way it looks, use PUMP hairspray. NO aerosol! It doesn't work, because too much of it floats away in the air.

I use unscented, extra hold, White Rain. You can experiment with different brands. Unscented still has a smell when it is still wet. It does disappear when dry.

You want to saturate the fabric pretty well. Then let it dry. I usually do it twice, sometimes even three times. It should be pretty stiff when finished. You don't want it fanning out when you remove the pins.

If you are in a great hurry, you can use a hair dryer to speed the process.

A couple of tips, while I am thinking of it. Please use 100% cotton, silk or linen. It must be a natural fabric to hold its shape. If you use any synthetics, expect to be a very unhappy pleater. That's just how it is.

If you don't know what the fabric is that you want to use, try the wrinkle test. Grab the material and crush it in your hand. If it is cotton or even mostly cotton it will hold the creases from just a second or two of crushing....Usually, if it has synthetic in it, it will do the "permanent press" thing....It will unwrinkle in a matter of seconds. Run the other way! It won't stay pleated if it doesn't stay wrinkled.

The other thing about using natural fabrics is the gluing. They will glue like a charm....Synthetics, you can keep adding glue until you are blue in the face...It will come unglued or start showing through the fabric. Most irritating.


One more thing, get yourself some ball headed quilting pins. They will save lots of sore fingers!


Now I have to go do the whole thing again. Remember? I need two. Please let me know if you try it. I would like to see how you do.

See you tomorrow.

Sunday, March 27, 2011

A New Pin Board...

Today is about tool making, instead of mini making. The pin board that I use for making pleated bed skirts, dressing table skirts, and regular draperies, is all important.

My old one was getting a bit worse for wear. I think that I have been using that one for about 6 or 7 years. Maybe even more.


I have tried other materials for pin boards and they simply don't work as well as ceiling tile.


Styrofoam and foam core are really bad. They don't hold the pins as taunt as they need to be to make good pleats, so don't bother to try. You will just be frustrated and wonder why it isn't working.

This is a photo of the stuff that I am using. You can usually find it at home improvement stores and larger hardware stores that carry building materials. As I said yesterday, if you buy one sheet you will have a lot of stock for various uses.

For the new pin board, I cut a piece that was 12" by 18". I wanted it long enough to be able to pleat a piece to go around two long sides and one short side of a bed.

The mini beds that I make are 4 1/2" by 6". The pre made beds may vary and you will have to measure as you go.

In the case of the brass bed, I will be cutting three pieces to fit the two long sides and one short end. I will still pleat the strip all in one continuous piece. Then I will cut them to fit with a bit left on each end to turn under a hem on the sides.

After the board was cut to size, I took four pieces of 1/4" graph paper and covered the board. I carefully lined up all of the squares. Then I fastened the sheets down with transparent tape.

Next I covered this with waxed paper. You can still see all of the lines, but this protects your fabric whilst you are spraying it with hairspray. The hairspray will cause the lines to run a bit, but it won't leak through to the fabric .

I plan to go through the different steps of different types of pleating next. Hang in there. You will probably get sick of pin boards before I am done.

I have the feeling that I am going to have to take a "dress Tessie break" soon though. She got up from inspecting the new board and I noticed that she has dried gesso all over the hem of her dress. Just look at her!

Her only comment was, "See? I have proof that I work!" For some reason, I have a slight suspicion that the messy skirt was deliberate. She keeps making comments about missing her aprons. Maybe I can get to that this afternoon....Do you think that she would be really annoyed if I just washed the dress and got it out? I don't thing that would do at all.

When she gets it into her head that she wants new, washed just isn't going to do the trick. Back to the sewing room.

See you tomorrow....

Saturday, March 26, 2011

Once Upon a Mattress.....

I realized that the raw linen mattress cover that I had on the bed before wouldn't look right if the color scheme was black and white, so this morning I ripped the old one off and started from scratch.... If you want to do a mattress with this method, you need an acoustical ceiling tile panel. You can get it at any home improvement store by the 2' by 4' sheet. It is inexpensive and will make many beds, chairs and other kinds of mini furniture. You will also use a piece of it for making a pleater if you use the method that I do. Get the smoothest one that you can. It comes in different textures. The smoother the better for our purposes. For this particular bed, I cut the tile just big enough to sit inside of the rails. Depending on the thickness of the foam, I use one or two pieces of tile...In this case, I had one inch foam, so I only used one thickness of tile. The tile is about 1/2" thick. Since I am trying to stay with black and white, I covered the mattress with white cotton. And since the bed will not be taken apart after it is finished, I just glued it right to the underside. I didn't bother with hemming it as I would if it were going to be removable. I folded it almost like I would if I were wrapping a package. I didn't make it overlap on the bottom. That would just add to the bulk. Since I haven't decided if I want the top sheet to show over the top of the quilt/bedspread, I just pinned it in place to show you how you would do it. I folded and glued a narrow hem at the top edge and folded the sheet over so that the raw edge was inside the fold. If I wanted a lace edge on the sheet, I would glue it under the hem at this point. Again, the folding is similar to a package. In this photo you can see the raw ceiling tile in the center of the bottom, if you click the photo. Tessie is getting anxious. It looks like she is going to be holding the mattress down whilst I go do a dust ruffle for the bed. I will show you how I do that tomorrow. I think that I am finished for the day. The temperature outside is a perfect 70 degrees. I am going out and do yard work for a while now. See you tomorrow.