Years ago, I used to follow a blog called Marlies and Minis. I went to look for it this morning and found the name but couldn't find the blog. It looked as if some kind of computer outfit had taken the name over.
I originally got this pattern from Marlies. She should get full credit for it.
I decided to teach it to the Wednesday Witches today. Thus the hunt.
Marlies, wherever you are, I thank you for the pattern. It is a good one and I have used it often.
It is for a pitcher made of paper, that looks like it is an old metal pitcher. It is fun because you can make it from any paper that you happen to have on hand.
I usually use double sided, card stock weight, scrapbook paper. If you don't have that, you can glue regular weight paper back to back and use that.
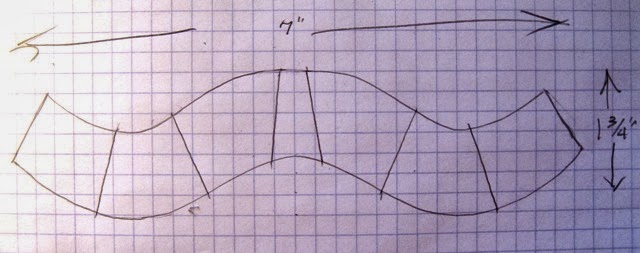
This is another one of those that, if you have a program that will do it, you should try to re size the pattern in that program. The measurements on the first photo will give you some idea of what you are doing.
After you cut out the two main pieces, use a pencil and roll them on your leg. This will give the curve that you need, without kinks and folds that you don't want. Start at the center and work out to both edges, to get it right.
After you are satisfied with the curve, run a thin line of glue down one edge and glue it over the other edge.
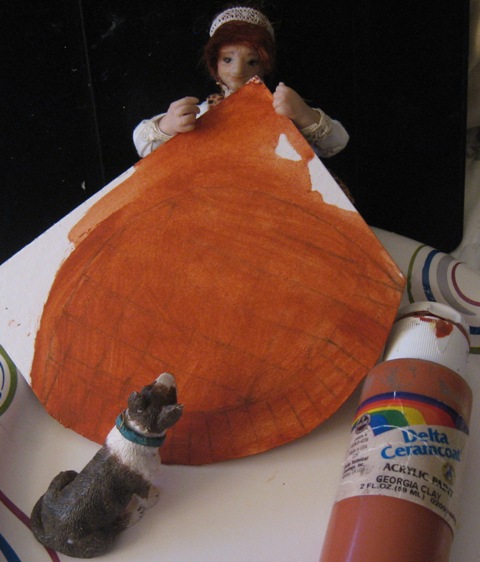
This is what it should look like.
After the glue is dry, run a line of glue inside the body of the pitcher and sit the top portion down in the hole.
Sometimes you have to trim this to suit your taste after you get it on and dry.
Just keep messing with it until it looks good to you.
The one that I am working on is on the left. The handle has been glued to the outside of the back, where the two back seams meet.
You can put the top of the handle inside or outside the top. Let it dry well and then curve the handle down and fasten it to the back seam of the pitcher where you like it.
The last step is to cut around the bottom edge after the glue is dry. Then cover all of the raw edges with either gold or black with a Sharpie. I even covered the inside of the top piece with gold Sharpie on the center dark blue pitcher.
Anyway, I started the Wednesday Witches making them this afternoon... They are like potato chips. Bet you can't make just one! And by the way, You can make flower pots by making the body piece shorter and turning it upside down. Then put an extra strip of the card stock around the wide edge and glue the narrow edge of it to a scrap for the bottom, just like the pitcher. Let dry and cut off the excess. There you have it!
Post Script... A couple of you found Marlies and Minis. I never thought of looking for her with her blog title. Anyway, she was one of my favorites until someone took her blog away. Now I am going back to join in her followers. Here's the URL. http://marliesandminis.blogspot.nl I am going to look for the original pattern on her site. I do hope that I didn't do anything wrong by using it.
See you tomorrow.
Don't forget to poke the photos to enlarge!
Showing posts with label Tutorials. Show all posts
Wednesday, September 21, 2016
Saturday, April 2, 2016
Testing, 1-2-3 Testing....
OK. Since some of you said that you would like to make your own people... Here's a short tutorial on getting things in the right place.
The head is the most important part. On a 5 1/2" doll, it goes as follows.
The head should be about 3/4 of an inch long and about 1/2" wide...
The eyes are at the halfway point between the top of the head and the chin.
The eyes should have an eye length between them.
The bottom of the nose is at 2/3 of the head. In this case it is about a half inch.
The mouth is 1/3 between the nose tip and the bottom of the chin.
I got Tessie to lie down next to the sketch, so that you could see the similarities? between them. She really is 5 and 1/2 inches tall. The hair and the stretched out feet make her look taller at the angle that I took the photo.
She kept squirming whilst I was taking the photos... And complaining? You would not believe some of the words that she used!
I first make a pipe cleaner armature. Everything is two pipe cleaners twisted together. These are the long ones that they call chenille stems. I bend two in half and twist them. These become the back bone and legs. I take one and twist half of it together and put it a little more than an inch down and twist the rest. That becomes the arms. They will be shortened when we put on the poly clay ends. As will the bottom of the leg stems. They only go part way into the leg portions of clay.
Anyway, the arms when stretched out should be about the same as the height.
From top to bottom. Shoulders at one inch. Waist is two to two and a quarter inches down. Torso finished at three inches and the knees at four. The last half inch takes up the ankles and feet.
Assuming that you made a head, arms and feet, you then assemble them with the pipe cleaners. I wrap the ends of the stems with floral tape to keep the arms, etc. from slipping off. I cut a little off until the length looks right... Starting with the feet and head, so that I will know when the height is right. Head first, then feet.
After that, I cut strips of thin quilt batting. I wrap the arms with about one inch strips. The upper legs with a little wider strips.
Over the years, I learned to stretch the end of the strips and smooth them into the layer underneath. When you are just starting out, you may have to use a little glue on the end.
I use a wider strip to go around the torso. You can put a little extra padding in the bust and the bustle area... I don't. I find that the clothes fill things out nicely, especially on Tessie.
Some people cover the batting with strips of nylon stocking material or some other jersey. I don't. Tessie wears bloomers. That seems to cover her bottom nicely and hold things together. Her top is enclosed in a dress top or blouse that covers everything. She seems to do just fine with those coverings. If she starts complaining, I just make new ones.
Of course, Tessie had to try out the new foot and a couple of the new hands too.... Maybe I shouldn't show you this.
She built a better skate park on the stove this morning... She has been buzzing around it on the skateboard I found yesterday, while cleaning... I really shouldn't clean. It always gets Tessie into trouble..
The butter dish will never be the same. She inserted the ends of two energy bars under the lid and away she went... She has to be quick. She jumps the energy bars at both ends. Only the middles are smooth enough to ride on.
She has been singing "Girls Just Want to Have Fun!" at the top of her lungs. I guess I should go make more hands and feet. I doubt that she is going to get through the day with the ones I just made.
I just heard her yell, "Testing, 1-2-3, Testing!". I guess I should go see what she has added to the mix... I don't think I want to know!
Wish me luck. I think that I'm going to need it!
See you tomorrow.
Tuesday, December 1, 2015
Doing It From Scratch!
It took me a good half hour to simply dump everything out and start over. I even washed the box... I was forced to. There was sand in the bottom...
I can now find everything that is in the box at a moment's notice.
I have also decided that, if I show you one of the boxes that I am working on, I will give you a simple tutorial with some of the things in the box.
This is about as simple as they get. I cut a 3/4" long piece from my Cape Honeysuckle plant outside. You could use just about any branch that was the right size. I used these because they fit the acorn caps that I happened to have.
The second step was, using white glue, I glued the acorn cap to the top of the branch. Then I made a hole in it by simply painting a black dot. Or if you were so inclined you could drill a hole. I took the lazy way out. I did drill a small hole for the perch. I used a whittled down toothpick for that part. That's all there is to it.
See you tomorrow.
Thursday, November 12, 2015
Since You Asked...
OK... Some of you asked about the directions. There are some elsewhere in the blog, but I am not sure where... Oops...
So.... We will start from scratch.
I bought a mixed box of Tampex tubes years ago. They were just for pillow forms and canisters. I have quite a supply, so I am not sure if they even make them with cardboard tubes anymore... I hope so. If I ever run out, I am going to want more!
Anyway. Someone asked what I use to cut these things. I use the very SHARPEST exacto blade that I can find. This one is one of the new Z blades. They are realllllly sharp and you have to be a bit more careful with them than the regular size 11 blades. I used white glue in a syringe for the whole project.
How to get a straight cut? First I find a paper that I want to use and either use the pattern on that to cut a straight line or I measure on the back side. I cut a strip and then glue it to the uncut tube. For the interior tube cut. I wrap the paper strip around it and mark it a bit higher. That's what is happening in the first photo.
I then stick the exacto blade straight into the tube on the edge of the paper.
Using an in and out motion... Not sawing, I cut along the line. To cut the top and bottom. Sometimes a little trimming with a pair of small, sharp scissors may be needed.
I then find the size of tube that fits best inside the outside tube and cut it about 1/16" taller than the outside tube. This will be glued inside. That way the lid will have a place to sit on.
This paper was not ideal, as it is kind of free handed, but it did work. You can see where I overlapped the cut piece on the top lid edge in the above photo.
I don't cut the top or the bottom round until they are glued to the lid.
I leave the top lid paper until the canister is finished. That way I can center the design before I trim the excess.
Last of all, I use bunka or #5 pearl cotton to do the edge trim...
Now you know how to do it. I hope that you can find the Tampax assorted size in cardboard tubes.
Good Luck!
See you tomorrow!
Wednesday, October 7, 2015
Pillow Fight!!!
I think that I did this on another post a long time ago... It bears repeating...
I am in the middle of doing the pillows for the couch this morning.
About 30 years ago, I took a couple of classes from Judy Williamson. This is one of the things that I took away from those classes and have used ever since.
There is no easier or faster way to do a lot of mini pillows when you need a lot of them! It is a strip of the fabric, plus a quarter inch on either long side. You press it down the middle wrong side out. Then you turn a quarter inch back on either long side.
In the first photo you can see that I cut a strip of fabric twice as wide plus a half inch, as I want the height of the pillows for the back of the couch. The first photo will make semi square throw pillows. No measuring.
The second one will make three pillows. Two will be three inches long and one will be a little shorter. The width of the couch is six inches.
I then do a quarter inch seam on the right end of the strip/ I back stitch both top and bottom, so that they won't let any of the stuffing out. I move to the other end of the pillow. In this case, three inches. I do a row of stitching to finish that pillow and a half inch away, I start the next pillow. Measure that, if necessary and repeat. You can do a bunch of pillows really fast with this method. They can be marked before you sew if you need to.
In this case I simply followed the lines in the pattern.
I probably won't get them all finished this morning. That's why I am telling you this part now.
Walter and I are going to see "The Martian" this morning and will probably leave before I have the last part done.
Next I clip the corners and then turn them right side out.
The bag of sand is what I use to stuff them. Some people use salt. Some use beads. Salt solidifies in some climates. Beads make for tiny lumps in the pillow. So sand is my weapon of choice now. I get this at Walmart in the floral section.
After the pillow is about 1/2 to 2/3 full of sand, I blind stitch the opening shut. It is sometimes also referred to as a ladder stitch. One stitch on one side and then one on the opposite all along the opening. You will find that you can shape them any way that you want to on the bed or couch.
I will have them finished by tomorrow and maybe even more on the tree bookshelves.
See you then.
Thursday, December 4, 2014
It's Raining Snow Men...
The weather outside is frightful... It is drizzling. And icky!
I woke up with one of my middle of the night ideas. Making snowmen from the leftover Christmas snow blankets that I have been using to cover the yards.
I decided that it would be really easy to make snowmen to go in the yards. It is!!! Especially with the Terrible Two plus One helping...
Tutorial time. I started with one of those extra long toothpicks that I bought. You could probably use a pointed skewer too.
Then I proceeded to form three balls by rolling them tighter in my hand. The kind of snow sheets that I have are very loose.
After I got three balls of different sizes that suited what I had in mind, I stabbed up from the bottom of the largest one with the toothpick. You might want to put a bit of glue between the balls. I didn't because the stuff I have sticks to itself pretty well.
This is the hardest part. The toothpick can get snagged and not go through if you aren't careful.
When I got all three of the balls where I wanted them and shaped right, I sprayed the whole thing with unscented Suave extra hold pump hairspray. That seems to keep the balls in the shape that you want them.
I then went out in the wet backyard and found a couple of small Rosemary bush branches for the arm. I simply put a bit of clear Aleene's Glue on the ends and stuck them in the sides of the middle ball.
I found some small black pebbles and used the same glue to put on his eyes, mouth and buttons.
I used an orange seed bead for the nose.
Tessie contributed her favorite Christmas hat..
Meet Mr. Snowman! Easy as pie... I don't think that saying counts. I hate making pie. Too much fuss and bother...
See you tomorrow.
Thursday, July 3, 2014
Hand Me a Brushpick!
There has been a discussion on the Greenleaf Forum about these dental picks for a couple of days now. Finally Debra found them at Walmart and wrote about it. I saw it at five AM and was at Walmart by five thirty!
People wanted to make knives from one end of them... I brought them home and discovered that they would make other things too.
It was suggested that the knife end would be cut of at the length of the handle and the blade part painted silver and the handle brown. I took that suggestion one step further.
Just cutting it at the end of the handle does make a nice carving knife.
I took it upon myself to shorten the blade end too. It can be made whatever shorter length you want it to be.
I also sanded the blade with an emery board until it was a lot thinner than it was when I got it.
Tessie came in while I was doing it and offered to zap it to size. I refused, knowing that other people don't have Tessie to do the work.
The other end is a sharp, pointy thing with a bunch of thinner sharp pointy things coming out of two sides.
I immediately thought, Ice pick and Muddler for drinks.
When I cut off the side thingies There was the icepick. When I left them on, the muddler for drinks.
So far, two knives and two bar tools.
I then cut off the ends and left the middle. Three lumps on either side of a straight piece. I went and got a piece of typing paper and cut it to 3/4" wide, in a long strip. I glued one short end to the side of the middle section and rolled it around, until I got a thickness I liked. Cut it off and glued the end down. Almost instant rolling pin.
I painted the metal parts of knives and tools silver and the handles and rolling pin Territorial Beige.
The fastest tools I have ever made and they look pretty good for what they are.
I am off to see what else these little gems will make. There have to be other uses for them. There are 120 in the package for under two dollars! Cool tools and cheap besides!
See you tomorrow.
Monday, December 9, 2013
Adding Class....
In order to add class, first remove Tessie from the room...Oops! Note to myself...Don't let her hear you say that.
The tower needs a bit more glitz. A tall chandelier is in order.
I thought I would cheat and use the bottom of the one in Tessie's attic in the craft cottage.
I should have started from scratch. It would have been faster.
Oh well. Now it's done.
I think that it needs a bit more. Maybe a swag at the bottom.
It took me more time than I thought it would. I have been at it since about 9:00AM. It is now noon.
I must have been holding this at an odd angle...It looks like there is a candle missing. I think I need to do a bit of bending and adjusting. The E-6000 is not quite dry on the candles either.
If you are interested in making one for yourself, there is a tutorial here. http://caseymini.blogspot.com/2013/06/of-silk-purses-and-sows-ears.html
This is another version, but once you learn to do it, you can make them as tall or as short as you want....Just a change in the length of the wires and number of beads.
I had to try it to see if it fit in the room. It does.
I was tempted to drop it on Tessie's head. She has been playing continually since yesterday. She remembered a few tunes from long ago...
Yes....She remembered "Bohemian Rhapsody". One more chorus and I will strangle her.
I found out the secret of her longevity...Someone suggested earplugs for me...Sometime before that occurred she got the idea without any suggestions from elsewhere.
I asked her a question a couple of hours ago and she just kept pounding on the keyboard.
I lifted her hair from over her right ear and sure enough...Wads of bathroom tissue stuck out of her ear. Then I noticed that Spike was sporting the same ear attire. Poor dog.
I guess I am not the only one that can't stand the noise. My question is...Why play, if you don't want to listen?
Unfortunately, I think that she has decided to keep the music room. I am going to have to lock her out of it at night or we won't get any sleep at all.
Back to crystals and candles.
See you tomorrow.
Friday, September 27, 2013
Books for Bookworms...
Yesterday afternoon, I made 29 books...That was not enough.
I thought you might like a couple of quick ways to make books for your bookworms.
First you find a baby rhino to hold the paper down....Just kidding. Actually, he wandered in all by himself.
In the first photo, I have the steps to making a faux book. I am going to be gluing these into the bookcases, so they don't have to have pages that work.
You have a choice. Either the fake ones that are just fillers or the ones that really open.
First, for the fakes, I use white or beige fun foam. I cut it into various sizes(under one inch both ways) for the inside of the books.
For the outside, I use either patterned card stock or really thin leather.
I cut a 1" strip of the outer material and glue an inside piece to one end.
In the case of the leather, I simply fold it around and glue it to the front, spine and back. Then I trim closely to the inside of the book. For the card stock, I score a line next to the inner edge of the interior and fold the book up. See above. Then I score another line by where the rhino has his nose. In other words, I am creasing between the sides and the spine, so that I will get a straight fold.
Then I glue the back cover to the last page and trim with a small pair of scissors all around.
If I want pages that move, I cheat a lot of the time. The pad that you see behind the other stuff is from the dollar store. I can get a lot of books out of that... I use the gummed edge for just a few or I spread white glue along the edges of all four sides and that gives me more. If you are careful lining the edges up, you can do that to the whole thing. Or if you are lazy, you can use their gummed edge and use the rest of the pad for scratch paper. The strip of white, by the Exacto is one that I just cut off of the top by putting a ruler in place and running the knife along it until I had enough pages for the book that I wanted. From the strip, I then cut individual books. I followed the same procedure for this kind as I did for the solid one.
Here are the bookworms full of books. This is not what they will look like when I get them in the room, but I wanted you to see that they hold a surprising number of books.
I will probably intersperse a few other things between the books, so that they don't look so crowded.
Now for the desk.
See you tomorrow.
Thursday, September 26, 2013
How to Build a Worm....
You may be able to get a fair bookcase by blowing this up, but I would advise you to re draw it.
The back plate on the original one was wood. Today, just for fun, I decided to make it from illustration board. It is the same thickness as the wood. The wood was 1/16". So is the illustration board. You could make these any shape or size that you want to. I tried to keep the height of the book shelf uniform, at about an inch all the way across. It's close, but a couple places are just a hair larger.
I made the size on these bookcases 3/4" deep. Again, you could make them deeper if you want to, but most 1"scale books will fit on 3/4".
For this one, I left the back white so that you would be able to see more clearly. I am thinking of all different ideas for this. It would be fun in all different colors for a child's room.
I used brushed silver for the sides and supports on this one for contrast. You could use any card stock weight paper for the sides.
I cut the upright supports double width, folded them and glued. They should be heavier than one thickness. I cut a strip from the card stock that was 1 1/16" high and 12" long. That gave me enough for all 6 supports. I cut them at 1 1/2" intervals and folded them in half. The fold will go to the front when I glue them in place. put glue on the inner surface and fold them flat. The ones I did yesterday were wood veneer and thus thicker.
You have to have two one inch strips for the outer shell. I marked them at 3/4" and 1". Then I cut the one inch line.
I scored the 3/4" line with a stylus and folded it at a right angle. I slashed the 1'4" all along about 1/4" apart. Do not go over the fold line.
Starting at one corner, I made a 1/8" fold to wrap around corner over the end. Then as I was going along, I cut Vs in the parts that went over the outside curves.
Gluing a few inches at a time, I made sure that the glue was on the back to cover where the paper would be and on the edge. That makes for a nice, neat edge.
When you start to run out of your 12" strip, you should be at the middle of the bottom. On the one yesterday, I made sure that the seam was right at the center bottom. This one, I forgot that and as you can see, the line is visible to the left of the bottom center. The other one looks a lot better.
I got carried away. I didn't need the Vs in the inner curves. It doesn't hurt, but isn't necessary. The tabs won't overlap on a straight stretch or an inner curve. The Vs are really only necessary on the outer curves. And the corners should be clipped at a 45 degree angle at the corners.
Paying no attention to the bottom right, this is how it should look when you get everything glued to the back. As you can see, the other two inner curves lay just fine without the little clipped Vs.
If you want your shelves to be really straight, It is a good idea to use a small ruler or even a square corner of paper and continue the lines on the back piece to the edge of your sides.
You will have to trim the folded supports at the back a little. By now those should be dry. Simply run just a little glue along the top bottom and back edge of the supports and put them in place where your guide lines are located. Again, You can change the location of these too, but be aware that the size of the supports may have to be a bit larger or smaller.
When you are finished, fill it and enjoy. I would suggest that you use something to glue the shelf in place, rather than trying to get it to hold up with wax or putty. It can be pretty heavy when filled with books.
Go look at "unusual bookcase ideas" on Bing or one of the other search sites. There are all kinds of ideas for bookcases for which this would work.
Experimentation can be fun. And sometimes even successful! Go for it!
See you tomorrow.
Sunday, September 8, 2013
Not Quite Yet...Needs Tile....
And besides, the gesso is slooow to dry...
It is cloudy and drizzling outside. Humidity is about as high as it can get.
I have the first coat on, but don't want to put the second one on until that is dry....Whenever....
After a couple of coats of that, sanding between coats, I will put on the spackle. When I get finished, no worries. Even if the foam disappeared, there would still be a solid shell there.
Someone suggested that it might, but I am pretty sure that it won't. My teacups have lasted over twenty years. The foam on those is just fine. And they are out in the open.
While waiting for things to dry, Tessie offered to help me with the tile... She's just like me. Hand her a paintbrush and some paints and she's a happy camper.
There is a tutorial for these tiles somewhere else in the blog, but I will briefly go through it again.
I used illustration board from Hobby Lobby and I am finding that it is not quite as hard pressed as the stuff from Michael's. It will be OK though. After it dries, I will put a finishing coat on it.
This is the bottom of the fireplace. I had to wing it. In the original room, there is no tile or brick...Just stucco. I don't think that they will be building any fires there.
First step in doing brick or tile this way is to map out where you want it to go. In this case, I wanted fanned tiles around the edge to match the curve of the fireplace above. The center was filled in with diagonal squares. I did this roughly, by eye, because Sautillo tiles are known for their irregularity.
Next, with a new blade in the Exacto knife, I scored to the left and right of the lines at an angle. Cutting a V groove in the board. Maybe about a 32nd of an inch.
Basically, all I am doing is taking the top layer or two off, so that the "grout" will be dimensional.
If you use this to do a lot of brick or tile, be sure to change your blade every once in a while for a cleaner cut. You don't want your blade to drag.
After that was finished, I took Rain Gray, some kind of brown(there was paint over part of the name) and a tiny bit of black and did washes over the whole thing. I made sure that it got to the bottom of all of the cracks. I started with the light brown and mixed the gray in a little at a time and then just a touch of black at the end.
Tessie would have you believe that she did this to help Zar get his new place together....Is she kidding? She can't even lift that brush!
She did help with the mopping up though. You need to keep a Kleenex or paper towel handy and wipe over the washes to keep the tile more red.
As I said before, I will spray the tile with a coat or two of satin varnish when it is thoroughly dry...Not yet.
I will keep checking. I want to get this part finished. I'm going to go wire in the transformer now....No worries about wetness there.
See you tomorrow.
Thursday, August 29, 2013
Fingers Before Forks....And Putty Knives...
This morning I gave the steps a couple of coats of water based acrylic artist's varnish. Both sides. That keeps them from curling so much.
I glued them to the steps with white glue.
To keep them down until they dry, I used painter's tape.
Meanwhile, I put together the log storage unit. Same method as the rest of the stairs.
I used my best tool to coat the inside with spackling paste. Fingers work best. I can get down into the corners and move the stuff around where I want it. If I used a putty knife or something similar, I would scrape off as much past as I put on.
The brush at the bottom of the photo is what I use to make the lace work in the stucco. It is from a bag of cheap brushes from Walmart.
Here you can see the result.
I did wipe most of the paste from the corners. That gives a better, finer lace work. If you leave it in, you get a lot of big heavy blobs. And we don't want that.
This is as far as I have worked so far today. Two steps, the log box and the bottom area. I should be able to finish it in a couple of hours. Fingers crossed.
If you are ever doing this, painter's tape is your best friend.
I took a piece and ran it along the edge beneath the step and slashed the opposite edge as I went. Thus the curve.
When I finished spackling, I just pealed it off. Nice crisp edge...Please ignore the bit of spackle on the step. It will wipe right off with a damp cloth. I didn't notice it until after I took the photo.
After I finish with the paste, I will attach the log box and spackle the front edge of that...That should do it for today.
By then I will be covered from head to toe in spackle. I never said I was neat and tidy....Did I?
See you tomorrow.
Tuesday, June 25, 2013
And the Winner Is.....
KATIE! That is the Katie of Katie's Clay Corner blog. http://katiesclaycorner.blogspot.com/ She is an avid miniaturist and does lots of different things. I am an admirer of her aging and woodworking.
Congratulations Katie!
Now on to other things. I'll bet that you thought that the boxes were something new that I just thought up. Not quite. They started with a kid's cardboard pencil box back around 1990. At least that is when I started doing them. I taught a class on how to do them back then.
You can still find the cardboard pencil boxes on line, but they aren't nearly as nice as they used to be. Not as thick.
I woke up about 2:30 this morning and couldn't get back to sleep, so I thought about what I could do to make it easy for the rest of you that were interested, to build your own box. I decided to show you how I did the original one.
You can take it from there. It can be made into anything that you want.
I am going to do it the way that I did it originally for the class. Only this time I am using a wooden cigar box that I had handy.
You will have to take your own measurements and make your own plan, but it is really simple.
The first thing that I did was sit the box on a piece of GOOD foam core. Not the kind that you get at the dollar store. It needs to have a hard finish so that it won't warp as much.
I lined the back edge of the box up with the edge of the board. Then I used the lid as a compass and drew a semi-circle on the surface of the foam core.
As you can see, the first blade that I found was not exactly sharp. No worries. The surface will be covered.
With this box, I had to cut off the lid and treat it as a separate piece. Your box may not have to be done this way. With mine, the lid fit down inside, flush with the top edges of the box on both sides.
I cut it off and slid it into the side at a 45 degree angle. If your box top overlaps the box all around, this step is unnecessary.
I cut a piece of wood to fill in the far edge and two small pieces to fill beneath the sides of the arch.
I cut out the arch by making a paper pattern. The paper was cut to the size of the lid and folded in half. The arch was cut from that. Then I traced around it on the lid and, in this case, I cut it out on the jig saw.
The only one of these that I have left is the mini, mini one that Tessie is holding in the second photo....Did I mention that, when I was taking that photo, she hissed at me. "This one is MINE!"
She wasn't talking about the little one she is holding... She is keeping the big one she is standing in. Typical Tessie.
Anyway, here's the little one up close. I will start doing the spackling, landscaping and flooring next.
As I said, the indoor outdoor thing is nothing new. You can do it many different ways. You can put a door or window in the wall, instead of the arch. You could possibly make it two rooms by using two box bottoms. It is really easy and a lot of fun.
Back to work. Again, congrats Katie!
See you tomorrow.
Sunday, March 17, 2013
It's My Turn! Get Off!!!!
I did the daybed this morning and as soon as I finished, it started.
Zar got there first and Tessie didn't like it.
Personally, I am getting tired of having to fight for everything I make. Even when it's meant for me.
In case you want to play along, here's the original pattern for the daybed. As usual, if you use it, I would love to see it...Also it is for personal use only. Not for resale. Pattern or finished furniture.
It is very simple. Balsa, a couple of super cardboard tampons. Not the fancy plastic kind.
A light bulb went on over my head this morning. I have always sawed dowels in half when I wanted a rolled arm on furniture.
I grabbed a tampon and went to work. I cut it the length of the arm. Then I cut a piece out of it about as wide as the balsa that I was using...3/8".
I had already cut the three pieces of balsa that I needed(see pattern).
I also cut a piece of card stock the same size and shape as the mattress.
As you can see, I glued one edge of the tampon to the top of the arm and let the rest curl over the side. I then put this against some card stock and traced it for the two ends of the arm.
By the way, I rounded the two ends by drawing around a penny. Then I cut them out with the jigsaw.
I wouldn't recommend that anybody doing this for the first time use fabric that has to be lined up or matched. The fabric that I used was double tough. It had to be lined up and it was on the bias. Not a lot of fun to do.
I used batting from just above where the mattress goes to the bottom of the outer tampon, with just enough to tuck under the edge of the tampon on the outside.
I ran a strip of fabric around three sides of the two base pieces.
Then I covered the rolled arm, starting on the inside and working over the top. I tucked the end of the fabric inside, atop the batting and glued it in place against the balsa.
I wrapped a strip of fabric across the outside, under the arm and glued it in place with the edges rolled to the ends and bottom and glued in place to cover.I wrapped the top of the mattress around the card stock. Batting cut to fit and the fabric large enough to wrap around to the back of all four sides and glued.
The front leg of the daybed is simply a piece of the inside of the tube. It happens to measure 1/2", the same as the height of the placement line on the other end. You can adjust the pattern according to the height of the beads or whatever you use for legs.
I glued everything together and pinned it to hold until dry, right through the layers.
I now have to go lock a couple of people in a closet and claim my daybed. It's actually my turn. I need a rest...
See you tomorrow.
Labels:
Casey's Cottage,
furniture,
Tessie,
Tutorials,
Zar
Subscribe to:
Posts (Atom)