Don't forget to poke the photos to enlarge!

Sunday, June 30, 2013

Indoors and Out....

We are finished!  Here's the outside, which you saw yesterday....It was finished then, but I had to chase down the bird and Tessie to really have it finished. 

I took the toilet bowl brush away from her, before she could get to the birdbath.  So...One problem solved.  Then I went to the kitchen and hid all of the saltshakers and unopened salt containers too....She is adept at getting into things and if she can't, she calls Zar.  No more bird catching!
Here's the inside.  I added a painting of the Grand Canyon.  No...I didn't do it.  I have a whole notebook full of all different kinds and styles of paintings that I have cut out of various sources over the years.  I actually had a choice of five grand canyon paintings.  This one fit the space and color requirements best.

I mounted on a piece of heavy card stock and framed it with plain picture frame molding.

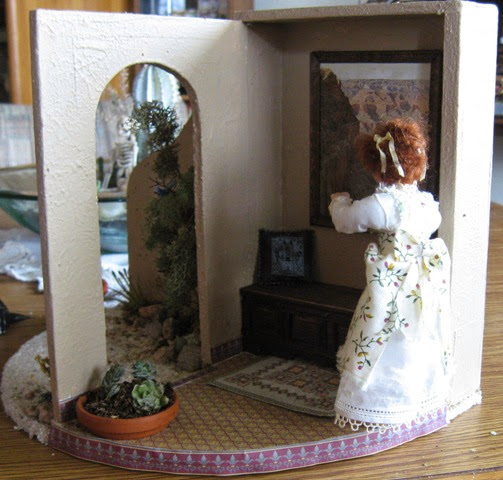
I had the pillow and the rug in my stash too.

The floor was rather boring without something layered over it and this rug had the right colors and a kind of tile feeling in the design. 

The pillow was made from an old silk necktie.

As you can see, the cacti garden is still doing well...We shall see how long it lasts now.

I am closing the book on this one.  On to something else tomorrow...I don't know if I will go backward or forward.  It depends on the mood of the six year old.

Tessie is still annoying me about the hairdo.  I may just have to fix that before I go onto other things.  Let's face it.  She won't quit until I set it right...

See you tomorrow.

Forgot to add, today is the last day of Google reader...I just transferred all of the blogs that I follow over to bloglovin about 7 this morning....I am not sure that I will stay with it, but I wanted to make sure that I could still follow the blogs that I do now...As I understand it, Google is no longer going to support blogs that aren't blogger.  I transferred over by joining and then one click copied all of the ones I followed to a site there.  It is similar, but not quite the same...I guess I will have to get used to it or find another one.  There are several others out there.

Saturday, June 29, 2013

The Blue Jay Has Landed...

My friend Joan gave me a blue jay in mini, from a show a few weeks ago...He has now found a home of his own.  He didn't show up very well in the trees at the craft cottage.  Here, he is a stand out.

I did the landscaping this morning.  I won't go into all of the details, because I did a lot of that in the craft cottage yard.

I will tell you how to make a mole hill out of a mountain though.

I started with a block of dry floral foam and got what is in the corner, covered with white glue...Yup.  All of the green stuff is leftovers....thus the mole hill...

I painted that white to keep all of the sand the same color and then smeared it with lots of white glue.  I sprinkled on some of the sand and shook off the excess.

Then on to the landscaping goody bag.  I used the heavenly bamboo, Nandina, for the branches of the tree.  It turned out kind of mesquite looking...
I used clumps of the railroad, reindeer moss for the foliage.  Then I went to the backyard supply house for rocks.  My back yard is full of desert stones and I don't think I am going to have to buy stones anytime soon.

I had cacti and other vegetation left over from the craft cottage, so that was done in no time...

Then Tessie got involved.  "It needs life!"  I knew that she wouldn't let up, so I told her to go find some...

I thought that would keep her out of my hair for a while....Wrong-O.

She was back in a flash. She had a salt shaker in one hand and the blue jay sitting on the mesquite tree, just as nice as you please....

I asked her how she did it and she replied, looking down her nose at me, "Honestly!  Didn't you ever hear that the way to catch a bird is put salt on his tail?". 

I looked a little closer and saw that the poor bird was just covered with salt...I doubt if he could lift his wings to fly away...

The last time I looked, Tessie had him in Eskiaga's patio birdbath.  He seems to have survived the ordeal, but the birdbath is now a salt water vessel and no self respecting bird but a sea gull is going to use it again.

I am off to supervise the cleaning of the birdbath....I see Tessie sauntering that way with her toilet brush....Gotta go now!

See you tomorrow.

Friday, June 28, 2013

Faking It...

OK, only one vote for white.  Way more for adobe, which by the way is most always covered with plaster/stucco, so is not the most popular choice for color.

I do like it though.  I used my favorite Trail Tan Ceramcoat.  Not bad at all...

Last night, I faked a chest to go inside the cigar box.  I looked at a lot of real Mexican furniture.  I have an Artes De Mexico catalog from 1967.  They have been reproducing early Mexican Colonial furniture for many years.  The catalog is one of my favorite books.  The painted cabinet in the upstairs of the Southwestern room is a copy of one of theirs. The catalog itself is put together with real wrought iron nails and the cover is floppy pieces of rawhide.  Really cool.
 

Anyway, sidetracked as usual. Sorry about that.

As I said, I faked it.  The front and top are real, the rest is just supports.   I cut the front 1 1/2" high by the width of the box.  The top was 1 5/8" by the width of the box.  The side and back supports were the same height as the front.  The back one was the same size as the front.  The sides were the same height, but less in width, to allow for the depth of the front and back.

I didn't plan for the scroll bottom...No floor tile underneath.  Now I have to patch it. 

Nothing is glued in yet.  I just did a dry fit an thought that you would like to see what direction I am headed.

When I did this as a class, I gave people the option of a very simple version of this bench.  No scroll bottom and just panels faked with chair rail.

This one, I carved the panels and then trimmed the edges with 1/16" double bead molding to give it a more finished look.
I like it except for the white streak on the right panel...It was a flaw in the wood.  When I finished carving, it wouldn't take the stain the same as the rest.  You can see it just a little in the next panel over and on the right foot.  I am going to go back in and fix it.  Most irritating.

Oh!  I almost forgot.  See the little cactus garden?  I found the terracotta pot(small saucer for under a starter pot).  I filled it with potting soil when I got home and grabbed some shoots that the squirrels had dug out of one of the dish gardens.  I don't know how long it will last, but for 28 cents, I am going to see.  Hey!  It's lived for about two hours, so far.  There is hope.

See you tomorrow.

Thursday, June 27, 2013

Gesso Again, Then Tile...

You will be able to see the second coat of gesso on all of the photos today.  I didn't want to bore you with plain white photos of blank walls.

I left the jar ajar last night so that it would thicken a bit.  This morning I applied it with a stiff brush and used a cheap foam rubber stencil pouncer to see how it would work....It did.  In fact, I think I like it better than the regular bristle stencil brush that I usually use.

On to the floor.  I decided to use the gold paper with trim on the edge.

I laid the paper in the corner and held it there while creasing the outer edge.  Then I cut it about a quarter inch outside of that and cut Vs In the bent part about every half inch.  This eliminates a lot of excess overlaps.

I wanted the interior of the porch to be higher than the sand, so I simply cut another layer of the foam core to fit the space.

That brought it up another quarter inch.  You can also double up on the walls if you want them thicker.  I do sometimes.  I didn't this time, because I wanted to make it as simple as possible.
I used the border to trim out the step in the arch and more to run along the edge of the curve.  I don't like edges just painted or not covered.  It looks so much better if you take that extra step.

As usual, Tessie helped....She stood on the door way tile until it dried nice and flat.  Oh.  I used Yes glue to do the main part and plain white glue for the boarders.  The white glue holds quicker and is stronger.

I found out why Tessie is being so helpful... She announced that, "I want my old hair back.  These silly ribbons are getting in the way and my bangs are all messy again.  Reverse it please."  This must be serious.  She never says please...But I did have to promise not to take any bald photos when I do it...No fun at all.
I am now trying to decide if I want the adobe white or if I want it more of a natural tan adobe color...Opinions?

I am now looking at my cigar box collection and trying to decide if I want to do more.  I think that I have a bad case of box pox...Stop groaning...

For Giac.  Here's the book case....All fixed...No minis were harmed in the fall.

I repaired the glass with caulking compound and the shelf is back in place....The only way that you can tell that it was broken is, There is a pile of books exactly the right height under the middle now.  That will keep it from happening again.  It is by no means perfect, but it works.

The one at the top left broke a long time ago because of the same situation...the glass shelves are supposed to slide into a slot where the light sources are...Sometimes they don't stay put and then they drop in the center...

I don't want to get rid of the unit.  The shelves are way deeper than normal book cases and perfect for mini rooms and houses on top.  They don't see a need for making these anymore....The center unit, where the southwestern room box is, used to be for a big old TV.  Stupid flat screens made this obsolete.  Don't get me wrong.  I love the flat screen TV.  I just miss the depth that used to force manufacturers to build deep units like this one.

Anyway, the one that broke this time was the bottom one on the right.  I put in a lot of books that I don't read anymore, then put an antique photo in front of them.  Thank goodness I didn't carry out my plan to take those books to the used book store!

Back to work.

See you tomorrow.

Wednesday, June 26, 2013

Icky First Coat....

Day Two.  This could mostly be done in one day.  I used to teach this class in three or four hours and a lot of people went home with it mostly finished.

OK...Here we go.  I used the infamous Walmart sand, from the floral department.  With the Craft Cottage and this, I haven't even used a half a sack. 

I first sat the box and lid where they would be on the board and traced around them.  That was to determine where the sand would be. 

Then I took the box and lid off and did what you see in the first photo.  I used plain old tacky glue, straight from the bottle.  Then spread it around with my fingers.  Then sprinkled the sand on and patted it down so that more of it would stay.

 If you are new at this, I would suggest that you do about a quarter of it at a time....

But first, I spread the glue around where I wanted it on the edges.  I had to go back and do the left back edge that isn't covered in the first photo...Yup.  I forgot it.

The only part I didn't do is where the tile is going to be.  That's the curve in the foreground of the second photo.

This is kind of messy, so work on news paper or paper plates.  That way you can dump the excess back in the sack.

If you are using good (like Elmer's) foam core, and a good thick glue, you shouldn't have any problem with warping...Sometimes it is essential to spend more than a dollar for foam core.  I do use that too, but not on something like this.

Next, you glue the bottom of the box in place and follow that with the lid, trim pieces and the outer wall.

I use an exacto clamp to keep the lid and box in line.  That assures a square corner also.

When I got the clamp on, Tessie showed up with a pile of tile paper....I vetoed all but a couple. 

She seems to think that she is going to get her pick of the decor in this one.  I like both of these.  If I use the bottom one, I will cut off the boarder and use it along the edge of the floor curve.

The blue and white one will have to be faked as tile.  It is really 20 year old wrapping paper...Yes...I save everything.  I have used this for floors and walls several times.
I kicked Tessie and the tile to the curb and did the first coat of gesso.

Tessie's only comment was, "Icky first coat."

Hey!  The first coat just had to cover everything inside and out.  The pretty part comes later.

I have to stop now.  The Wednesday Witches are meeting today.  Not here, thank goodness.

I have a kitchen table full of books and other stuff from the big bookcase.  One of the shelves broke the other day and I am in the middle of patching it.

It happened once before and I fixed that one with silicone sealant...It has held up pretty well.

I should know by know that you can't load glass shelves with books...and more books, without them breaking.  Actually, it wasn't that.  The back panel came loose and dropped the light bar down so that it wasn't supporting the shelf like it is supposed to.  Oh well.  It will take a day or two to set it right.

I need to go get ready for the witchy meeting.

See you tomorrow.

Tuesday, June 25, 2013

And the Winner Is.....

KATIE!  That is the Katie of Katie's Clay Corner blog. http://katiesclaycorner.blogspot.com/  She is an avid miniaturist and does lots of different things. I am an admirer of her aging and woodworking.
Congratulations Katie!

Now on to other things.  I'll bet that you thought that the boxes were something new that I just thought up.  Not quite.  They started with a kid's cardboard pencil box back around 1990.  At least that is when I started doing them.  I taught a class on how to do them back then.

You can still find the cardboard pencil boxes on line, but they aren't nearly as nice as they used to be.  Not as thick.

I woke up about 2:30 this morning and couldn't get back to sleep, so I thought about what I could do to make it easy for the rest of you that were interested, to build your own box.  I decided to show you how I did the original one.

You can take it from there. It can be made into anything that you want. 

I am going to do it the way that I did it originally for the class.  Only this time I am using a wooden cigar box that I had handy.

You will have to take your own measurements and make your own plan, but it is really simple.

The first thing that I did was sit the box on a piece of GOOD foam core.  Not the kind that you get at the dollar store.  It needs to have a hard finish so that it won't warp as much.

I lined the back edge of the box up with the edge of the board. Then I used the lid as a compass and drew a semi-circle on the surface of the foam core.

As you can see, the first blade that I found was not exactly sharp.  No worries.  The surface will be covered. 

With this box, I had to cut off the lid and treat it as a separate piece.  Your box may not have to be done this way.  With mine, the lid fit down inside, flush with the top edges of the box on both sides.

I cut it off and slid it into the side at a 45 degree angle.  If your box top overlaps the box all around, this step is unnecessary.

I cut a piece of wood to fill in the far edge and two small pieces to fill beneath the sides of the arch.

I cut out the arch by making a paper pattern.  The paper was cut to the size of the lid and folded in half.  The arch was cut from that.  Then I traced around it on the lid and, in this case, I cut it out on the jig saw.
The only one of these that I have left is the mini, mini one that Tessie is holding in the second photo....Did I mention that, when I was taking that photo, she hissed at me.  "This one is MINE!" 

She wasn't talking about the little one she is holding... She is keeping the big one she is standing in.  Typical Tessie.

Anyway, here's the little one up close.  I will start doing the spackling, landscaping and flooring next.

As I said, the indoor outdoor thing is nothing new.  You can do it many different ways. You can put a door or window in the wall, instead of the arch.  You could possibly make it two rooms by using two box bottoms.  It is really easy and a lot of fun. 

Back to work.  Again, congrats Katie!

See you tomorrow.

Monday, June 24, 2013

"If I Can't Have It......

...Nobody in this house can have it!"  That was Tessie this morning...

I asked her what she was talking about... Here's what she replied....Grab a cup of coffee...This could take a while.

I sprayed the floor with matte Mod Podge finish this morning and gathered up a few more things for the shelves and announced that the box was done.

That's when this all started.

Here's her answer.  "Since you won't let me have it, it should go to some nice person that made a comment while you were doing it."

That sounded OK, so I let her go on with her rant.  "Take one last photo of me sitting in the chair and then I will tell you what I have been doing an d what I have in mind..."
"Now that I and the pup are out of the box, take another photo."  Never a please or thank you...Just orders.

"Any comments made from today on won't count.  I have been coming in here and adding to my list each day.  I put the last name on early this morning...I am finished.  Done.  The list is complete." 

At this point, I decided that I needed another cup of coffee, if she was going to continue.

I got it and she started in again.  "To be fair, I didn't duplicate anybody's name...One to a customer, as they say...By the way, who is "they" anyway?"  I am going to check her list to make sure that it is exactly what she says it is.

"As for you, you get to do the packing and shipping.  I will be directing as usual.  Some of the stuff is going to have to be fastened down.  Leave some spaces on the shelves for the person that gets it to add a couple of their own things."

She went on and on about how hard she worked to finish the box...It must have been when I was asleep and she must have undone everything that she did before I got back...

I will boil it down for you.  Tessie made a list of everyone that commented and one of you is going to be contacted for a snail mail address to send it to.  Short and sweet.

The drawing will be by tomorrow.

See you then.

Sunday, June 23, 2013

Meeting the Deadline....Maybe

See that little black thing in my hand?  It's the smallest portable radio that I could find at Walmart this morning.  It's cost?  Ten dollars!  It's a Magnavox and it runs on one AAA battery.

I wanted it to carry around and listen to when I am outside or someplace that there isn't anything else to entertain me.

I had a brainstorm whilst messing with it...Now I have to find a very small speaker.  Then I can have music in some of my room boxes or in one of Tessie's houses. 

I did try one of my big speaker sets that I use with my I pad.  It works, but too big to hide anywhere.  I am thinking maybe Radio Shack might be able to help.  We shall see.

I spent the morning hand sewing...Real stuff, not mini.  These two shirts came with a white bib inset in the neck, but when I got them home and tried them on it was a bit small for my taste...So I took  a white tee shirt and used the bottom edge to make the neck insets and one set of white cuffs and the bottom of the sleeves to do the other set.

That little bitty thing sitting on top of the neck of the yellow shirt was what was in the neckline before.

OK...I know that you want to see progress. I did some shading on the floor with Prismacolor pencils after I finished the shirts.

Tessie helped...(She paid me in chocolate chip cookies to say that.)

Anyway, I should be meeting her deadline by tomorrow morning.

See you then.

Saturday, June 22, 2013

It's all Fun and Games.....

Last night I worked on the rug for the craft cottage...It doesn't look like much more, but that was a couple of hours work, considering that there are 484 cross stitches to a square inch.

Fun and games....Tessie watched and munched cookies.
 This morning I went to Walmart and found some new fun tools for minis in the nail art section. 

They are short handled, very nice brushes and stylus.  One liner. One angled.  Both those and the stylus will work well for getting into small areas of tile, etc.  It came with a couple of sheets of stencils for nails...Small fun bonus for me.  I just really wanted the short handled implements. 

The real fun and games came at a garage sale at a neighbor's house.

I found another piece of green glass in which to house a terrarium.  It's almost an exact match for the desert landscape.

The fun was watching Tessie try to balance on the lip of the jar for photos...She kept falling in and I had to fish her out.

For some strange reason, her zapper doesn't work inside that kind of glass....Nice to know... Now where did I put that big cork that would fit the neck of this bottle? 

The kids are coming today to celebrate Father's day.  They were up in Phoenix last weekend.  

I just made bean salad and apple pie....The bean salad is fine, but the apple pie has tiny bite marks around the edges...from both a witch and a dog....Now about that cork....

See You tomorrow.

Friday, June 21, 2013

OK....Stop Nagging!

I am back....Working on the Mystery Box.  It is no longer much of a mystery. 

I am down to the wire.  Tessie is still holding out for Monday as the deadline.

I did the bolsters and pillows this morning. 

Here are the things needed to do it.

You have seen me do the Tampax bolsters before.  There is a tutorial under beds in the labels list.

I will go through it once more in an abbreviated version.

These were easy.  No cutting of the tubes.  The inner tube is just a tiny bit under three inches, so they did the job for the bolsters along the back of the bed.

They were covered with a layer of batting and then a layer of material.  To this point, everything was glued. 

Then the ends were gathered with a single thread. 

Oops. I lied.  I did cut the outer tube in half for the white, shorter bolsters.

When they were finished, I decorated the shorter ones with green bows at the ends.

Since the pillows will be glued in place, I opted for the kind made with index cards.  Again, there is a tutorial elsewhere for these.

I made them 1 1/4" square.  Cut two of the card.  Glue on a layer of batting.  Then cover with fabric.

Sandwich two together back to back and decorate the edges. Then, when they are dry, you can bend them to look slouchy.

I have dropped the other two boxes for the time being...Tessie wants this one done.

I am not sure of the reasoning, other than the fact that she wants me to work on her stuff.

I am really close.  We just need a few more things for the inside and a finishing coat for the floor.

She is still fighting me for the hat, but I am bigger than she is... Maybe, just maybe, I will win.

Wish me luck!

See you tomorrow.

Thursday, June 20, 2013

Of Silk Purses and Sow's Ears.....

Never send a cheap gem show seed bead to do a rocalle's job  and definitely never send a #8 Walmart seed bead to do the job of a genuine crystal accent bead... The results is not at all the same and the trip is torturous....

I have been wanting a crystal chandelier for the craft cottage. I ran across this page of notes when I was cleaning my workroom....Any excuse to stop...This will do.

These directions are some that I copied from a magazine long ago and it's how I first made chandeliers.

How do I know?  I tried Zap a Gap glue just once.  Stuck all of my fingers to the top of my head with it...Never again....Just kidding about the top of my head.  The fingers were stuck to each other.

Actually, the seed beads were a hank that I bought at the gem show....Cheap...

The #8s were from Walmart.  The findings were some that I had on hand.


It doesn't pay to use cheap supplies when you are trying to do precise beading....As in having six arms of a chandelier turn out the same length...

At this point, it doesn't show.  To the left is the top and swags.  To the right is the bottom and the arms.
This is where I started getting into trouble. I finally resorted to putting a larger finding at the bottom.  That helped...Somewhat.

Never say die.  I was determined. So I made allowances by adding extra beads here and subtracting other beads there.

It took me twice or thrice as long as it should have...I was discarding beads with small holes, right and left...That is, they kept bouncing off the work mat, right and left.

I kept asking myself if I really wanted to do this...And kept going.  Anything to keep from cleaning the dreaded workroom...

This was the end result...The photo looks pretty good.  I took a picture and turned the chandelier a fraction of an inch...Took another photo and repeated. All in all, I think that I had about 15 photos at different angles.

Then I choose the photo that was the least offensive...

I will hang it in the craft cottage, at the same angle, as a lesson for what not to waste my time doing...  Until I find my decent beads and I know I have some crystals somewhere....

I told you my workroom needed cleaning again!  Now do you believe me?

See you tomorrow.

Wednesday, June 19, 2013

Time Out....


This morning, I started hunting for accessories for the Mystery Box...I did pretty well, considering that nothing was where it belonged.

I found a yellow hat with green trim that matched the room perfectly...Of course, Tessie claimed it and didn't want it to go in the room.  She wanted it in her hat shop...

I realized that the reason that I couldn't find anything was because Tessie was hiding things so that they wouldn't be put in the box...

While I searched, she sat on her tuffet and munched on chocolate chip cookies.  Only crumbs left for the dogs.
As I sat back to look at the box, so far, I saw this....Not good.

I can't work on the work table....No room.

I decided that I should clean a bit before going on....

Then I made the mistake of getting up when the timer went off, to go move the hose.  Still no sign of more monsoons.

Oops!  So much for working on the boxes...at least for the time being.  At least there is a path from the door to the worktable.....That's about all there is. 

I guess I am going to have to break down and straighten things out....

Tessie refuses to help.  When I asked, she told me in no uncertain terms, "It's not my mess.  Not my problem!  Call me when you are finished."  And with that she flounced out of the room.  Taking the dogs and cookies with her.

I guess I am on my own for now...
See you tomorrow, with a clean room...Maybe.
 

Tuesday, June 18, 2013

A Little of This and That....

 Yes, I am still working on the Mystery box....Among other things.

Sorry Phyllisa, no princesses.  I did get a mattress in it and some drawers on the front...Obviously a box bed now.  Maybe I can at least get this one finished before Tessie's Monday deadline.

Spike's little brother showed up this morning....I can't find Spike.  I think that Tessie locked him up someplace so that she could be the model...
For all intents and purposes, the remote is covered.  I may still have to put some fringe on top of his hat or a chain for him to go around my neck.  I am always losing him.

Tessie is scheming for a way to use him in one of her places of residence.  At least I will know where to look when he disappears.
Lastly, I did some more work on the rug for the craft cottage.

Don't let the pose fool you.  Tessie did NOT work on it today.  I did!

It is slow work doing the vines.  After I finish those, filling in the background will be a  breeze.

I have to go back to work.  The real house needs attention.

See you tomorrow.

Monday, June 17, 2013

And the Beat Goes On.....

That is Tessie's beat for petition signing...

In the middle of last night, about 3AM, I heard noise in the living room and went to investigate.

The fan light was on and Tessie was trying to get Cordelia and Eskiaga to sign the paper.  The trouble with this was....neither of them had any complaints.

She is trying to make me think that I am way behind on upkeep....It's not working.

This morning I did repair Nellie's front foundation.  Now all I have to do is paint it.

Tessie's nose was out of joint the whole time.  First she hung over the edge of Nellie's bed and complained.  That lasted until Nellie kicked her out for making too much noise.

It's hard to concentrate on stitchery when someone is shouting.
It was much better when I used the old "white washing the fence" trick.  I kept telling Nellie how much fun I was having and she agreed that it really looked like a fun job.

The next think I knew, Tessie was handing me the stones to put in the space.  As soon as it dries, I will paint it...I wonder if the whitewash trick will work twice in one day?

I still need to take the chimney off and see to the wiring in this one too...  Did I mention that I don't like wiring?  I don't.  I can do it.  I just don't like it.

Only a few more rows on the top end of the remote.  Actually, that's the bottom end.  The end that does the work is his chin.  So close.  Yet so far...

Back to work of one kind or another.

See you tomorrow.