Don't forget to poke the photos to enlarge!

Saturday, March 31, 2012

Never Leave Your Paint Drawer Open....

Unless you want something painted. It works every time. The paint party was going on when I got done yesterday. It takes them longer than it does me and the color selection is questionable.

I think that I need to make a trip to JoAnn's and pick up some more colors. The drawer looks like it is almost full, but there are a lot of duplicate colors and a lot of almost empty bottles.

I am not taking Tessie with me to the paint store though. See the two bottles in front of her? I got there just in time. She was looking for puce again....What is it with the color of fleas that attracts her? Remember her cottage that had a puce bedroom(see the photo in the header) and at that time she wanted everything, including her motorcycle painted that color.

I thought that she had outgrown that stage. Evidently not. "No, Tessie! I am putting my foot down. No puce in the weaver's cottage. At least not a whole room!".

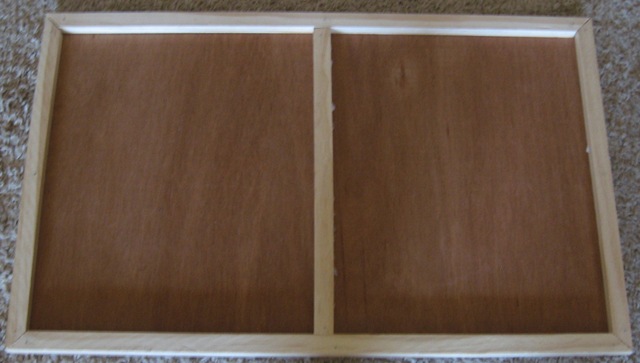
The party did manage to get two other rooms painted. Zar is sitting in the room that they did with "Black Green Ceramcoat. It has an off white ceiling, but I am still not sure that it isn't too dark.

I am really glad that I can work with a larger paintbrush than they can. It won't take long to change.

The room below was painted with Wedgestone Green Ceramcoat. That's much more bright.

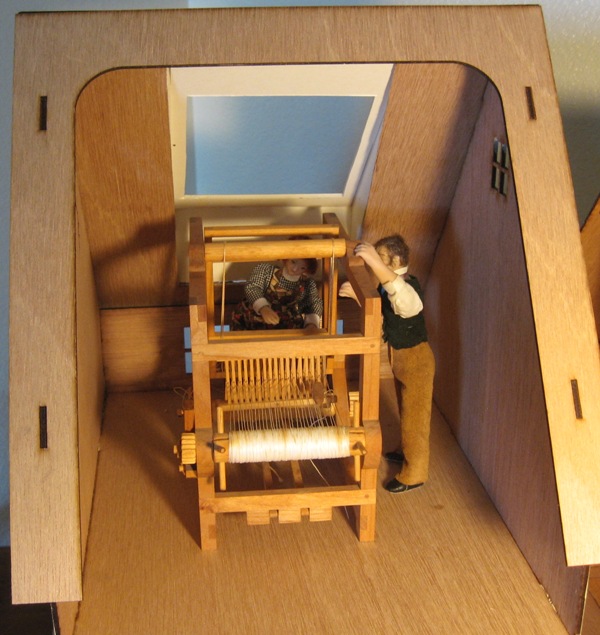
The weaver is going to need lots of natural sunlight. The room that Zar is sitting in is going to be for storing the roving and other wool.

Hmmmmm, roving....That must mean a spinning wheel will be needed. Tessie has a couple of drop spindles. Those will have to do for now.


After I told Tessie she couldn't paint the main room puce, she stood up to her full 5 1/4" and emphatically said, "I quit! I am not painting with any other color."

She left, dragging Zar along behind her. She zapped the house around to face outwards and climbed to the peak.

"Now you can take a photo of us on the partially finished room. You are so slow....I could have done this in about ten minutes!"

I know what kind of roof I would have if Tessie did it....Zapped tar paper. No thanks. I will do it slowly.

Oh! I did an experiment this morning.....I wish I would have taken a before and after photo. On the left hand side of the annex, at the bottom, you can barely see a gray wash on the bare wood of the foundation.

I didn't notice until this morning that I had dribbled gray wash top to bottom on the yellow wall. My first thought was, I have no more of that color. No touch up. Then I thought of all of the dried up paintbrushes that I clean with alcohol. It was worth a try. I went and got some on a tissue and started gently rubbing the dribble. The wash came right off. Granted there was a tiny bit of the yellow on the tissue too, but not enough to make a difference in the paint job. So, handy hint. If you drip, try alcohol to get it off. No guarantees come with this recommendation, but if you're desperate it's worth a try.

I dont' think that it will work on unpainted wood all the way. I got some of it off, but that's the part that you see in the photo. I am going to cover that with foundation stone anyway, so I didn't try too hard.

I guess that I had better go grab the puce and put it back in the drawer. Next time I will close it before leaving the room. Especially if there is puce involved!

See you tomorrow.

Friday, March 30, 2012

Look to the Right!

The announcement for Best Miniature Blog for 2012, by About. com http://miniatures.about.com/od/miniaturescommunity/ss/2012-Readers-Choice-Best-Miniature-Blog-Winner.htm was made this morning. WE won for the second year in a row. Thank you for all of your votes and support for the last month! Tessie is off somewhere celebrating right now....She and the rest of the crew are partying up a storm. I am left all alone to work and write....How sad?....This should be twice as fast as usual. I need to find something for them to celebrate more often....Back to work. I have three very boring photos to show you this morning. Please keep reading. There are prettier photos to be seen later.


I am working on the slate roof now. Very gray and very blah so far. The first step is to put a wash over the whole side to cover the printing on the cartons. It IS a wash. Very watered down paint. It is a mixture of Ceramcoat Hippo Gray, Charcoal, and White to start. I don't want three separate colors, but I don't want one solid color either, so I mix as I go. Before I am done, I will have gone over it many times. A dab here and a dab there to change the color of different areas. In the second photo, I have scored between the wet shingles on the bottom eight rows. You can clearly see where I stopped.


The top part doesn't have as much wash on it and is drying fast. I will go back in and do some more painting and then score that part.


It is hard to tell what I did with the painting in the photos. In a couple of places you can see where I have made it a little darker at the top of the shingles, under the next course to make the edges stand out. Basically, I fuss with it until it looks right.I tend to use the same approach that I would use if I were doing a painting of a roof. Darkness under the front edges here and there and lighter tones dry brushed on the bottom edges to further emphasize the contrast.


Here it is with all of the basic scoring. I will go back in and do it again in some areas, where it doesn't seem to show as much.


Paint and score. Paint and score some more.


When I get the paint part looking the way I want it, I will let it dry thoroughly and then start shading with Prismacolor Pencils. That's when the roof starts to really look more like slate than egg cartons.


Hang in there. This is going to take a couple of days. Meanwhile, here is something to keep you amused.....Remember I promised you pretty photos at the start of this? Here you go.
http://www.flickr.com/groups/cottages/ I stumbled upon this site this morning. There are over 4,000 wonderful photos of cottages from all over the world. I have not had time to explore it fully yet, but I think that I am going to be distracted a lot by this site. I want to build at least ten different ones so far.

If you double click the first photo you will get a larger view. If you double click that one, it will take you to the slide show. For those of you that don't know, as well as setting the time of each slide to a number of seconds, you can go down and pause it. Then when you go back up(still on pause) you can stay on each photo as long as you want until you click it to move. No pausing and then clicking it to go again that way.

Have a wonderful day, wandering around the world, dreaming of the next house you are going to build in mini. I know I will....No, wait. I have to finish the Weaver's Workshop.

See you tomorrow.

Thursday, March 29, 2012

Changes....

OK, first of all, Tessie has learned not to stand so close when I am gluing on shingles. At one point, she had her right cheek stuck to the roof. I had to pry her loose. You don't want to hear the words that she was using while I did it....

I am using plain old Aleene's to stick the egg cartons on the roof. It always takes way longer than I think it is going to. I cut all of the shingles with scissors. First into strips. Then into rectangles and then clipping two corners of each shingle....Yup. Lots longer than estimated.

I start out by just randomly cutting out a bunch of shingles about 1/2 to 3/4" across and about 3/4" tall. I use those for the most part. I have to cut special sizes here and there to fill in, but that's easy enough.

I want them to look like the slate is old, chipped and cracked when I am done, so I am not at all careful about making everything uniform.

After I get them all glued on, I will start doing washes over them. I will also have a stylus in my other hand to knock down the cut edges and make them worn and smooth.... The large end of the stylus is for that. The small end will be used to put in cracks and other defects as I go. It is easiest to do this with the egg crates wet....Therefore if I paint and poke all at the same time, I am again killing two birds with one slab of slate....No...I really don't kill birds, if there was any question. I have the best fed birds in Tucson, in my back yard.


You saw me leave the room yesterday and come back in the middle of the blog. This is what I was doing. The skylight looked too blah.

I cut the corners out and put in posts with finials at the top.

I think that I am going to have to put a second coat of stain on them. The walnut that I used doesn't soak up as much as the bass wood in the window frame.

I can see that there needs to be a touch up in the corner of the frame by Tessie's hand too.

All of this will get done eventually. It's amazing that I can spot the defects in the photos better than with the naked eye.

The other thing that I did yesterday, that I forgot to mention, was cut out all of the mullions in the other windows, thus making myself more work.

There will be six more diamond paned, leaded windows in those big old holes. The sixth one is in the top half of the door.

From the looks of things, I don't think that Zar is too comfortable on the roof. If Tessie falls off, she will just zap herself to a soft landing....Zar on the other hand is more breakable. He doesn't know how to zap.

Tessie has tried to teach him from time to time, but even though he is a Steampunk genius, there isn't a witchy bone anywhere in his body.

I guess I should go finish the roof and rescue him, not necessarily in that order. Tessie tends to zap him somewhere and then wander off and forget where she last left him.

Back to the real world of laundry and the better world of roofing...

See you tomorrow.

Wednesday, March 28, 2012

"You Didn't Show Me the Hammer!!!"

I laid the foundation of the Tudor this morning. I used the same 3/4" by 1/2" wood that I used for the base. For the base, I used the 1/2" side facing out. This time I turned it with the 3/4" facing out. I wanted a little taller foundation than the base.

This is one piece of lumber that is cheap and it has a lot of uses in miniature building, even when you are cheating. If I am using a kit made of luan plywood, that's one thing that I always add. It gives a very sturdy feeling to an otherwise shaky building.

First I mitered the corners and glued them together. I then put a line of glue around the top and put the building on top of that. Then I put in three nails on each side, through the floor and into the wood strips.

It is much easier to do this step before putting the building together. I was having such a good time with all of the laser cut pieces that I just plain forgot to do it. One of those "Duh!" moments.


As I was getting ready to nail, Tessie wandered in and nicely volunteered to hold the nails, while I hammered them in.

She was all set with the first one. As she held the nail in place, she turned her head towards me and screamed, "No!!! Not the big hammer! You didn't show me the hammer!" She threw the nail at me and jumped out of the way.

As I held the nails in place and wielded the hammer, she explained, "I thought you were going to use Zar's hammer. There's no way I am getting anywhere near YOUR hammer. That thing is big and mean!"

So much for building help for the day.

I laid the hammer on the counter after I was finished and went away to find my coffee cup. When I came back, there was Tessie, rudely kicking my poor hammer. Then she jumped back and shook her fist at it.

I am now wondering what kind of childhood trauma caused the panic. At any rate, I will have to be careful. She might just decide to banish all hammers from the house. When she does that with anything, I have to go out and buy replacements for whatever she banished. They are never to be found again. She is very good at banishing spells.

I also finished laying the slate on the front roof. I still need to finish the annex roof and the back arches. Then I will start doing the washes and ageing...

I just went out and changed the skylight after seeing this photo. I hope that this will work....You will get to see if it did tomorrow.

I have to go to the Wednesday Witches mini meeting this afternoon. Reality is cutting into play time again...

Maybe I will take something small to work on that pertains to the Weaver's Workshop.

I have to go now and check on the whereabouts of my favorite hammer and put it away carefully....I want to keep that one. I don't want to have to shop for a new one. It just wouldn't be the same.

See you tomorrow.

Tuesday, March 27, 2012

More Shingles, Please.....

I started the shingling this morning. I had to affix the roof lantern to the roof proper. Whilst the glue was drying, I finished the rag rug. I am quite pleased with how it turned out.

I don't think that I mentioned in the first part of the tutorial that I split the two threads going lengthwise and did a row between those as well as the open rows. That made for twice as many rows and a much fuller rug.

I ran a row of white glue down each side and let it dry. Then I cut the edges down flush with the outer rows on either side.

I then pressed the rug. spraying with water as I went. That made the rug very flat and stiffened it somewhat. The waste canvas has a great deal of sizing in it and reverts to it's stiffened state when pressed. That makes it easy to finish.

After pressing, I simply cut straight across each end with large, sharp scissors. Those work better than small in this case. You can cut across in one stroke and get a very straight edge.


Now about that roof....several hundred shingles after I started, I only had the roof 3/4 finished and need to stop and cut a lot more.

I am having to do a lot of cutting and fitting of individual shingles. Right now it looks a bit messy, but that will go away when I start painting it.

This isn't all of the 6 or 7 egg cartons that I cut into strips. It's just the part that I cut into actual shingles.

I am definitely going to cover the windows at the bottom of the second floor. The rest of the windows are going to get the mullions removed. they will be replaced with diamond paned, leaded windows to match the skylight.

I did get the interior of the loom room painted. I used a mixture of Ceramcoat Old Parchment and some Folk Art Buttercream to lighten it a bit....No...I can't just use the color that comes out of the bottle. What fun would that be?

I am going back and cut more shingles until I am blue in the face and then....I have to cut cobblestones for the base.

I had an overabundance of egg carton lids when I started....Oh well...I can start again. Eggs for breakfast anyone?

See you tomorrow.

Monday, March 26, 2012

Get the Lead In....

Back to the skylight...or as the Georgians called them "Roof Lanterns". I kind of like that term. I found it when I was looking for the history of skylights.

I decided that I would just keep going in the direction of half timber and all the things that go with that style.

Windows? What else? Leaded. Back then the glass was made in small pieces. I decided on diamond panes.

In the first photo, you can see what I used. I found a piece of real picture frame glass the right size to work in the skylight and glued it in place. Then I dug through my stash and found my golfer's lead tape. It is self adhesive, so all I had to do was cut it into narrow strips. I used scissors, but if you are going for accuracy, I would suggest a metal ruler and a sharp Exacto knife.

I made the mock up accurately and from a good grade of foam core. I am going to use that instead of going through making a whole new one. It is going to be covered completely, so nobody is going to know it's not wood, unless they take the whole thing apart. Hush! Don't tell!

Did I say rustic? It is that. I only have the skylight sitting on the roof to show you how it is going to look. I did the actual work elsewhere. It's much easier to do the strips of leading flat.

I taped a piece of graph paper to the back of the glass for better placement. That let me line up the diamonds.

after that, I framed out the window with 1/2" scale crown molding on the interior. That kills two birds with one stone. It covers the seam between the glass and the wall and gives a finished edge all around. It happens that it is the same thickness as the foam core that I am using.

First I trimmed all of the excess lead around the window. Then I framed the exterior with 1/2" scale chair rail. Logically, these windows wouldn't open. They would however, need support. I put two vertical pieces of chair rail to divide the window into thirds.

Now I have to go back to the real world and finish the laundry and cleaning. By tomorrow, I should have the roof lantern finished.

See you then.

Sunday, March 25, 2012

I'll Be Darned!!!

It works! See these ugly stitches on ugly stained canvas? They are turning into a woven rag style rug.

I was sorting through things this morning and found a piece of waste canvas that people use to do cross stitch on non cross stitch fabric.

I flashed on the baskets that I do with Penelope needlepoint canvas.

Then I flashed on an old needlework book that I have that has darning stitches in it. And the answer to your next question...Yes. I have been known to darn socks. Only my own hand knitted ones.

This is a page from the book. So called darning stitches are simply running stitches, done in a pattern. They can get pretty fancy if need be.

As I said, I have used them on baskets, but I don't like to use Penelope canvas for rugs. It's too thick.

When I found the waste canvas, I found the solution.

Oh! In case you are interested in the book, it is "The Complete DMC Encyclopedia of Needlework" by Therese de Dillmont, in it's present life. In it's former life, the copy that I have from the late 1880s is just called the "Encyclopedia of Needlework". Mine is not a first edition. It was first published in the 1870s. DMC Thread Co. first started business in 1746. That's a long time to keep people in stitches.....OK...You can stop groaning now.

As you can see here. The other canvas is much too stiff for rugs. Good for baskets though.

I cut off a piece of the waste canvas. It was too white. I took a beige sharpie, because I was too lazy to make tea for tea dying, and dirtied the canvas . I didn't want the white to stand out.

I then threaded a small tapestry needle with three strands of embroidery floss and started stitching. I went under the first thread of every other pair of threads.

On the second row, I did the same thing, but on the pairs in between the first course. That gave me an alternating stitch. After you have done some it looks like a loom woven rug.

You can pick the waste canvas up at most stores that carry cross stitch supplies and the plain old six strand embroidery floss too.

I am going to have to experiment with some of the patterns. This type of stitchery can be done on any even weave fabric. After all, it was first used to repair rips in clothing and other material.

Anyway, I thought that this might be a fast way of doing some "weaving" for the workshop.

I am still researching the skylight. I found that they go back to the Georgian period. That could be anywhere from 1714 onward....They didn't specify which George.... I, II, or III. I do remember being in Sir John Soane's home(early 1800s) in London and that has a wonderful skylight in the third floor that gives light even to the basement level, where the crypt with the sarcophagus is located....But that's another story. If you get a chance wander over to the website and visit. It is most fascinating. In case you can't tell, it is my favorite place in London. http://www.soane.org/history

Back to the darned weaving!

See you tomorrow.

Saturday, March 24, 2012

Room To Move...

I love it when a plan comes together! I decided to go with the skylight. Let's just say that somebody, sometime, modified the roof line.

This morning I measured the length and width of the skylight. Then I put the measurements in the center of the roof. The three courses of already laid shingles were at the perfect height for the wall of the house and the front wall of the skylight to match....No. I didn't measure. I was just lucky....

I then measured in 3/8" from the lines. That gave me a cutting line that would match the opening of the skylight.

I am now thinking that I may block the two bottom windows. They aren't needed and were strangely placed in the original kit. It's easy enough to do. I will simply cover them with mat board or even poster board.

See the piece that is leaning against the front of the building? That's the piece that I cut out of the roof. I did it with an Exacto knife. It was a little more time consuming, but left a narrower path between the pieces than a saw would. If I had decided that I didn't like the skylight, it would have been easy to glue the piece back in place. But I do like the skylight, so now I have some extra wood, if I need it.

Here's the inside. Two and a half extra inches makes a world of difference. Tessie and Zar can now both stand upright next to the front wall. No more crouching down to get around the loom.


Speaking of the loom, if Tessie opts to put it in with the seat slid back to the far wall, there is lots of room for other things in the room....

Here's proof. I doubt that I will get a lot more done today. Tessie won't budge. She is happily weaving away.


Zar "borrowed" a chair from the potions room in the townhouse, unbeknownst to Cordelia. She won't miss it. That room is one in which she is not allowed, per the rental agreement.


All in all, I am pleased with what is happening so far.


I should build the foundation, so that I can start making some things permanent. Notice I said should....I am enjoying taking parts of the house wherever I want and working on them whilst watching Netflix.


I am off to mini work now.


See you tomorrow.

Friday, March 23, 2012

Shortcuts and Old Styles...

I am all about shortcuts when at all possible. I decided to see what a skylight or dormer would look like on the workshop.

Sneaky person that I am, I always save all of the scrap pieces of the punch out dollhouses until I am finished with the structure. See that piece leaning against the side? That is where that end of the building was.

Rather than do a lot of figuring of angles and using a lot of geometry, I simply laid that piece against a piece of foamcore, making sure that the edge of the side of the house was parallel to the edge of the foamcore. That gave me a straight vertical line at the end of the skylight. In other words, the front corner. Then I simply drew the shape of the side on the foam core, twice. cut a piece the height of the end and the width that I wanted the dormer. One piece for the top of the skylight. That was the same width as the front piece and as long as the top of the side. I glued the top and front between the two side pieces. That's all there was to it.

I will do the finished piece from luan door skin. More sturdy.

First I tried a straight forward skylight. It seems too low for me and besides, it modernizes the lines of the structure.

We almost lost Tessie. She insisted on trying the skylight mock up as a slide. She has a thing for slides. Remember the incedent with the staircase in the Clockwork Cottage, with the bathtub?

Zar had to pull her up to the peak of the roof, before she crashed and burned.

Then I tried putting a couple of window frames on the front to see how that would look, with the additional height.

No decisions so far. I really need to decide what time period is going to live here. Right now, I am leaning towards the dormer. More headroom. Less contemporary. That means more cutting.

Before I get back to work, I have something to show those of you that are interested in needlework.

I went over to April's this morning and she is doing some serious cleaning out.

She gave me the shirt off of my own back! I flashed on this a couple of weeks ago. It is a blouse that I made and embroidered about 30 years ago...She used to wear it sometimes. I have no hope of ever wearing it again....It seems to have shrunk...I know I didn't get any bigger....Hey! Even April can't get into it now....I know it's the shirt tha got smaller.

Anyway, this is for the naysayers that told me that the new fangled acrylic. washable, embroidery thread that Coats and Clark put out in the 80s wasn't any good. They said use wool and have it dry cleaned....I didn't listen. I like to try new things. I bought a whole bunch of the stuff. As I was buying it, I guess that nobody else was. The price kept dropping and I think that some of the skeins were only ten cents a piece.

Let's put it this way. The colors are just as nice as they were when they were new. The texture of the thread is still beautiful....No matting or fuzzing.

I have crewel pieces done with wool, in that same time frame, that look like the cat slept on them and had a bad night.

Don't tell anybody. I still have a stash somewhere of this great yarn....I may just have to find them and make another blouse. One that fits me or April.

I can't do that yet though. I need to play with my dormer/skylight.

See you tomorrow.

Thursday, March 22, 2012

Bottoms Up!

No drinking game....Just the start of the roof. I cut egg cartons apart into slate shingles last night. Not nearly enough. For a small building, this has a lot of roof. I started shingling this morning. Three rows were finished and then I got bored.

I bribed Tessie and Zar with big chocolate chip cookies to help by holding the roof vertical whilst I glued the shingles in place. That's the reason that there are only three rows. They aren't very steadfast when doing this kind of job. They kept putting the roof down and taking cookie breaks.

That pile that you see on the tray is what's usable of six egg cartons. All of the flat parts of the top. Before I finish, I will have to cut more.

I took a trip to Home Depot this morning and got the sticks to make the frame on the lot and the foundation.

Here's the underside of the ground piece. I will do the same for the foundation of the house.

I miter the corners and glue and nail the pieces to the luan.

After that, I flipped it over and put the workshop on it. I do believe that it is going to be just about right. The staircase will go on the left side, as you are looking at it.

I will have to bash that a bit. I don't want a double wide staircase. I just want it going up the side of the wall.

Poor Tessie...She keeps suggesting, "I could sure use an elevator. All of that climbing up and down to get to the second floor will tire me out. When I get there, I won't have enough energy to weave. You had better put a sleeping bag in the storage room with the wool."

It seems like, when she wants me to build something extra, she always forgets that she can zap herself in and out of places...Convenient forgetfulness....Elevator for a two story building? I don't think so...

Back to roofing...

See you tomorrow.

Wednesday, March 21, 2012

The Terrible Two Return!

Or....What to do with old, thick, perfectly good paint... I don't believe that I have ever shown this technique for plaster work. Some will say that it's not a legitimate way to do it, but I learned to do it in oil painting classes a long time ago. It works.

I happened to have partial bottles of my two favorite colors for half timber houses. Not enough of either to paint the whole building and both were getting older and thick...So...I cut off the tops of four bottles and scooped out the paint that was the consistency of mayonnaise. I stirred them together and added a bit of new white paint that was thinner, until I got the thickness that I needed.

There was enough for two coats. The first coat, I put on with an inch wide, flat brush with a cross hatching technique. I needed to cover the texture of the wood grain. No "with the grain" painting.

The bottom half of this photo is the first coat. Covers well, but not enough texture. For the second coat, you can either ruin the brush that you are using, go find one that you don't care about, or use a round stencil brush. Bristle, not sponge.

The second coat, at the top of the photo is simply a thick coat pounced on randomly. I try not to put in any kind of pattern.

When it drys, instant plaster. Notice, I didn't put on any primer. I just went to it with the paint. It works just fine.

I did that and then I went and got a piece of door skin(luan 1/8" plywood). I had a scrap that happened to have enough room for the base.

This piece will be the ground.

I will also have to make the foundation of the house. As it is...there is no foundation. Not very realistic.

I need to take a trip to the hardware store for more wood. The base/ground will set up a bit. An example of this is the ground around the Tudor Trailer. I need some 1/2" to 3/4" square stock to do this part and the foundation.

I am not sticking the two structures together or the roof on the main building until I get further along. Right now everything is floating.

Well....It only took 24 hours. Tessie and Zar are back.

Tessie was delighted to see the loom on the second floor....She climbed up there and went to work.

I made a big mistake....I forgot that she knows how to use it.

Zar was not far behind. I heard them talking from the kitchen, where I was cleaning up from breakfast.

Tessie started with, "Wow! A new building for me to do my weaving!"

So much for peace and quiet. If she starts weaving, there will be no stopping the clicking and zipping of the loom.

The next thing that happened was even worse.

Zar dragged in his woodworking bench from the Clockwork Cottage....I am going to have to finish that one of these days....He keeps emptying his stuff from there into other buildings. He thinks that puts a claim on said buildings...

I don't think that I will be able to stand the click and zip of the loom AND a man with a hammer and saw downstairs making furniture!

At least I have the length of the build to figure out how to talk them out of the idea. Who knew that they would band together to claim the building. I was expecting the usual fighting and not speaking to each other for the duration....One can only hope that things will go back to usual. I love it when they get annoyed and don't talk to each other for days on end....I'm going back to work, fingers crossed....

See you tomorrow.

Tuesday, March 20, 2012

Weaver's Workshop?

Tessie and Zar have lost all interest in the new building. They both went away in a huff..,,

Spike, loyal dog that he is, stayed and kept me company....I think he was just hoping for a bone.

Once I get going on this, I am sure that the Terrible Two will return with all kinds of helpful suggestions. They were really annoyed when I told them that I was probably going to turn this into a weaver's workshop.

I bought one of Warren Dick's working floor looms at the Tucson show two years ago. I did a very plain room box for it. Nothing to write home about.

I think that this structure will make an excellent home for it.

As it stands now, it had a footprint of about 13" by 18". That's counting the overhang on the front of the building. I will have to allow for the outside staircase that will be added later on.

The first thing I am going to have to do is make a base for it. It isn't too stable as it stands and by adding an extra pad underneath, I will be adding a yard and sturdiness at the same time. Size has not been established. If it is a town building, I will need a cobblestone walking space at the front. If it is a country place, it will need a garden...

I am definitely going to make it Tudor Half Timber...Have you noticed that I like that period....I am in a rut, but this building just looks Tudor to me. Maybe a modern weaver, living in an old building? The story will develop as the building goes forward.

I at least had the sense to check the size of the loom in the top room. It seems to fit either way.

Logically, it will have to sit crosswise. I tried it front to back first.

I always have to walk around in the room to see how it works. This one does not have a lot of head space when the loom sits front to back. It bothers me that I would probably be able to walk around it, but someone taller would be bumping their head or squeezing through tight spaces this way. And another thing. You can't really see the working parts of the loom either.

I think that this is the way to do it. There is still not a lot of walking space, but it is all usable. No head bumping. A lot of the buildings from the Tudor period weren't very roomy though.

Somewhere around here, I have a copy of an inventory from a will. It is from a weaver in England in the 1600s. I found it in a book at the University. That will give me some guidelines to go by.

The bottom of the main building will be the shop itself. Finished pieces of weaving for sale. The annex will be storage and maybe a place to rest. We shall see.....Of course, plans can change on a whim...

Two more days to vote.

See you tomorrow.

Monday, March 19, 2012

Rainy Sunday, Hail-y Monday....

Yesterday rain and this morning, as you can see from the photo of our neighbor's yard, there was hail on the ground for a while. Two days of this kind of weather is not the usual AZ climate.

That's what all of the white dandruff on the ground in the first photo is. BB shot sized hail. Ick!

This morning I cleaned and did some laundry and then I did a bit of mini-ing.

It took me almost all of 45 minutes!


Every year, Greenleaf Dollhouses http://shop.greenleafdollhouses.com/?gclid=CIy0l77i864CFcIFRQodR0M08w puts out a kit that is especially designed for their "Spring Fling" contest.

I have belonged to their dollhouse forum for a number of years. It is open to anybody that is interested in dollhouses of all kinds. Everybody is waiting impatiently to find out what the kit is going to be this year. It usually shows up around the first day of spring.

The way it is supposed to work is, you buy the kit and build whatever you want with it. Then you can try to win a number of prizes with it. I think that the deadline is around Labor Day.

I usually buy the kits and stash them for future use. One of them is the Russian Cottage. That one was from about 3 or 4 years ago.

I had the one from last year under the bed. Whenever I don't want to build from scratch and want a quick project that is still a complete building, I usually turn to them. I am always afraid that, if I don't start the one from last year, they might not let me have the one from this year.....And besides, if I didn't do it that way, I would have a huge stack of kits....Oh wait...I do have a stack of kits under the bed already. Pretty soon I will be like the "Princess and the Pea" Only I am not a princess and it will be a lot more lumpy.

Last year's kit was great. You could purchase the main building. Then if you wanted it to be bigger, they had a right and left wing and an outside staircase kit. Those three could be purchased separately.

I got the main building, the left wing and the staircase. The excitement was, all were laser cut. Having never tried their laser cut kits before, I decided to give it a try.

This morning, about 11:45, I pulled the kit from under the bed. It took me about 10 minutes to get the parts out of the package. That was the hardest part.

After less than 45 minutes, this is what I had. The main structure is all glued together and ready to decorate.

I don't think that I ever want to do another die cut kit after this.

I still have the side wing and the staircase to assemble, but I have to decide how I want to do it and what it is going to be.

Zar and Tessie are arguing about that, naturally...

If they don't watch it, I am going to find a new friend that is more co-operative and they can go party somewhere else.

Incidentally, the window mullions are laser cut right into the sides of the house and all of the trim is just waiting to be installed....Absolutely NO SANDING!!!

I might just call this a case of love at first sight! Now all I have to do is figure out what it wants to be when it grows up.

P. S.!!!!! I just left the forum. The kit won't be out until next week. Dean(the Greenleaf Man) announced that the kit is going to be under 20 dollars this year, so that people can watch their pennies! It will have add ons, for extra money, if you want to make it bigger.

See you tomorrow.

Sunday, March 18, 2012

Rainy Day Blues....

Contrary to popular belief, it really does rain in Arizona...Honest! This is what it looks like, looking out of my workroom window this morning. It's supposed to rain all day today. That's not the bad part. The bad part is the wind blowing sideways. Love the rain part...Hate the wind.

So...I won't be outside today, if I can help it. It's a good day to clean up the mess from all of the dollhouse moving that I did yesterday.

I turned on the TV in the workroom about an hour ago. Now I am hiding and cleaning......Wetness is not my thing.
While cleaning out, I found the very first piece of furniture that I made from real sized furniture plans. It was in a book on Early American furniture and had all of the measurements of the pieces. I couldn't pick a five board bench....No....I had to pick a bed with ropes.

The only problem is, nobody could "sleep tight" on this one. The ropes needed to be tightened,not to mention that the headboard was unglued from the side bars.

When I made this, all I had in the way of tools was a #11 Exacto knife, a pin vice drill and some sandpaper. The headboard is not exactly cut as a mirror image. I did get all four posts right and the stringing part is OK. Not bad considering.

So this morning I re glued it and stretched the rope tighter.

When I was done, Tessie had to try it out. Her reaction? "Boy! Those people were short! She's right. Either the original was made of a small person or a young one. If she lays down, her head touches the headboard and her toes hang over the end. I suspect that it was an older child's bed.

It has been through several changes over the past 25 years. I don't even know what happened to the original coverlet. The one that you see next to it in the first photo is the first attempt that I made at computer printing a quilt. It has held up pretty well. It has to be between 10 and 15 years old. Closer to the 15 side.

The coverlet that is on it is a pattern that was in one of the early Piecework magazines, years ago. I kept wandering away from it, but after a couple of years of off and on work, I finished it. I tend to lose interest in other people's needlework patterns. It takes me longer to do them. Especially when they are all one color and repetitive.

Anyway, this seems to be one of those "stream of consciousness" cleaning days....Clean until I find something more interesting to do....Do that....Back to cleaning....Look out the window at the rain....Clean a bit....Watch TV. Fix a bed. Put more stuff away. Try to find something else of interest....I am going around in circles, but getting it done. Little by little...Back to work.

Don't forget to vote.

See you tomorrow.

Saturday, March 17, 2012

Trading Places....

What have I done??? I just found out that I am getting Tessie as an in room neighbor!

While I was sleeping, she somehow talked Cordelia into switching houses....That is, Cordelia will now be living in the townhouse that Tessie loathed. Tessie? She is moving into Cordelia's house with a few conditions.

She put a rider on the contract, saying that she had full use of the potion room, 24 hours a day and the same for the roof garden....I do believe that she is going to sneak in and use the bath too...Or she will talk Zar into letting her use the shower tower. There is no bathroom in the Mystery House(Cordelia's place).

Anyway, when I looked in on them the first time, there was Tessie packing. I had to pull Spike out of one of the larger boxes several times. She kept putting him back in. I finally told her that I would hand carry him to the new place. I don't see why she didn't just zap him over. That's what she did with everything else.


By the time I deposited Spike on the bed, she had zapped everything else over, including herself.

She didn't even have time to change positions before she arrived.

Perhaps I waited a fraction of a second too long. She also zapped my hand carved walnut be and dressing table into the room. She has had her eye on those two pieces for years.

As soon as she arrived, she started shouting at Spike, "Get off of my new bed, right now!!!"

She has been a busy bee. She also put in a chase to match the bed and a wardrobe. Hmmmmm...All new furniture. I do believe that she has been planning this for a while...Where's Cordelia?

Tessie did get a sewing loft out of the deal. She does like to sew.

After she got the bedroom settled, I found her and Spike in the kitchen area eating breakfast...By the way, if any of you are planning on moving and need boxes, Tessie bounced around on the computer keys with her pogo stick and came up with Sherree's site.
https://picasaweb.google.com/sherree2 That's where we both go for anything printed. She bounced down to the "Office Supplies" section and there found a sheet of six packing boxes. She made me help her re size them last night...For some reason, I didn't ask what she needed them for...Maybe it was something in the hot chocolate that she so nicely offered to make me just before she asked. You will be amazed at the number of useful things that Sherree has on that site. I once made miniature chocolate chip cookies and she had the packages for all of the ingredients. That's also where the gang gets all of the beer and sodas, by the case for their parties. Lots of neat stuff!
Tessie didn't change a lot about the main floor. She did put a new wicker chair in the corner. Other than that, she let Cordelia keep all of the stuff in the other house....

However, in reviewing the contract, I see a clause that states that Tessie has the right to retrieve any furniture, as long as she replaces it with something of similar shape and value....I wonder if Cordelia has some hot chocolate to sip whilst signing...?

I must say that Tessie has better taste than Cordelia did. The second floor is much nicer now.

I finally went looking for Cordelia...

I found her sitting in the bedroom of the town house, staring at the far wall. I don't think that she knows what hit her yet....

Tessie, when Cordey wakes up, you are going to be in sooooo much trouble!

I am going to go somewhere and hide now. I think that Cordelia is almost fully conscious...

So much for a nice quiet Saturday!

Don't forget to vote! Thanks!

See you tomorrow.