Don't forget to poke the photos to enlarge!

Friday, September 30, 2011

Rice Paper....Or Not to Rice Paper....

This is it. This is all I accomplished this morning...One potted bush. I am not even sure what kind of plant it is.... Can you tell that I am not impressed?

I cut leaves until I was blue in the face. My punch cuts fine on the drawing paper that I usually use for plants. It was NOT cutting fine on the rice paper. That stuff is tough!

I used rice paper all the way through college for pen and ink sketches. Loved it for that.

I am sure that it is just a matter of preference, but I was not satisfied with the results that I got this morning.

I couldn't find a couple of my flower punches. That was the first bump in the road. The punches that I did find not working, was the second bump.

I forged ahead and cupped the leaves. The did well on that step. I glued them to the stems. They did well there.

Then I got out the watercolor and did some shading on some of the leaves.(second photo)

I couldn't really tell a lot of difference with the before and after.

Since I couldn't find my tiny flower punch, I decided to just put some flower foam in a few spots and let it go at that....

That's why I am cleaning the workroom. To find missing tools and materials that I know I have stashed somewhere....

And besides, as soon as I finished it, Tessie grabbed it and ran. She is now in the roof garden, petting the pot and singing songs to make the poor little plant feel better. She says that I was much to mean to it.

Maybe after the room is clean and I find the punches that I really need, I will have another go at the rice paper. Right now though, I see a lot of pen and ink drawings in my future....

See you tomorrow.

Thursday, September 29, 2011

Painting a Rainbow...

Two more areas down in the workroom! After working on this hutch, I have decided that it needs painting. It looks very shabby, and not in a chic way, next to the new one that I put together.

This is where all of my beading supplies live now. The three bottom shelves are beads, findings and other supplies. I think that I am never going to another bead show. I have enough to last for two lifetimes now.


I got the closet straightened again. I still have to go through some of the plastic bins, but those can be done in the evenings while I am relaxing.

I even hung a new shelf in there. You can't really see the shelf itself. It is what all of the dried gourds are setting on, to the left.

I rearranged the storage bins again too. The two at the left end are turned to face front now, instead of sideways.

Now about that rainbow....Yesterday, my friend Joan brought some rice paper to share with the rest of us. I was delighted. I have been wanting to try mini flowers, using rice paper.

I turned the family room into a rice field of sorts. I dug out some watercolors, an old pad of regular paper and a big brush and went to work.

If you aren't familiar with rice paper, it's lots of fun. You can slurp water all over it and it stays flat and strong. See the clothes line in the corner? Each of those pages were laid on the pad and painted on both sides in one setting. Paint. Flip over. Paint again. If you do this with regular paper(as you can see by the pad with green on it)it buckles and fights every step of the way and if you tried to pick it up by one corner, you would wind up with a tiny corner in your hand and the rest nicely staining the carpet.

My watercolors were pretty stiff. They haven't been opened for years. The nice thing about those is, if you can get to the paint, you can still just add water and stir. They come back to life.

I am going to leave the paper and you hanging for twenty four hours. Then it will be ready to punch, form flowers and paint some more. I think that I will just sit and watch it dry for a while now. No. Back to work!

See you tomorrow.

Wednesday, September 28, 2011

"Silly Mini People..."

That's Tessie's opinion of today's tutorial. When I clean, I run across all kinds of old supplies that I had forgotten about.

Remember back in the 80s when country style was all the rage? I used to make clothes pin dolls and sell them at mini shows. I sold as many to non miniaturists as I did to mini people. They were just something fun to do. I guess that you might call them 3/4" scale. If you really wanted a scale...


I had to see if I remembered how to do it, or should I just pass the clothespins on to someone else?

After making these two, I am of the opinion that someone else can have the clothespins. I am not sure which garage sale I picked them up at.

I used to use real ones. These are made for crafts and I definitely don't like them as well.

Anyway, let's do it. I had already painted faces on these. They are basically a simple eye nose mouth combination, done with a extra fine Sharpie. Then colored in with colored pencils.

The hair is simply pearl cotton. For the bangs, I cut pieces about 1/2" long and laid six over glue on the forehead. Then I laid long strands across her head, until I filled it all in. The other one just has short pieces laid across the head and glued down.

The arms are done one of two ways. I prefer drilling a hole through the shoulder of the clothes pin. If you don't have a drill you can use the wrap and glue method shown on the left.

Here's a side view of the long hair. It was divided in half, braided and tied at the ends.

The curls are done around toothpicks and sprayed with hairspray.

I had to dress the one with curls before I could add them.

I made the hands with some natural colored leather, but you could do it with fabric if you don't have leather.

The sleeves are simply rectangles long enough to cover the arms and a little added for the glued hem. I wrapped them around the arm and glued the top edge to the clothespin. Overlapping the front over the back.

The skirt is a rectangle as long as you want it to be plus hem. It's 5 or 6 inches wide. On the blue one, I sewed the back seam. The pink one is totally glued. Even the gathers at the top were simply pleated with glue.

The bodice is a rectangle with hems on all four sides and a slit cut up the back, with a hole for the head.

After you get the dress constructed, simply decorate it the way you want to. Then you can finish the curls by cutting them in about 1/2" lengths and glue them around the head vertically.

Tessie wandered in about the time I finished making them. She named them Nancy and Jane....Then proceeded to box their ears for not talking to her. For some reason, she seems to think that, if it's shaped like a person, it should act like a person.

I am now cleaning up and getting ready for an invasion of witches.

See you tomorrow.

Tuesday, September 27, 2011

Tis' the Season.....

Maybe it's because, when it changes to fall here, we get more sleep because it's not so hot and we wake up with more energy. Maybe it's because my workroom gets cooler. That's usually the hottest room in the house in the summer months and the coldest one in winter.

This time of year, it's just right, temperature wise. Sooo.....I get a bee in my bonnet to deep clean.

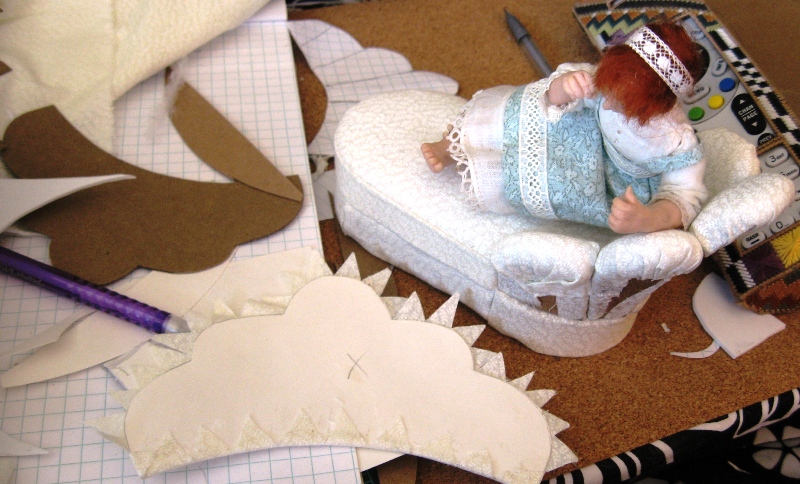
I am tired of hunting for things and not finding them until I no longer need them. Tessie is too....She's up on the attic shelf yelling, "Where's my bed???"

For the past two days, I have been locking myself in the workroom, hours at a time.

It is semi related to minis because, once I finish, I can get a lot more mini-ing done. And it will get done a lot faster if I don't have to look for a widget that I shoved in a drawer somewhere, just to get it out of the way.

OK. The rant is finished. On with the show and tell....Kathi, over at "Beautiful Mini Blessings" http://beautifulminiblessings.blogspot.com/ asked, in a comment last week, "How do I like to store supplies. Just for you Kathi. This is how I do it (theoretically).

I finished putting together another storage unit yesterday morning. I took the bookcase from Walmart and installed it on the wall next to the door. On top of that, I put a unit that used to be on my desk. It is usually used for office supplies, but I am using it for bottle of glue and various other supplies.

I painted the little house bookcase black. Let it dry. Stacked it on top. I now have a passable hutch. It is already full.

I have a habit of making up rules for where things go as I do it. Sometimes they get re stacked three or four times, until the most used items are on top. That way I don't have to move things to get to the ones that I want.

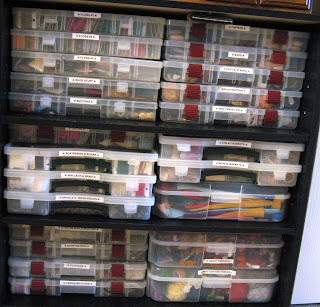
If you poke the photo, you can see that the boxes are all neatly labeled. That really helps.

Lucille, thanks for the tip from your comment yesterday! I am going to pass it along. Probably most people know it already, but I didn't. Maybe others would like to know. She said, if you push the "Ctrl key" and the "+ key" at the same time, you can make the photos even larger on the photo page. I did not know that! By the way, to get your page back to normal just use the little magnifying symbol down on the bottom right and punch it back to 100%.

Anyway, you should be able to read the labels if you do that. I did notice that I missed the container with felt in it. Putting that on my "to do list" now.


I have a second bookcase done already this morning. I am labeling everything as I go and that takes a lot of time. Thank goodness for the Dymo label maker!

I only have four bookcases, the closet and various other nooks and crannys to go.... I promise that tomorrow I will start doing some kind of mini tutorial along with the cleaning, so that you won't get bored like Tessie.

She has been pouting all morning because I hid her bed.... She didn't bother to look in the townhouse... Oh well...

Back to cleaning. See you tomorrow.

Monday, September 26, 2011

Early to Rise....

April and Seth came over for dinner last night. This was the first time that they had seen Zar's finished project. I accidentally left the light on in the trailer and after dark we noticed it.

Seth is a great photographer. I asked him if there was any way to take a photo of it, the way it was. He grabbed the camera and the tripod and did twenty or so photos.

This is the one that we liked the best when he finished. I realized this morning that I have never taken a good photo of the carving on Tessie's white bed....By the way, it is still in the top of the bookcase. I just looked. She zapped it back when I wasn't looking.

I took it out to take these photos. She put it back when I finished. She thinks that she is winning. I think that I am....Remember? I am bigger than she is.

I designed and made this bed a few years ago. I turned it on it's head so that you could see that it is really a bed and not just a block of ceiling tile.

I think that's why Tessie wants it. It's real...
I am going to paint the house shaped bookcase black today.....That should settle it. Unless she wants to live in an all black house, the argument will be over.

Don't forget to poke the photos for a closer view.

See you tomorrow. I will win!!!

Sunday, September 25, 2011

Off With Her Head!!!!!!

First of all, I thought that you might like a progress report on the pomegranates. They are about right for picking. Because of the low amount of rain this year, I had fewer and smaller than most years. A lot of them split open from the heat. Anyway, this is the last of the pomegranate reports.

Now....On to the title of this entry. This morning I know just how Alice's Red Queen felt!

I managed to get the new bookcase built. It was an easy build. Not long at all. I do believe that it will be filled to the brim in a matter of days.

That is, if I can evict Tessie! I put the black oak finish bookcase in place. So far, so good. Then I stacked the house shaped bookcase on top, to see how it would work. Just fine.

I plan on painting it black to match the bottom one. It might even look like it all belongs together.

I came in here to get the camera. It only took half a minute. When I returned, this is what I discovered.

No. Your vision hasn't gone bad. That is indeed Tessie on the top shelf....

As I entered, she declared, "This is more like it. Five stories and an attic. Spiderwort Manor! At last!!!" Then she settled into the chaise and relaxed.

That's when I turned into the Red Queen and hissed, "Tessie! If you don't take your furniture and get out, I am going to wring your neck! This is NOT one of your houses!"

I explained to her as calmly as possible that to spite the house shape, it was going to be a bookcase and shelves to put thing on....

She came back with, "My furniture are things!"

We went round and round about the difference between her furniture and "things".

My patience was ground to dust and I shouted, "Off with your head!"

In a flash, she was gone and so was the furniture.

I don't think that I am out of the woods yet. I went into our bedroom and I saw a bare foot sticking out from under the dust ruffle....And I heard a voice say, "These aren't at all adequate. The Harrison only has seven rooms and the Magnolia only really has four. Hmmmm....I wonder if they could be combined? That would give me eleven....No...I need more! Oh! There's a small cottage over there....That has three rooms...."

As she counted, I tiptoed out. I am hoping that she will fall asleep under there. I can move the house kits to another location and try to convince her that it was all a dream...That would be a kinder solution than dislocating her head from her shoulders.

I am off to start singing lullabies. Wish me luck.

See you tomorrow.

Saturday, September 24, 2011

Chaise Lounge....The Final Chapter...

Yesterday, after establishing the look that I wanted on the chaise, I started fiddling with a pattern. Here it is.

If you attempt one of these, you will want to check the pieces at every stage, and I do mean every stage. Yours won't necessarily turn out exactly like mine. It is almost impossible to make two the same with this method. I did a lot of trimming between fittings. Just a tad at a time.


You have to make allowances for different weights of fabric and batting. Also your cardboard or poster board won't be the same as mine.

For the petals, I used the plain cardboard that comes between layers in my Fancy Feast cat food. For the filler of the sandwich, I used two layers of fun foam. I wanted something that would curve nicely.

While I am on that subject, I curled the tops of the petals to the back slightly. That gave the whole back a nice arch.

Unfortunately, this photo was before the curve. I did the curves by cutting the cardboard against the grain so that it would curve more easily. All cardboard has a grain, just like wood.

I wanted the grain to go crosswise of the petals so that they could curve back....If I had wanted them to curve in the center in the other direction I would have cut them lengthwise of the grain.

I did the same thing when I cut the veneer for the kitchen cabinets in the Clockwork Caravan. I cut them with the grain running up and down the face of the cabinet, making it much easier for the wood to bend around the cabinets.

Tessie is holding one of the petals to show you what the "sandwich" looks like from the side. Bottom to top, cardboard, two layers of fun foam, another layer of cardboard and two layers of bonded batting....Notice that it doesn't go all the way to the bottom. That is to allow for the seat cushion to fit closely to the arm of the chaise.

The petals are glued into place and the sides of the petals are glued to one another.

In the next photo, Tessie has already taken over to see if it works. It does.

In front of her is the outer back that will cover the messy back of the petals. It also had to be custom cut. the width on that piece is about 1/2" wider than the inner pieces. You have to allow for the outward curve.

As you can see, I have clipped the fabric all around. That is so that some of the bulk will be eliminated when I fit it to the back.

The last chapter is gluing the outer back on and then decorating. I ran a fancy ribbon around the seams and Tessie condecended to my putting on a couple of bows and roses to go with the bed....Nice of her.

Sorry, but Mookie came in and decided to perch on the slide out. He sleeps there all of the time when either Walter or I are working....If he had his way, he would sleep on the four inch area in front of the keyboard....Thank goodness, he didn't try to fight for it while I was writing this.

He got bored and fell asleep shortly after I took the photo. He should be tired. He woke me up at 3:00AM this morning, wanting someone to play with. I am going away now and take a well deserved nap.

See you tomorrow.

Friday, September 23, 2011

Another Twist....

OK. I got up this morning and decided that the chaise was not coming out like I pictured it. I forgot that the back of the bottom end had to be a step out from the top one, to compensate for the thickness of the back.

I built that out with a strip of foam core, slashed at 1/4" intervals. The skirt went over that. I am not sure that I like either the fabric or the tailored style of the chase so far.

I kept going anyway.

I cut the back from foam core and slashed the piece lengthwise about 1/4" apart, not cutting through the front side of the paper. This allows the foam core to bend without breaking.

I then wrapped the top of the back in batting....Then I looked at it from all angles and immediately hated it.

I have done this particular style of chase one to many times...Ick! I am tired of it.

As of now, I am officially on another track. I decided to do a petal shaped back on it. Right now it is merely a prototype. I need to get the petals the exact shape and size that I want them.

I think that the center petal in the back has to be just a little higher and the side petals need to go a bit lower.

These will all be covered with a layer of batting and then with fabric. When they are right, they will fit together perfectly. Then all I will have to do is make a shaped outer back.

Hopefully, I will be back tomorrow with the finished article. Tessie is getting anxious and starting to twitch...."Chaise! I want it now! Chaise with petals....NOW!

Back to work.

Twitchy Tessie and I will see you tomorrow.

Thursday, September 22, 2011

Half a Chaise is Better Than None...

This is going to be a two parter. Tessie insisted on me making a chaise lounge for the bedroom. Had to be white. No ruffles. She says that the bed is enough ruffles in the room.

Back to the drawing board. I was tired of making the small one that I have made several times before. I decided that this one would be more spacious. Therefore, a new pattern was required.

Tessie is holding the first piece. That's the only piece so far.

I am using that for the base, upper seat and padded top. They are all the same size and shape.

Once I cut the three pieces, two from ceiling tile and one from heavy card stock, I covered the bottom piece by wrapping it with the fabric that I am using for the whole thing and gluing on the feet. These won't be seen because of a tailored skirt.

I padded the card stock with two layers of batting and did a wrap with the fabric. Then I glued that to the upper seating area.

The third step was to make the tailored skirting. It just happened to be 3/4" from the top of the base to the floor, so I cut pieces of card stock that height. I cut this into three sections to fit around the bottom front area. The back part will be covered by the arms and back....Those will have to wait until tomorrow.

Tessie is already liking it and wants it finished now....Not going to happen today.

This is going to be a "to be continued" episode.

Gotta go do something useful in the real world now. Beef Enchiladas from scratch with tacos and beans on the side take time to put together. It is either eat or mini. I am choosing to have Mexican food for dinner.

See you tomorrow.

Wednesday, September 21, 2011

Another Wednesday....

Yup....Another boring Wednesday. It seems like I don't get a lot of minis done on Wednesdays. Sooo...
You will be stuck with other things.

First of all, I am still short on space in the workroom. Even with all the shelves that I have. A couple of weeks ago I bought the box that you see in front of the dollhouse shaped bookcase... It is going to be built and stuck under the dollhouse one. You know the old saying, "If you can't build out, build up! That's how it's going to work.

After all, I have to find some place to put the contents of those leftover baskets...

Kumihimo report. I am still at it. Who knew that braiding string could be so entertaining? The these are the ones that I finished this week. They are all done with the basic eight strand braid. They look so different because of the different threads used and the different placement of those threads at the beginning of the braid.


Don't forget to poke the photos.

I decided to make some pendants to hang on the braids yesterday. These are the ones that I worked on. They still need a couple of finishing touches and a finishing coat. I am pretty pleased with them, so far.

Lastly, I will show you three completed ones. From left to right: The first one is a half timber cottage in a watch case. Someone was teaching a Victorian cottage in a watch case some years ago....I refuse to follow the rules. I changed houses after the class.

The second one is one of the pendants from yesterday.(It still needs finish.)

The last one is a pendant watch that I got at Walmart a few years ago. It runs like a champ for a ten dollar watch. The bail(the thingy that attaches the watch to the cord) is also from Walmart. There are ten assorted fancy bails to a package in the jewelry making department for 3.00 a package! Good buy!

Anyway, that's my report for a non mini day....Oh wait. The watch in the last photo qualifies as a mini! See? It's impossible to go a day without mini something.


See you tomorrow.

Tuesday, September 20, 2011

It's All Your Fault!!!

OK....I should have never opened up the argument of which bed Tessie should have... I then foolishly published the comments and Tessie read them. It's not really your fault. I did it to myself.

The trouble is, now Tessie is happily raiding the whole house for things that she wants in the townhouse....Cordelia is short one hand carved walnut dressing table, with matching stool.

She is blithely sitting on the front stoop with Eskiaga, talking. She doesn't know it is missing yet. When she finds out, she is going to be pretty upset. I will just have to bite the bullet and make her a new one so that Tessie can keep the walnut one.

I did confront her about it. She just looked down the end of her nose at me and said, "It matches the bed. I am NOT giving it back. It doesn't really go with Cordelia's bedroom." That was the end of that....It really doesn't.

Her bedroom is more tailored. Truth be told, I stuck it in there to fill the space, because I was too lazy to make another one. What goes around, comes around.

I designed and carved this dressing table back in the early nineties. It is no particular period. It just is.

The seat cushion is hand embroidered with silk on 35 count linen. The whole thing is about 1 1/2" square.

As I said, Tessie has no doubt that it is now hers. She is already stocking it with her toiletries. No. It's not installed yet, but that makes no difference. This is her way of laying claim to it.

Oops! I just saw the baby roadrunner getting a drink. All is silence in the yard when he is around. I can't call him a baby anymore. He is more like a teenager.


I am going to have to start chasing him out. He will be a danger to other birds and squirrels when he is full grown.

He will probably double the size he is now before he is finished. Make no mistake...He is a predator....Not the cute one that gets chased by the coyote. There is more truth to the cartoon than you know. They are smart and they are fast.

For now, he is welcome.... The first time I see him go after a bird, he's out of here.

See you tomorrow.

Monday, September 19, 2011

Back to the Future....

I'm Baaack.... To miniatures, that is. This morning I, at Tessie's request, painted her bedroom.

She chose a Ceramcoat color called "Stonewedge Green". It looks suspiciously like their old "Wedgwood Green". I don't know why they changed the name, but now the "Wedgwood Green is much brighter and totally different than it used to be. Strange.

After I finished painting, Tessie wandered in. She then Zapped the black and white brass bed into place....It was there for a few minutes and then in a flash, it turned into one of my hand carved walnut beds, dressed in white silk. I ignored her for a while and the bed kept changing, one to the other and back again....I finally couldn't stand it any longer. I asked her what she was doing?

Her answer? "Decisions. Decisions! Decisions? I can't decide which one I want." Did I offer her the carved walnut one? No. Did she ask if she could have it? No....

Personally, I can understand her vexation. I can't decide which one I like better against the green walls either.


If she decides on the white one, I guess I will let her have it. It has been sitting here and there without a real home for a long time now...For that matter, so has the brass one.

Please don't tell her. She will immediately start on the "I need a bigger house!" routine.

I also started drawing up plans for the kitchen cupboards. I kept having feelings of deja vu. Then I realized why. I designed this kitchen almost 20 years ago. It is part of a large roombox with the dining, living room and kitchen.

This is almost the same dimension and layout as the kitchen in the townhouse. I guess that I could just use these patterns again, if I had kept them. I drew them up. Built the kitchen and then tossed them.

As I said...."Back to the future." Here I go again...

It's the old addage, "Everything old is new again..."


See you tomorrow.

Sunday, September 18, 2011

Sleepy Sunday....

No. That's not a dead cat....It's just Mookie, in his usual place, when I work on the bed. He is under my lap tray. I have several, but he likes this one best, because it gives him a "cave" in which to sleep.

I turned on Netflix, found a Korean series called "City Hunter" and went to work.

No I don't speak Korean, but I can read subtitles. I started watching this one yesterday and would recommend it to anybody that does speak Korean or can read subtitles. I only have 6 more episodes to go.

Anyway, I am afraid to go back into the workroom. I might get it messed up again. I already had the kumihimo braid box out....Than led to getting some beads out to surround pendants to hang on the braids. You know....One thing leads to another and another and another.....

These are all works in progress. As usual, I can't work on just one thing at a time. I am anxious to keep working on the King Tutankhamen pendant at the top of the photo. The other three n that side are stones. The one on the left is another resin pendant. Or it will be. I just got started on that one. I am doing a 3/2 bead back stitch on it. After that row, I will start peyote stitch.

The one in the photo to the left is a pendant that I did last night. I bought some square wire last week. I like the antique bronze color with the stone....Actually it is a piece of petrified dinosaur bone that I bought at the gem show last year.

I wasn't sure how the square wire would work out, but it is very soft and easy to work with. This wrap only took me about ten minutes. Almost instant dinosaur pendant.

Tessie is off somewhere doing whatever witches do on their days off. It is so quiet and peaceful that I didn't seek her out for photos. I am going back to the beads now.

See you tomorrow.

Saturday, September 17, 2011

Almost Done(again)....Honest!

First of all, Tessie with due diligence, finished enough Kumihimo braid yesterday afternoon and evening to make a necklace. Then she lost interest. I am supposed to finish it for her. She did a pretty good job for her first try.

She is now digging through my beads for something to hang on it.

While she did that, I got to work on the room where all refuse goes to die... If I keep at it long enough, it will be, at the very least, livable...

Here you go. Proof of work.


The west wall is in good shape.


The closet is cleaned out....I can even see the floor all over the room!


Wow! There's actually a beige carpet under all of that stuff that was scattered around.


I found lots of stuff that I didn't know I had, while digging.


Tessie, mean witchy person that she is, had to come along and burst my bubble.


I could pretend to be finished until she came in, perched herself atop two baskets of leftovers and announce, "If you don't tell people what you are hiding in here, I will!"


OK....So I still have this much to put away(and a wee bit more).

Why is it, I can't get away with anything with the blabber mouth around? She is now calling loudly for me to stop typing and come finish putting things away.


I guess Tessie knows best...I never thought I would utter those words in a sentence together...


See you tomorrow, with a clean workroom!