Don't forget to poke the photos to enlarge!

Thursday, June 30, 2011

Fast, No Sew, Pillows...

I am not in the mood for sewing, so I decided to do no sew bed pillows. Please follow me for instructions. Here we go. Don't forget to poke the pictures.

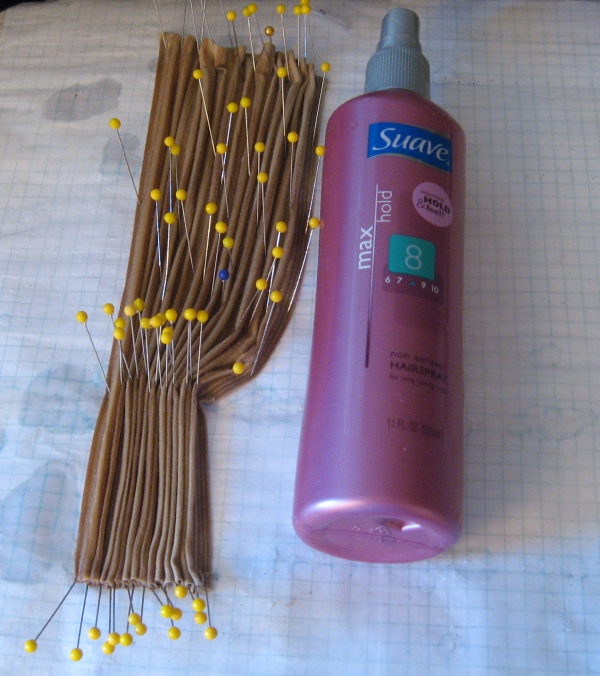
Get out some Aleene's Tacky Glue, sharp scissors and tweezers.

Find some cotton fabric that you like and some low loft quilt batting. Don't try fluffy quilt batting for this one. It doesn't work as well. Trust me....

Cut a piece of batting three times as long as the width of the pillow that you want to make. I cut these 3 3/4" long and 2"wide The result is a 24" by 15" Pillow in real life. When the batting is folded in thirds, the mini pillow is 1 1/4" by 2".

Next I cut a piece for the outside from my striped cotton. I made that piece wrap around the pillow with 1/2" extra on the raw edges all around. If you are lucky, you will find some fabric with a nice salvage like the one that I am using. If not, allow enough on one long edge for a glued hem. Glue the hem under if you have to do it this way.

Here's the tricky part. If you are doing this for the first time, I suggest that you get out an iron and turn under the three edges by pressing in one long edge(this will be folded in half) and two shorter edges in 1/4" only. You will need the extra for ease around the pillow.

Starting at the long edge, put glue on the folded edge that is turned down...See photo. Do not glue it to the inside of the pillow. Allow the seam to stay free of the pillow. It will look like the second case in this photo on the inside.

Next, glue the side seam the same way. Again, glue selvage to selvage....Not to the inside of the pillow. I did this seam half at a time to make sure that it didn't stick to the inside of the case.

When that is finished and dry, take a pair of tweezers and put the pillow form between them all the way to the other end of the pillow. This is the easy way to get the batting in, without messing it up. I learned the hard way that you can't just stuff it in with your fingers.

When it is all the way in, you can use a skewer or the points of your scissors to make sure that the corners are in correctly.

Last step is to put just a couple of dots of glue along the inside edge and pinch the edges together. This makes the fabric look like it has some weight. It doesn't stick up unnaturally.


I put up the curtain next to the bed. I did this by gluing the top of the curtain to a strip of wood, above the bookcase. Then I glued the curtain to the bookcase side. I put a piece of molding across the front of it to hide the top. When the roof is in place, the top will never be seen again.

As soon as the glue was dry, Zar started putting things in the shelves. The nice thing about the pillows is, they are scrunchy just like real ones. He can bend one to shove under his elbow whilst he reads.

I may have difficulty doing anything else in the bedroom today....I guess I should move on to the living room or kitchen now...

Tessie's nose is, once again out of joint. She is putting the screws to Zar for another week worth of Casey rental....He isn't going for two cookies, one muffin a day plus "expences". Who knows what she will consider expenses if he says yes...?

She is sitting in his living room pouting. Let them work it out. I am going someplace that is not here, now.

See you tomorrow.

Wednesday, June 29, 2011

Bits and Pieces of Rugs and Drapes

I finished the floors this morning. The living room now has a russet colored carpet, wall to wall. Tip of the day...If you want to use a piece of plush upholstery fabric for a rug, cut the piece just a bit larger than the finished area that you are covering. Coat the edges with white glue like the example in the photo. Let it dry. Then cut it to the exact size. Then glue it into place.

This carpet was thick enough that I didn't want to turn any edges under. As you can see, it lays nicely and edges exactly to the tile floor.

After I was done with the flooring, I went on to the bedroom area and the bookcase headboard.


The bookcase is staggered at the top to fit into the curved roof of the trailer. I simply made it like stair steps. The width is just a bit wider than the bed, so that the bed can slide under the bottom shelf in the daytime.

Of course, Tessie had some criticism. "Zar, you will have no privacy in here! You need a wall...No. Maybe a heavy curtain, to separate this part from the rest of the trailer. What if you get up and don't want to make the bed? You can just close the curtain..."

For once, Tessie had a good idea. I got right on it.

Only one problem. You won't get to see it until tomorrow. I put a hem in some striped camel colored fabric, suitable for a man....At least that's what Tessie says. "Very masculine."

Then I did the pin board thing to pleat it. It will hang beside the bookcase and come across to the front(theoretically). That way Zar can close off the bedroom if he so desires....He will probably go hide in there every time that he sees Tessie coming.

Anyway, now I have to let it dry. I sprayed it with the hairspray that you see in the photo. I could take a hair dryer to it, but I am going to wait until I get home from the mini meeting. I have other things to keep me busy now.

See you tomorrow. Hopefully with curtains in place.

Tuesday, June 28, 2011

Before and After Day...


I have been working on the floors today. I got out the red mahogany stain for the bedroom floors. I saw it sitting on the table by Tessie's zebra chairs. My weird little brain started connecting the dots....Or chairs and stain. I have never liked the light brown plastic look of the wood on these chairs.


They are cast resin that I got at Pic 'n' Sav years ago. The casting is great. The color is icky. I decided to do something about it. I went after the "wood" part with stain and a small brush. Minutes later, I had the chair on the right. Now all I have to do is sit and stare at it whilst it dries....a couple of hours or a couple of days?


I decided that the tile part of the floor is the part that is going to be seen most. If you click the photo, you can see what a difference mounting it on illustration board and going over the grout lines with a stylus makes. The left side is unlined and the right side has been gone over with a small stylus. Now the whole thing will be glued in place in the trailer.


Zar and Tessie are pessimistic about the floors. They do look pretty bad in the before photo...


I am using some of the raw bamboo place mats that I bought a couple of months ago.


I find it easier to cut and stain them before I take off the strings that hold them together. I ran them through the micro lux saw at the length that I wanted them. Then I just stained the whole piece that I cut. I wasn't sure how the bamboo was going to take the stain. It did well.


As soon as I got the stain on, I released the slats from the strings to make sure that the wood underneath was stained too. It was.

I am leaving the floor rustic looking. After all, it is mostly going to be under the bed.


If you use the bamboo slats, be sure to note that one side is more rounded than the other. I used them flat side up. Rounded down.


After I got them on the floor, I weighted them with a heavy book, over some wax paper.


It came out pretty good.


Did you notice that Tessie changed aprons? This is to signify that the zebra chairs match her apron and they are still hers. She is fearful that Zar will want to keep them for the trailer.


Zar didn't tell her that he was getting all new furniture for his trailer....He, in turn, is worried about her stealing his, when she finds out....


I have to get back to work now. I still have the living room floor to do.


See you tomorrow.

Monday, June 27, 2011

Get Off Of My Bed!!!

Bed making 1o1....I decided to work on the bed this morning. Everything in the bedroom end of the trailer is done except for the floor now.

This is my usual way of bed making. It all started with a class from Judee Williamson way back in the early 80s. She is a great teacher and I learned a lot from her. Since then I have changed a lot of the methods though.

I had a bed block already to go. It consists of three layers of acoustical ceiling 4 1/2" by 6" glued together like a layer cake. That is covered with muslin. That keeps the tile from shredding on the edges.

I then cut a piece of illustration board the same size and glued four layers of low loft batting to that. Go easy on the glue. It only has to hold together until you cover that with muslin or cotton for the bottom sheet.


Next, I cut out some strips of index card that were 3/4" wide and a little less that the height of the bed. These form the pleats.

I cut a piece of cotton fabric twice as long as the strip of pleats that I wanted to go around three sides of the bed. I turned under a hem with white glue.

Then I glued the strips of card vertically along the bottom edge of the strip, with the width of one of the strips between them. The uncovered part of the cotton forms the inverted pleats.

Lay it face down on your work surface. put a line of glue on the sides of two of the pieces of card. Force them together and press down on the tunnel of fabric that forms between the two.(center of photo) Each side gets glued down to the cards. When they are flipped over, they should look like the pleats on the left of the photo.


Next I glue the pleats to the sides of the bed and fold the top part without the card down over the top and glue. Then the muslin covered mattress is glued on top of that.
For the quilt, I covered a piece of the low loft batting with a piece of fabric that was about 3/4" extra all around. I lightly glued the edges to the back as a form of basting. I didn't line the quilt because the bed will be permanently made.

I then did a pattern of french knots all over the top to quilt. Then I cut a piece of muslin for the folded portion of the top sheet.

There are more details in other entries, under the "bed tutorial" section.

I didn't get to the pillows or the bookcase headboard yet. That comes next.

As you can see, I finished the inside of the window and put up a rolling blind.

Meanwhile, Tessie crowded in and tried it out. She says that Zar has nothing to worry about. She pronounced the bed a failure and stupid.....

Her exact words were....."The bed's too high and the ceiling is too low! How can anybody be expected to stand up and bounce on a bed when they hit their head every time they jump? Dumb bed!!!"

Oh well. That solves the problem of her trying to talk Zar out of the trailer. If she can't bounce on a bed, the whole domicile is worthless in her eyes.

Back to work. I have to make the most of my time. The next three days, Walter is in Detroit. Wednesday night I will be frantically cleaning up the mess, but until then minis, here we come!!!

See you tomorrow.

Sunday, June 26, 2011

"Let Me OUT of Here!!!"

Today I started the windows and finished the one in the bedroom. I thought that you might be interested in the method. I can't claim it as my own. Lots of people do it this way. I have been doing it this way for about twenty years.

Walter keeps me supplied in golfer's lead tape. They use it to balance clubs. I am not exactly sure how it does that, but I do know that it works well for mini leaded windows.

It is sticky backed and easy to use. I cut this particular bunch with plain old scissors. I didn't want it too perfect and even. If you want it perfect, use an Exacto and a ruler on a flat surface. I whacked off a chunk that was easy to handle and went at it. I cut the strips about 1/32" with the back still on. Then when I went to put them on the plastic(glass) I put the glass on my quad rule pad for a guide. If I were doing a stained glass pattern, I would tape it over the pattern and put down the strips over the lines. The lead tape curves easily for that Kind of pattern.

I just did a simple diamond grid on this little window.

After I got the lead on, I painted one side, lead and all, with clear nail polish. Whatever you have will work. After the first side was dry, I flipped it over and painted the other side the same way.


It gives the glass a nice wavy hand made look and it also seals the lead. If you want stained glass, use Sharpie permanent pens on the inside and clear nail polish on the outside.

I didn't want this window to open. I installed it with cove molding. I fitted four pieces with the cove facing into the room and glued in place. After it was dry, I put the window in place from the outside and covered the edges with the cove facing out.

Zar liked it....Tessie did not! She went inside and saw what I had done to her escape route. Mad witch!!!

Why is it, whenever she gets mad, she panics and forgets that she can just zap herself out of any situation?

She was inside pounding on the window and yelling, "Let me OUT of here NOW!!!

Zar was snickering at her predicament and that just made matters worse. Finally she calmed down when he pointed to the back side of the trailer.....She looked over to the open side, grinned sheepishly and said...."Oh. Never mind...". Then she jumped out and disappeared in a puff of humiliated smoke.

We haven't seen her since. It is so nice and quiet. I might even get some work done.

I am either going to tackle the large front window or maybe the bed and bookcase headboard, now that I have that end of the trailer essentially finished.

See you tomorrow.

Saturday, June 25, 2011

Playing...Don't Nag...I'll work Tomorrow.

I am taking the day off to play on the computer. I finished the coloring on the roof yesterday. Zar and Tessie have their heads together, planning interior decor now.

If they can take the day off, so can I. At least some of you(needle workers in miniature) may benefit from it.

I started playing on the laptop and decided to do some rug designing. You will have to poke the photo to get a better look. It is an original design, so as usual, personal use only please. For fun, not profit.


The rug is 99 stitches by 151. If you do it on #22 hardanger you will get a rug about 4" by 7". If you use finer canvas, it will be smaller, if coarser canvas, it will be larger.

It is a simple rug with two colors of pink for the flowers, one color of green for the stems and leaves, some gold dots here and there, dark blue,and a cream background for the rest. Six colors in all.

I will probably do it on #24 congress cloth. That is my usual weapon of choice. This will not go in the trailer, so I probably won't start it for a while.

I just thought that you might want something to do whilst I was messing around today. I promise to go back to work tomorrow. Honest.

See you then.

Friday, June 24, 2011

I Break for Vampires....

OK...The third time had better be charmed... I have lost this post twice, trying to publish. I am not a happy camper....

I don't break for all vampires. Just Spike. Yesterday afternoon, the phone in our bedroom went haywire and the outlet is behind a six foot bookcase. By the time that Walter got home, I had most of the books out and when he arrived, he helped me with the rest. He also took Spike's Crypt down from the top.

I decided that it could use a good cleaning and refurbishing. The doors were off their hinges and the inside looked like a tornado had been through it. Literally.

The dust inside was as bad as outside.

I went to work with Clorox wipes, lemon oil and some stiff brushes.

It didn't take long to get it back in order.

Look at the difference in the color of the top of the bed in the first and second photos. Don't forget to poke them to make them bigger.

I doubt if Spike has been spending a lot of time in here, as messy as it was. I suspect that he has been using other people's houses. He doesn't sleep when they do, so it's not a problem.

I did notice that he has fresh from the oven cookies... I just went and checked. He didn't use my kitchen. He tends to leave the oven on and a mess everywhere when he cooks. Nobody seems to be able to catch him at it. I wonder who's kitchen is dirty this morning?

Anyway, the crypt is ready to go back up on top now. I think that it will be wise to wait for Walter to help. It is much easier with one person on the ground and one on the ladder.

About the Clockwork Trailer....I finished the shingles and did more painting on the roof. I still need to do a little more wash to darken the shingles on the rounded part of the roof. They don't look right with the flat roof part.

I did notice, or I should say, it was pointed out to me that moss is already starting to grow between the stones and under the edges of the shingles.

I had better get back at it and do some more on the inside, while I have a chance. I don't want moss growing under my feet...Or between my toes....

See you tomorrow.

Thursday, June 23, 2011

Time Off For Good Behaviour

"Come on, Tessie. You know she deserves it!" That was Zar, on my behalf this morning.


I finished putting on all of the shingles early this morning. Both ends. I told them that I was going out for a while. Tessie started grousing about me wasting time....I don't know why she should care. She is getting paid, whether I work or not.


Zar, on the other hand, thought that I needed a little time to go out and explore the world. He finally convinced Tessie that it was in her best interest. "She will probably hit the antique mall and come home with all kinds of goodies and you will be the first one in line to grab your share of the spoils."


That got her attention. She signed my hall pass, so to speak. Freedom from shingles!


I did go straight to the antique mall. I was on a mission. I want a table to put the Clockwork trailer on when it is complete. It's an incentive to finish it.

I found what I was looking for. I have a weakness for 30s and 40s style occasional tables. This one was a gem and very inexpensive. I have several, but this is the first one with a drawer.


Tessie and Zar inspected and approved it. Then they saw what else I had purchased and the table was all but forgotten.


I found a grab bag of jewelry.....April and I used to buy these at the thrift stores for a dollar when she was younger....Inflation reigns. Now the people at the antique malls sell them for ridiculous prices. I have seen them as high as 25.00! This one was five and had a lot of good stuff for Steampunkery and other mini and jewelry things.


Tessie was shouting, "Me first! I get to pick first!", even before I got the bag open. She immediately grabbed a "new hat".


Never mind that she can barely hold her head up with it on. It is gold mesh and has several large dangling stones hanging from the back....The height of fashion???In what universe?


Zar found the piece that was my reason for buying the bag. It is a bangle type watch in copper. The bracelet part looks so Steampunk that I want it too. Don't tell him that I am going to go hunt up a battery and see if it still works. If it does, we are going to be having a bit of a tussle to see which one of us gets it.


Keep your fingers crossed for me. It will be hard to bend and I am not sure what I would use it for in the trailer, but I sure would like to wear it for a while.


I am off to hunt for batteries now.


See you tomorrow.

Wednesday, June 22, 2011

Another Week???

At least....Zar is paying through the nose. It's just a good thing that he makes big bucks from his Steampunk patents. Don't tell Tessie. She would be trying for more than ten bucks and two cookies!


She has now promoted herself to home inspector. I had to patch the roof in one place, but it will be covered with shingles. It seems that the original plan called for the solid roof piece to go more towards one end. Zar wanted the roof garden pretty much in the middle.


Zar has started the shingles on the other end of the trailer...He is working as far away from Tessie as it is humanly possible to work.


We are tearing the top edge of the shingles to make them thinner, so that they will lay flatter on the curved surface of the roof. So far, so good.


I am pretty close to being finished with the half timbers. Looking at the photos, I can see some places that could still use something.


Tessie just discovered that I gave Zar one of her LED lamps. I have the distinct feeling that I am now on her naughty list. Hey! She had no place to put it. It is copper and doesn't really work in the townhouse, but then again....It's the principle of the thing. It's hers!


We are going to have to sit down and have a talk about sharing things. Maybe after I finish the trailer. I am too busy right now and the Wednesday Witches are descending in a couple of hours. I have to go get ready.


See you tomorrow.

Tuesday, June 21, 2011

Half Timber and Mutant Hummingbirds.....

OK. I know that you are dieing to find out about the mutant hummingbird first.

Meet Woody. He is a slightly confused woodpecker. We have quite a few that hang out around here, but this one is special...The others go for the suet and squirrel food....Not Woody. He is a hummingbird in training. Yes, He does drink the sugar water. In fact, I think that he gets more that the hummers do. He hangs on there for about five minutes at a time and sticks his beak in the little slots. I am afraid that I am an enabler. I keep filling the jar and he just keeps coming back for more.

Now. On to more serious matters. I am working on the half timber on the trailer. I thought that you might like to see how I am dealing with the curved corners. I am cutting them out of 1/16" bass, to match the size of the straight pieces.

I am simply holding the wood to the side of the trailer and tracing around the outer edge of the curved portion. Then when I have the correct curve, I am using a piece of the straight wood to get the right width. I line the edge of it up with the curve and draw another line the correct width. First cut the interior of the curve and then the outside. Less breakage that way. I cut the first two out with an Exacto that I had handy. It is almost as fast as walking into the workroom and setting up the saw. After they are cut, I will stain them to match the other pieces.

This is what I finished last night, before I ran out of strip wood. I went over to the hardware store this morning and they were out of quarter and three eighths wide strips of one sixteenth wood. I bought what they had left earlier in the week. So I solved the problem by buying some half inch and just ripped them down with my saw.

I am now ready to start on the front. No more fooling around. Zar said so! I am absolutely not going to be done by tomorrow and he only wants to pay for another week of my time.

It seems that the price is going higher by the minute. Tessie now wants ten bucks and two cookies a day. On top of that, she wants an assortment! Poor Zar is going to be broke before the trailer is finished. I had better go back to work, double time.

Gotta run. See you tomorrow.

Monday, June 20, 2011

Dancing on the Ceiling....

When I finish this, Zar is throwing a trailer warming party.....On the roof!!!

It took me all afternoon yesterday just to lay the flooring and almost two hours this morning just to paint it...Not counting the time that I took out to pull weeds in the back yard and change the laundry from washer to dryer a couple of times.

I will probably be installing the ceiling much later. I still need to do the ends and it would be wise to do most of the trim while I can still reach in through the roof to do it.


Tessie tried to zap to the roof this morning and didn't quite make it...Now I am wondering what she used her zapper for, that made it lose power....That always worries me.Here's a better photo of how the slates on the roof are going. I still need to do some touch up here and there. Poke the photo for a closer look.

I am afraid that people that try to dance on this floor are going to stub their toes a lot. It's very uneven. Of course that's the way it's supposed to be. Now they are discussing a wrought iron railing around the edge, to avoid law suits. I haven't broken it to them that I haven't decided what kind of ladder/stairs I am going to put on the outside for ingress to the roof yet.

The other thing that I started working on this morning is a window in the bedroom end of the trailer. OK. You caught me. The sides are not glued in permanently yet. Tessie wanted to try it out as an escape hatch....I am not sure what she thinks she is going to be doing in there that would require a quick out. She can get through it, but I don't plan to have it a working window. She is going to be surprised if she has to use it.

Meanwhile, Zar is having second thoughts about a window in the bedroom. One less way for her to get in when he's not there.A couple of other things. I stained the kitchen table yesterday and Zar went looking for some of the things from the cottage that he is going to use until here until the cottage is built.

A good cup of cappuccino and time to drink it....The two machines of choice.

I am seeing doubt in Zar's eyes that I am going to be finished by Wednesday.....It is reflected in my own. Tessie has a wicked gleam in hers....Somehow, I think that she is adding up the dollars and cookies that she will get if Zar has to rent me for another week.

I am working as fast as I can! Gotta go.

See you tomorrow.

Sunday, June 19, 2011

Flat Tires and Lobsters......

Between the two above subjects, I have not done a lot on the trailer today. I found that I had a flat in the parking lot at Walmart this morning. I called April to come rescue me, since I didn't think that it would be nice to interrupt Walter's Father's Day golf game. She came running and a guy that works there helped change it. Thanks Gus!

When I got home, I did some staining of half timbers and then decided that I wanted to make sure that I had a suitable tile floor for the kitchen.
Zar and Tessie got into an argument about the suitability. Tessi con and Zar pro. I have used this particular floor before. It is one of my favorites from this Dover book.

I don't know if it is still in print, but if it is, it is invaluable for tiles. I simply sized it with my TPS 15 greeting card program and printed it out on card stock. I will glue it to a piece of mat board and then incise the grout lines with a fine stylus. The rest of the floor will be carpeted in the living room and probably wood in the bedroom area.


I am now looking for fancy ceilings. I am looking in here. This one was first published in 1977. I got it second hand several years ago. Again, it is wonderful, but I imagine that you would have to search for it second hand. Good luck!


While I am being lazy, Spike and Fuzzy pup are vigilantly guarding the opening in the foundation. Something or someone must have moved in overnight. I am going to let them handle it for now. They seem to have things under control.....Maybe by tomorrow I will have actually accomplished something.


See you then.